Embryo series courtesy of Einhard Schierenberg
Table of Contents
Immunohistochemistry in C. elegans includes two major classes of techniques: immunocytochemical localization of proteins in situ and Western blot analysis of purified proteins. In this section, we will discuss a variety of techniques for immunocytochemistry, as well as simple Western blotting techniques for worm proteins.
Immunocytochemistry provides the most direct method for identifying both the cellular and subcellular distribution of your protein. Although GFP or other translational or transcriptional constructs can provide a relatively rapid indication of gene expression or protein distribution, there are a number of potential problems with these techniques (Mello and Fire, 1995). These include abnormal regulation of expression from multi-copy transgenic arrays and abnormal localization of the protein due to over-expression or the presence of the tag. If possible, the predicted distribution of your protein should be confirmed with the use of antibodies in situ. Specific antibodies also allow you to examine protein modifications and expression in vivo.
Although antibodies can be very useful tools, generating a specific antibody protein can be difficult, time-consuming, and expensive (see Harlow and Lane, 1988). Unfortunately, except for antibodies to a few highly conserved proteins (e.g., actin and tubulin), most antibodies generated against specific vertebrate or invertebrate proteins do not cross-react specifically with their C. elegans homologs. Furthermore, when you specifically generate an antibody against a C. elegans protein, the antibody may only work with a subset of immune techniques, e.g., Westerns but not in situ or vice versa. A brief Antigen preparation protocol highlights some considerations when designing antigens.
Whenever you use antibodies, it is important to test for specificity. In addition to the standard controls, such as pre-absorbance of your antibody, worm-specific methods may be available to test antibody specificity. If there are null mutants or RNAi worms for the gene and protein of interest, then compare antibody staining (of Westerns or in situ) in those strains with staining in wild-type worms. Nulls can also be used to affinity deplete your serum (see Depletion of primary antibody protocol). On the other hand, if there are transgenic over-expressing lines for the protein of interest, those can be used as positive controls. Generally, you will need to do some sort of affinity depletion before you can detect specific staining of Westerns or worms (see Affinity purification protocol).
C. elegans provides specific rewards and particular challenges for in situ analysis of protein distribution. If you have an antibody that works in situ, you can examine the distribution of the protein in the entire organism at all stages relatively rapidly. Other than the intestine, most tissues have relatively low levels of autofluorescence, so many different dyes and secondary antibodies may be used, allowing triple labeling of antibodies or more.
On the other hand, immunocytochemistry in worms is relatively difficult due to problems of access and size. Both the egg shell of embryos and the cuticles of larvae and adults are relatively impermeable and must be disrupted chemically or mechanically (or both) for the antibody to have access to the internal cells and proteins. The small size of the individual cells and their compact architecture can make visualization of the cellular and subcellular distribution of proteins in some cells quite difficult. A confocal fluorescent microscope or a wide-field fluorescent microscope with de-convolution software can provide increased spatial resolution. When detailed examination of subcellular distribution is necessary, then one can attempt the supreme challenge of immuno-electron microscopy. For a discussion of electron microscopy and immuno-EM in C. elegans (not covered in this section), see the Worm Atlas website.
There are several different techniques used to allow antibodies access to the tissue of interest. If you are specifically interested in the distribution of a protein within the cells of the gonad, the very early embryo, or the intestine, then the appropriate tissue can be dissected out of the adult (see Freeze-crack protocol). To examine protein in a larva or adult, the two general methods are to 1) collect worms in small tubes of liquid and to freeze and chemically treat them to disrupt their cuticles (see Tube fixation, Bouin's tube fixation, Peroxide tube fixation, and Picric acid + glutaraldehyde fixation protocols) or 2) compress and freeze worms between slides and mechanically pull off the cuticle layer (see Freeze-crack protocol). Different fixation conditions differentially preserve antigenicity and tissue morphology. The Fixation conditions protocol discusses how to determine the optimum fixation conditions for a particular antibody and protein combination. You can use a control antibody such as anti-DNA or anti-actin to monitor accessibility and morphology with the different fixation conditions.
Western blot analysis is useful for several reasons. It can be used to examine the relative levels of expression of different size forms of your protein, such as those due to alternative splicing. It can help identify post-translational modifications such as phosphorylation or glycosylation. Western blot analysis can be used to screen for changes in protein expression under different conditions or in different mutant backgrounds. Changes in protein expression may also be seen with immunocytochemistry (and examined in a cell-specific way). But, generally antibodies do not distinguish between protein variants in situ unless specifically designed to do so. And some antibody works well for Westerns but not in situ.
Preparation of denatured protein from C. elegans is relatively straight forward, since simple boiling of adults or embryos in a typical protein buffer frees many proteins from the body (see Worm protein preparation protocol). A major difficulty with Western blot analysis arises from the fact that the entire worm is usually used for protein preparation. Thus, even if your protein is of fair abundance in a particular tissue, e.g., the nervous system, its abundance relative to total worm protein may be quite low. Therefore, sensitive detection methods are generally required (see Western transfer protocol).
If you generated your antibody using a fusion protein or a coupled peptide, then first test your antibody for staining of a Western Blot using a very low concentration of this protein. If you can not detect the protein in this purified condition, you are unlikely to be able to detect it in a complex mixture of worm proteins. The antibody may still work on worms in situ, since the antigen will be in a different conformation in the fixed worm than in the protein gel.
When you test an antibody on a worm preparation, it is helpful if you can use a Western blot from a tissue or strain that is enriched for the protein. For example, if the protein is enriched in a particular stage, then preparation of synchronous populations is recommended. If a particular enriched tissue can be dissected out fairly rapidly (e.g., the gonad), that is also recommended as the starting preparation. If you have a transgenic strain or mutant that over-expresses your protein, then use it to test for specificity of antibody binding in Westerns.
C. elegans cell culture (Christensen et al., 2002) provides novel tools for immunohistochemistry. Cell culture provides an easy method to test antibodies for staining of cells without concerns about permeability and accessibility (see Fixation conditions protocol). It also may provide an enriched source of particular cell types (e.g., sorted GFP-positive cells) for use in Western analysis. Despite this, the intact organism continues as the major focus of immunohistochemical techniques, as described in the following protocols.
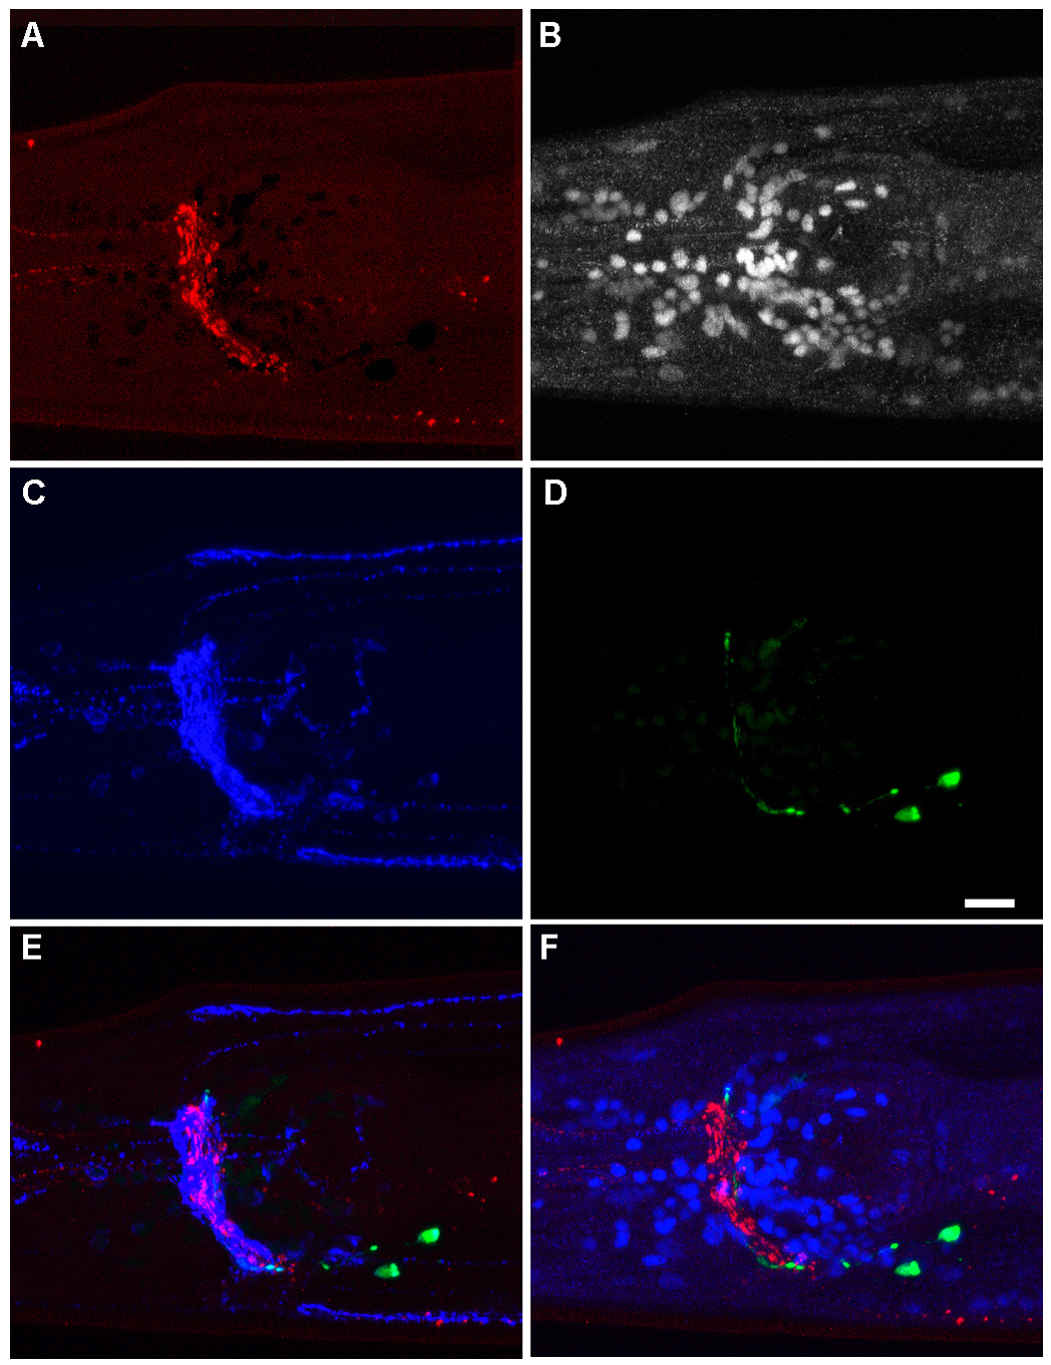
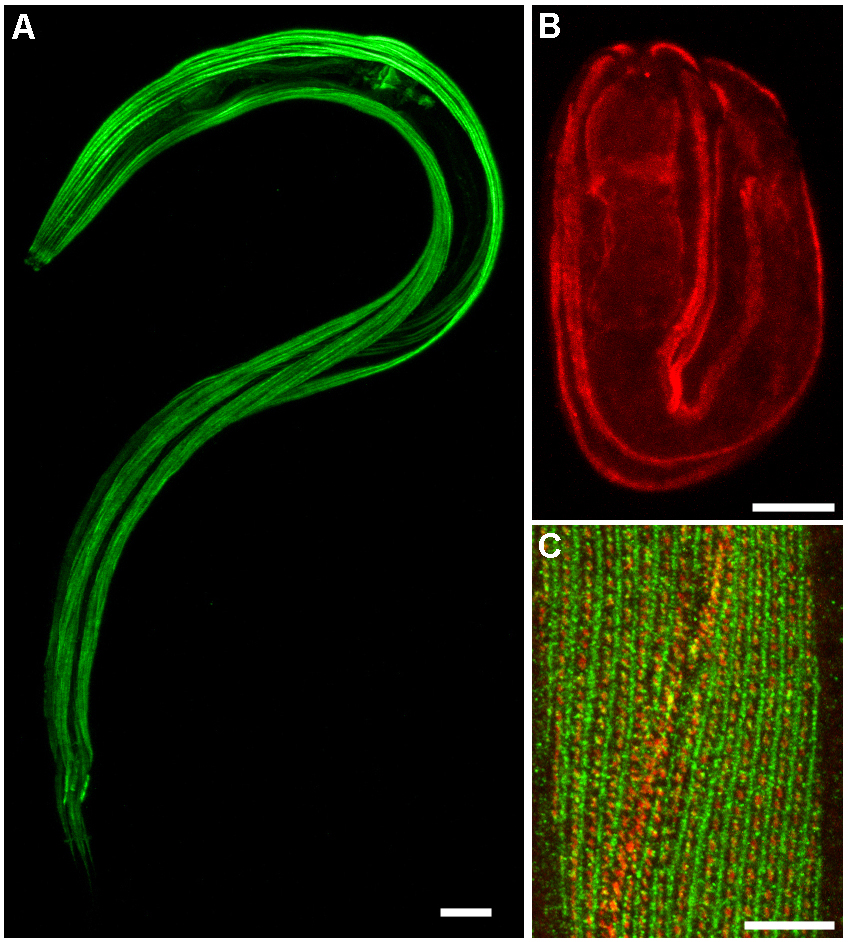
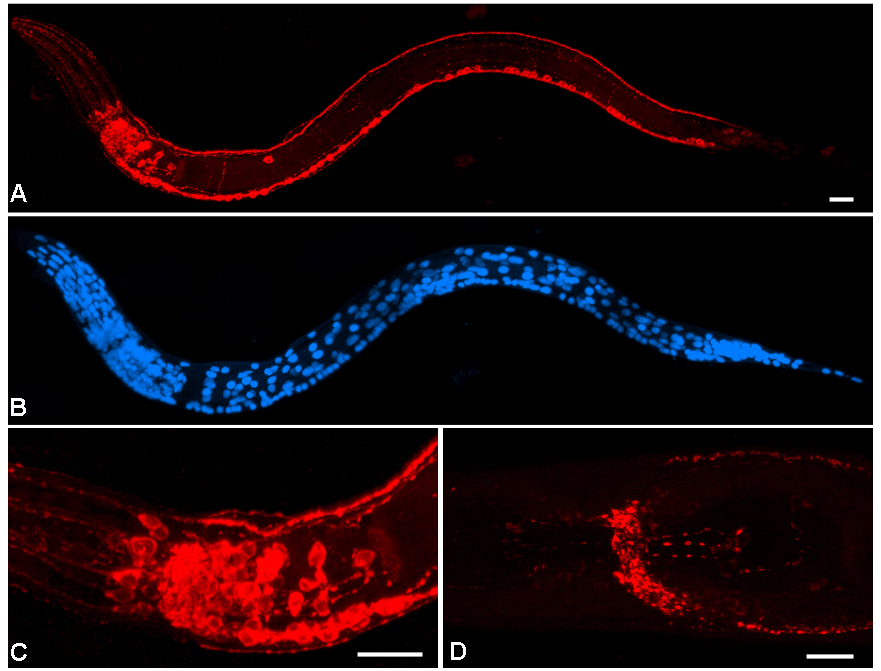
The figures illustrate antibody staining of C. elegans using the protocols covered in this section. The fixation conditions range from a very "light" fix (Figure 1, Protocols 6 and 13), to very "hard" fixes, followed by permeabilization by collagenase treatment (Figure 2, Protocols 7 and 14) or other chemical permeabilization (Figure 3, Protocols 8 and 14). Each antibody has its own optimum fixation conditions, see Protocol 5 for a discussion of how to determine those conditions. For staining in wild type versus transgenic strains, see Figure 4.
|
Figure 1. Light fixation and staining of multiple antigens in the head of an adult OH99 mgIs18 [Pttx-3GFP] prepared using Protocol 6. Freeze-crack. (A) Staining of the vesicular monoamine transporter (VMAT = CAT-1), shown in red. This antigen is found in synaptic vesicles of monoaminergic neurons.(B) DNA, white, was labeled with DAPI. (C) The vesicular acetylcholine transporter (VAChT = UNC-17), found in cholinergic synaptic vesicles, is shown in blue. (D) Staining with an anti-GFP antibody is shown in green. The GFP fills the cytoplasm of the AIY neurons. (E) Merged image of anti-VMAT (red), anti-VAChT (blue), and anti-GFP (green). (F) Merged image of anti-VMAT (red), anti-GFP (green) and DAPI (blue). Fixation was for 2 minutes in methanol followed by 4 minutes in acetone. Staining followed Protocol 13: Staining slides. Primary antibodies were goat anti-VMAT (Goat 258 polyclonal antibody purified with Protocol 4: Affinity purification), rabbit anti-GFP (Molecular Probes) and mouse anti-VAChT (Monoclonal 1403). Secondary antibodies were Cy3-conjugated donkey anti-goat, Oregon Green 488-conjugated donkey anti-rabbit, and Cy5-conjugated donkey anti-mouse. See Protocol 13: Staining slides for a discussion of anti-GFP and secondary antibodies. mgIs18 [Pttx-3::GFP] was a gift of O. Hobert; unc-104(e1265) was provided by the CGC. Images are maximum projections of confocal series, contrast enhanced in Adobe Photoshop®. Anterior to left, ventral down, scale bar is 10 μm.
|
Figure 2. Hard fixation in tubes to visualize neurotransmitters. Serotonin (red) and GFP (green) were labeled in the head of an adult RM2304 unc-104(e1265); mgIs18 [Pttx-3::GFP]. The bright red cells are the NSMs; the bright green cells are the AIYs. Worms were prepared using Protocol 7: Tube fixation with fixation for 24 hours in 4% formaldehyde, followed by incubation in collagenase for 6.5 hours. Staining was done using Protocol 14: Staining tube-fixed worms. Primary antibodies were rabbit anti-serotonin (H. Steinbusch, Free University) and mouse anti-GFP (Molecular Probes monoclonal 3E6); secondary antibodies were Cy3-conjugated donkey anti-rabbit and Oregon Green 488-conjugated donkey anti-mouse. mgIs18 [Pttx-3::GFP] was a gift of O. Hobert; unc-104(e1265) was provided by the CGC. Images are maximum projections of confocal series, contrast enhanced in Adobe Photoshop. Anterior to left, ventral down, scale bar is 10 μm.
|
Figure 3. Bouin's tube fixation for muscle preservation. (A) Actin was labeled in a wild-type L2 larva fixed using Protocol 8: Bouin's tube fixation with 1 hour in Bouin's fixative with methanol and β-mercaptoethanol, followed by incubation in Borate Tris buffers. Staining was using Protocol 14: Staining tube-fixed worms with mouse anti-actin (Chemicon monoclonal C4), followed by Oregon Green 488-conjugated donkey anti-mouse. (B) Talin was labeled in a wild-type embryo with rabbit B547 anti-talin (gift of Bob Barstead and Gary Moulder) and Cy3-conjugated donkey anti-rabbit. (C) Double staining of talin, stained with rabbit B547, and vinculin, stained with monoclonal antibody MH24 (gift of Russ Francis) in a wild-type adult. Secondary antibodies were Oregon Green 488 donkey anti-rabbit and Cy3 donkey anti-mouse. Maximum projection of overlapping confocal series, contrast enhanced in Adobe Photoshop. All scale bars are 10 μm.
|
Figure 4. Staining in wild-type versus transgenic strains. The transgenic strain RM1810 cha-1(md39); mdEx10 [F57G7] contains multiple copies of the cosmid that contains the cha-1 and unc-17 genes. This strain produces abnormally high levels of the ChAT and UNC-17/VAChT proteins. It is useful for testing the specificity of anti-ChAT and anti-VAChT antibody staining in situ, for increased ease of cell identification, and also for Westerns (see Protocol 17: Western transfer). (A) Staining of the VAChT, shown in red, in RM1810. (B) The same worm stained with DAPI to show nuclei. (C) A higher magnification view of the head of the same individual. (D) VAChT staining in a wild-type N2 shows the typical synaptic localization of the protein. Note that over-expression of VAChT leads to mislocalization of the protein in neuronal somas (compare panels C and D). The RM1810 and wild-type worms were prepared using Protocol 6: Freeze-crack. Fixation was for 2 minutes in methanol followed by 4 minutes in acetone. Staining followed Protocol 13: Staining slides, with mouse anti-VAChT (Monoclonal 1403) as the primary antibody, followed by Cy3-conjugated donkey anti-mouse. DNA was labeled by addition of DAPI in the mounting medium. Maximum projection of overlapping confocal series, contrast enhanced in Adobe Photoshop®. Anterior to left, ventral down, scale bar is 10 μm.
For a thorough discussion of antigens and antibody generation, see Harlow and Lane (1988).
There are a number of companies that will assist you in your antibody production, from the generation of fusion proteins or peptide antigens through serum purification. See the following for suggestions for peptide design and coupling (see Peptide coupling protocol) and affinity purification (see Antibody purification protocol).
The most frequently immunized animal is the rabbit. If you plan to do any double labeling, try generating your antibodies in one or two different species. Chickens are recommended: they are relatively inexpensive, the collection of antibody in eggs is humane, and they often generate robust immune responses. It is generally more economical to have the company deliver the eggs to you rather than the purified serum. Chicken antibodies are easy and inexpensive to partially purify from the egg yolks (see Chicken antibody purification protocol).
Generation of fusion proteins for immunization is much more laborious than buying peptides, but immunization with fusion proteins is more likely to lead to useful antibodies. If you have a company generate the fusion protein for you, be certain to request sufficient protein for testing, affinity purification, and affinity depletion of your serum.
Green Fluorescent Protein can be a wonderful protein to use in translational fusions (see Reporter gene fusions section of WormMethods). If expression of a translational GFP fusion leads to rescue of the mutant phenotype, then the location of GFP fluorescence in the rescued animals is likely to correspond at least partially to the normal localization of your protein. Of course, the localization should be checked with immunocytochemical localization of the endogenous protein in a wild-type animal. If your protein is not functional or stable in a GFP fusion protein, there are a number of very small epitope tags such as 6-His and Myc that can be fused to your protein and used for preliminary localization studies (Roehl et al., 1996).
Immunization with synthetic peptides is the quickest and easiest way to try and generate antibodies, although it is not always productive. Companies will predict immunogenic peptides or you can design the peptides yourself (http://immunax.dfci.harvard.edu/Tools/antigenic.html). If they are potentially immunogenic, then N-terminal or C-terminal peptides are recommended.
Be sure to order enough peptide for testing, affinity purification, and affinity depletion of your serum.
Use at least two different peptides from the same protein: peptides are inexpensive and many peptides are not immunogenic or are not exposed on the fixed protein. If cost is a major concern, two peptides from the same protein can be injected together during immunization; the serum can be specifically affinity purified as needed.
Peptides are generally conjugated to carrier proteins such as KLH (keyhole limpet hemocyanin), most easily using a kit and a peptide with an extra N-terminal cysteine. Peptides may also be coupled to serum albumin (see Peptide coupling protocol).
Peptides can be conjugated to two different carrier proteins (e.g., KLH and serum albumin). One conjugate can be used for immunization and the other conjugate can be used for affinity purification (see Antibody purification protocol).
This is a very simple and rapid procedure that uses glutaraldehyde to cross-link a peptide to serum albumin as the carrier protein (Harlow and Lane, 1988). The serum albumin should be from the species that will be immunized, e.g., if you plan to immunize a chicken you should use chicken serum albumin as the carrier protein. The basic premise is that the immunized animal will not generate many antibodies against its own serum albumin.
Dissolve 5 mg peptide in 1 ml sterile 100 mM NaPO4 buffer, pH 7 in a 1.5 ml tube.
Dissolve 20 mg serum albumin in 1 ml sterile 100 mM NaPO4 buffer in a separate 1.5 ml tube.
Mix peptide and albumin solutions in a tiny clear beaker and stir well with stir bar.
In hood: Stir constantly while adding drops of 20 mM glutaraldehyde (TOXIC). Add the drops at a rate of 100 ul per 5 minutes until up to 1 ml of glutaraldehyde has been added over a period of almost one hour.
Ideally, the solution should be slightly yellow when the protein is slightly cross-linked. If the solution turns yellow before the full 1 ml of glutaraldehyde has been added, stop adding the glutaraldehyde.
Dialyze at 4°C with PBS. Do at least 3 changes each with one liter of PBS for several hours.
Divide into 10 or 20 1.5 ml tubes and speedvac (no heat) until dry. Assume each tube has approximately 1 or 2 mg of protein-coupled peptide.
Store at -20°C in well-sealed aliquots.
This antibody enrichment procedure is based on the protocol of Gassmann et al. (1990). It uses serial PEG precipitations to enrich for the antibodies. The end product, although far from pure, is stable and is suitable for immunocytochemistry or Western blotting. Further purification is needed before immunoprecipitation.
Carefully break egg into palm of gloved hand or into an egg separator.
Using a squirt bottle of cold dd water, rinse the yolk.
Remove and discard as much of the white as possible.
Drop cleaned yolk into a beaker with a stir bar.
Break yolk with a pipette, if necessary.
Add cold buffer A, ~ 10 ml per yolk.
Stir on stir plate for >2 minutes.
Stir in 30 ml per yolk of cold 7% PEG.
When well mixed (>5 min), pour into centrifuge bottle (leave behind the scum on beaker).
Centrifuge at 14,000 g for 10 minutes.
Pour the top two layers (a thin layer of oil and a liquid layer) through a funnel with a Whatman #1 filter into a new centrifuge bottle. Discard the yellow pellet.
Add PEG 8,000 powder to a final concentration of 12g/100ml fluid.
Shake in centrifuge bottle on shaker at 4°C for 1-2 hours, until the PEG is in solution.
Centrifuge at 14,000 g for 10 minutes.
Pour off and discard fluid, leaving behind orange pellet.
Spin pellet at 5,000 rpm for 2 minutes.
Remove with any fluid with a pipette and discard.
Add 5 ml per yolk of buffer A.
Dissolve the pellet in the buffer by stirring it with a glass rod (laborious) or by letting it sit or shake overnight at 4°C.
If desired (not necessary for antibody for staining), remove residual PEG with dialysis or ammonium sulfate precipitation.
For maximum yield, have all solutions and do all work at 4°C.
Obtain and process pre-immune eggs. Pre-immune chickens may have anti-nematode antibodies.
Start by processing a single egg per beaker. Once a plateau of antibody production has been reached (after 3 immunizations), you may process together all the eggs produced in one week by one hen.
Intact eggs will last at least 3 weeks at 4°C.
| Buffer A: for 1 L of 10X |
| 13.6 g KH2PO4 (1X final 10mM) |
| 58.4 g NaCl (1X final 100mM) |
| 10 ml 10% Sodium Azide (1X final 0.01%) TOXIC |
Add to 900 ml dd water
Adjust pH to 7.2 with concentrated NaOH.
Top to 1 L with dd water.
| 7% PEG: for 100 ml |
| 10 ml 10X buffer A |
| 7 g PEG 8,000 |
Add dd water to 100 ml.
Time and stirring are required for the PEG to go into solution.
Pre-absorbing antibody with a bacterial acetone powder may improve the specificity of the binding of your antibody, especially if your antibody was generated against a bacterially expressed fusion protein (Harlow and Lane, 1988; Miller and Shakes, 1995). However, affinity purification has the potential for a much more significant improvement in specificity.
This protocol uses nitrocellulose membranes rather than columns for antibody purification (Smith and Fisher, 1984; Duerr et al., 1999). This technique minimizes the time that the antibodies spend in the elution buffer in order to maximize antibody recovery. It is also quick, simple, and inexpensive.
If you have used a KLH-coupled peptide as your antigen, you can affinity purify your antibody with a serum albumin-coupled peptide to increase specificity (or vice versa).
If you do not have a pure antigen protein preparation, you may still use this method to purify your antibody. Run your protein mixture (e.g., partially purified fusion protein) out on a gel and then Western blot it to a high-quality, high-binding nitrocellulose membrane. Cut out the area of the membrane containing the blotted protein of interest and use the membrane in the following procedure.
This protocol can also be used to affinity deplete your serum. For example, if you have used a partially purified fusion protein as your antigen, you can use a partially purified preparation for a different fusion protein to bind (and discard) antibodies that recognize the non-specific shared portion of the fusion protein or the bacterial contaminants.
Procedure 1. Coating of membrane with antigen
Add 10 ml NFDM to a 100 mm petri dish (to block any protein binding sites on the dish).
Shake at low speed (40–60 rpm) for 1 hour at room temperature (or longer at 4°C).
Rinse dish 3X with TBST (about 20 ml per wash) and drain well.
Add 15 ml Antibody Transfer Solution.
[Optional: save sample to check protein concentration in Antibody Transfer Solution.]
Place 1 nitrocellulose membrane into dish with forceps (not fingers).
Shake 30-60 minutes at room temperature (or longer at 4°C).
[Save unbound Antibody Transfer Solution and check for protein concentration.]
Rinse membrane in dish 3X with TBST.
Cover membrane with NFDM.
Put on shaker for 1 hour at room temperature (or longer at 4°C).
Procedure 2. Pre-elution of membrane
Rinse membrane in the coated dish 3X with TBST.
Rinse briefly with dd water.
Add 10 ml glycine buffer.
Swirl for exactly 60 seconds.
Pour off and discard glycine buffer.
Quickly rinse membrane 3X with TBST.
In hood, rinse briefly with dd water.
Add 10 ml TEA buffer (TOXIC).
Swirl for exactly 60 seconds.
Pour off and discard TEA buffer.
Quickly rinse 3X with TBST.
Cover membrane in dish with NFDM.
Shake 30 minutes at room temperature.
Procedure 3. Incubation with antibodies
Rinse membrane in dish 2X with TBST.
Add 10 ml TBST to dish.
Add 0.5 ml (or less) serum to dish.
Shake for 1 hour at room temperature (or longer at 4°C).
[Save antibody solution after binding (see comments below).]
Rinse membranes 3-6X for 5 minutes each with TBST.
Procedure 4. Elution of antibodies
Prepare a 15 ml tube with 150 ul 1M Tris pH 8.2 for glycine rinse.
Prepare a 15 ml tube with 800 ul 0.5M Tris pH 6.8 + 200 ul 1M HCl for TEA rinse.
Rinse membrane briefly with dd water.
Add 5 ml glycine buffer.
Swirl for exactly 20 seconds and pour off and save glycine buffer in tube with Tris pH 8.2.
Immediately add another 5 ml glycine buffer to dish with membrane.
Swirl membrane in second rinse of glycine buffer for 20 seconds.
Pour second glycine rinse in with the first rinse.
Quickly rinse membrane 3X with TBST.
In hood, rinse membrane briefly in dd water.
Add 5 ml TEA buffer (TOXIC).
Swirl for exactly 20 seconds and pour off and save TEA buffer in tube with Tris pH 6.8.
Immediately add another 5 ml TEA buffer to dish with membrane.
Swirl membrane in second rinse of TEA buffer for 20 seconds.
Pour second TEA rinse in with the first TEA rinse.
Quickly rinse membrane 3X with TBST.
Check pH of eluates and adjust to pH ~7.5 with appropriate pH Tris BEFORE STORING.
Since the volumes are so small, use pH strips to check the pH.
Cover used membrane with NFDM and store in dish at -20°C for later re-use.
Procedure 5. Optional concentration
Put glycine eluate in the top of a Centricon or other concentrator (mw cutoff <10-40,000D).
Add plain Phosphate Buffered Saline (PBS) to fill line.
Balance tubes and spin 20-30 minutes at 5,500 rpm at 4°C (or as directed) until concentrated.
Discard flow through.
Add PBS to 15 ml and repeat spin.
Discard flow through.
Add Antibody buffer to 15 ml and repeat spin.
Discard flow through.
Repeat spin if needed until volume <1.5 ml.
Store concentrate in a 1.5 ml capped tube at 4°C or -20°C.
Repeat for TEA eluate.
Nitrocellulose membranes must be high quality with high protein binding. We use Nitroplus transfer membranes 82 mm discs (MSI).
Never touch the membranes with your fingers; always transfer them with forceps.
Antigen-coated membranes may be used more than once. Store them in NFDM at -20°C. Membranes will show decreased purification effectiveness after 2-10 uses, depending upon the antigen and serum.
Be sure to have the Tris solutions ready to neutralize the buffers immediately after the elution steps. Elution and neutralization should take about 1 minute per buffer. Adjust pH to 7.5 before storing.
You may do several membranes simultaneously. However, be sure to do the elution step sequentially so that the antibody does not sit in the high or low pH buffer too long.
Glycine elutions have been more productive, but TEA elutions usually provide some specific antibodies in lower concentrations. Note that the glycine elution is a high salt and low pH elution.
The eluates may be stored at 4°C or -20°C; concentrate the antibody before storage.
If you are testing a new antibody, the eluates can be used after pH adjustment but before concentration for Westerns or immunocytochemistry. Try eluate diluted 1:1 - 1:50 in Antibody buffer with 1% BSA (for immunocytochemistry) or Antibody buffer with 1% NFDM (for Westerns).
The optimum amount of serum to use with each round of purification will vary. Start with 0.5 ml serum per membrane, but save the unbound serum and test it with another round of purification.
| Antibody transfer solution (per membrane) |
| 12 ml dd water |
| 3 ml Methanol (final 20%) |
| 375 ul 1.0 M Tris pH 8.0 (final 25 mM) |
Add ~1 mg antigen in its buffer to 15 ml transfer solution.
Take a sample to check the antigen concentration before and after binding to the membrane.
| Tris buffered saline with Tween-20 (TBST) for 1-2 membranes |
| 6.1 g Tris free base (final 50 mM) |
| 8.8 g NaCl (final 150 mM) |
| 500 ul Tween-20 (final 0.05%) |
| 5 ml 10% sodium azide in dd water (final 0.05%) |
| 900 ml dd water |
Add concentrated HCl to adjust pH to 8.0 (use pH paper).
Add dd water to final volume of 1 L.
Store at 4°C.
Make up and store 10X stock.
You can use PBST (PBS with 0.05% Tween-20, pH 8.0) instead of TBST.
| Tris buffered saline with nonfat dry milk (NFDM) for 1-2 membranes |
| 100 ml TBST (or PBST) |
| 3 g Nonfat dry milk (final 3%) |
Mix well with stirring and gentle heat, if needed.
Store at 4°C for up to 5 days.
| Glycine elution buffer for 10 membranes (20 ml per membrane) |
| 121 mg glycine (final 5 mM) |
| 25 mg BSA (final 0.01%) |
| 125 ul Tween-20 (final 0.05%) |
| 7.3 g NaCl (final 500 mM) |
| 200 ml dd water |
Use dilute HCl to adjust pH to 2.3.
Add dd water to 250 ml.
Store at 4°C (keeps many weeks).
| 1.0 M Tris pH 8.2 (~500 ul per membrane) |
| Store at 4°C. |
| TEA buffer (20 ml for 1 membrane): TOXIC |
| 175 ul Triethylamine (final 50 mM) |
| 25 ml dd water |
| 0.5 M Tris pH 6.8 (~1ml per membrane) |
Store at 4°C.
Phosphate buffered saline (PBS)
Antibody buffer
Purify your antibody before testing (see Antibody purification protocol), since non-specific staining of unpurified antibodies usually masks specific staining in C. elegans.
Although a few antibodies work with a wide range of tissue fixation conditions, your antibody is likely to work best (or only) with a particular fixation regime (see Harlow and Lane (1988) and Harlow (1999) for discussion). Major classes of fixatives are precipitating agents (e.g., methanol and acetone) or compounds that cross-link proteins (e.g., formaldehyde and glutaraldehyde).
After fixation, you must permeabilize the tissue to allow access of the antibodies. This is done by the inclusion of a non-ionic detergent in the incubation buffers. After or during particularly hard fixation conditions, treatment with an organic solvent such as methanol or acetone may be necessary for adequate permeabilization (Harlow and Lane, 1988).
In C. elegans, chemical treatments can be used to permeabilize the cuticle, including incubation in collagenase or reduction in β-mercaptoethanol (Finney and Ruvkun, 1990; Garriga et al., 1993; Miller and Shakes, 1995). However, these treatments may also destroy the ability of antibodies to recognize your protein. Therefore, initially test fixation conditions on freeze-cracked or otherwise mechanically disrupted worms or tissues. Or, if applicable, examine dissected tissue (see Freeze-crack protocol; Crittenden et al., 1994) or cultured cells (Christensen et al., 2002). Once the optimum fixation conditions for mechanically disrupted or dissected worms have been determined, then determine whether one of the Tube-fixation protocols that use chemicals to disrupt the cuticle might be more convenient.
You can monitor tissue preservation and accessibility at a gross level by examining the morphology of nuclei stained with the DNA-binding dye DAPI (see Staining slides protocol). DAPI permeates tissue more readily than antibodies; if you do not see DAPI labeling of your cells, then you are unlikely to see antibody staining.
For more specific (but more expensive) examination of tissue accessibility with any fixation method, use a control primary antibody. Good controls are an antibody to DNA (Chemicon mouse monoclonal antibody MAB030) or to a cytoskeletal protein (Amersham L9 anti-tubulin; Calbiochem Ab-1 anti-actin; ICN Biochemicals C4 anti-actin). All of these antibodies work on worms prepared with a variety of fixation conditions.
All fixatives are TOXIC.
Try the following with freeze-cracked slides or tissues or cells (See Freeze-crack protocol):
100% methanol: 2 minutes on ice.
100% acetone: 2 minutes on ice.
100% methanol 4 minutes on ice followed by 100% acetone 4 minutes on ice.
1% formaldehyde in 0.1 M Phosphate buffer + 50% acetone: 30 minutes on ice.
0.5% formaldehyde in 0.1M Phosphate buffer: 1 hour on ice.
4% formaldehyde in 0.1M Phosphate buffer: 1 hour on ice.
4% formaldehyde in 0.1M Phosphate buffer: overnight at 4°C.
4% formaldehyde + 0.1% glutaraldehyde in 0.1M Phosphate buffer: overnight at 4°C.
4% formaldehyde + 1% glutaraldehyde in 0.1M Phosphate buffer: 24 hours at 4°C.
Try the following with tube-fixed worms (See Tube fixation protocol):
1% formaldehyde: 1 hour on ice.
4% formaldehyde: overnight at 4°C.
See the Freeze-crack protocol for recipes for different fixatives. Formaldehyde and glutaraldehyde solutions should be made fresh.
Start with #3 and #6, and then try other conditions as needed. As you discover the optimum conditions, you may change the concentration of fixative, incubation duration, temperature, and the buffer (for example, you can try a buffer including picric acid and/or borate or methanol). Generally, fixation is done in cold solutions to prevent diffusion before fixation.
As you go down the list, the fixation conditions get harder, i.e., more precipitated and/or cross-linked. As this happens, the fixation conditions get more difficult to evaluate because the antibodies will not penetrate the tissue as well, autofluorescence will increase, and fewer worms will stick to the slides. If you need long formaldehyde and/or glutaraldehyde fixation conditions, you can switch from the Freeze-crack to the Tube fixation protocol. The tube fixation procedures are longer and have more variables than the freeze-crack procedure, but the morphology of hard fixed worms is much better with tube fixation.
If you are going to be testing multiple antibodies (or multiple batches of one antibody) you can keep stocks of unstained tube-fixed worms in the refrigerator or -20°C freezer (see Tube fixation protocol and Bouin's tube fixation protocols). Tube-fixed worms last months in the refrigerator or indefinitely at -20°C; although some antigenicity may be lost, fixed worms that are 5+ years old can show specific antibody binding.
If you do cell culture, you can fix and save your old preparations with a variety of fixatives. Store the fixed slides in PBS at 4°C or protected from dehydration at -20°C and use as needed to test antibodies. If you find a protocol that appears to give you specific staining, then use similar fixation conditions on freeze-cracked worms or dissected tissues.
Freeze-cracking provides a quick and simple way to remove portions of the worm's cuticle, allowing penetration of antibodies (Strome and Wood, 1982; Albertson, 1984; Miller and Shakes, 1995; Duerr et al., 1999). Dissection of worms (Crittenden et al., 1994) can increase antibody access to some tissues and early embryos.
The procedure generally begins with a large number of worms and ends with a few stained worms. The morphology of the worms is variable; preparation of relatively intact worms takes practice. However, the ease and speed of the technique and the minimal chemical disruption are very useful for evaluating antibodies and are optimum for localizing some antigens.
Procedure 6. Freezing plates of worms on slides
Use a plate of healthy worms.
Place large flat slabs of dry ice or place a flat metal plate firmly on top of crushed dry ice in a Styrofoam container.
Wash the worms from the plate with M9 buffer or dd water and collect them in a 1.5 ml tube.
Spin the worms at 2000 rpm (~400 g) for 2-3 minutes.
[Optional: To enrich for adults, let the worms settle for 5 minutes at room temperature.]
Remove the supernatant and repeat M9 wash until ~ all bacteria are gone and solution is clear.
Rinse worms with dd water, spin or let settle, and remove all but about 50 ul water.
Label lab-made poly-lysine slides with indelible ink and place on counter frosted side up.
Using a glass pipette, place a small drop (10-20 ul) of worms on the slide.
Let the worms settle briefly.
Use the pipette to spread out the worms and liquid so that individual worms are not overlapping.
Carefully press an unlabeled (commercial) poly-lysine slide down on the worms label side down so that only the unfrosted parts overlap.
Press straight down slightly, enough to immobilize but not rupture most of the adults.
Carefully (without sliding) put the slides on a flat piece of dry ice for 5-30 minutes.
Proceed to Methanol and/or acetone fixation or Formaldehyde and/or glutaraldehyde fixation.
Procedure 7. Freezing individuals or small numbers of worms
Transfer the worm(s) to a food-free plate and let them rid themselves of bacteria.
Place a small drop of dd water on the middle of a sticky lab-made poly-lysine slide.
Pick the worms up individually with a clean pick and shake them off in the water drop.
The worms should partially stick as they fall and touch the poly-lysine.
Multiple (up to ~50) worms of similar sizes can be done on the same slide.
The more worms you do on a slide, the larger the fraction that you will lose.
When you have transferred the worms, place a commercial poly-lysine slide over the worms.
For a few worms, the weight of the slide should provide sufficient compression.
With many worms, press down evenly and lightly to compress the worms.
The water droplet should not reach the edges of the slide after compression.
Immediately and smoothly transfer the slide to a flat piece of dry ice or metal on dry ice.
Proceed to Methanol and/or acetone fixation or Formaldehyde and/or glutaraldehyde fixation.
Procedure 8. Dissecting worms: for intestine, gonad, early embryos
Place a small drop of 0.2 mM levamisole in dd water onto a lab-made poly-lysine slide.
The levamisole paralyzes and contracts the worms and aids dissection.
Transfer several adults to the drop.
Slice the adults near the head, vulva, or tail with two fresh 25-26 gauge needles.
Options: Use dissection scissors, or a blade breaker/holder and fine razor blade.
With practice, the intestine and gonad will extrude and stick to the poly-lysine slide.
Early embryos can be pulled free from the rest of the worm.
Option: Bleach gravid adults, collect embryos and place in a drop of dd water on the slide.
When you have dissected several adults, place a commercial poly-lysine slide over the worms.
If necessary, press down lightly and evenly on the top slide until it touches the tissues.
Immediately and smoothly transfer the slide to a flat piece of dry ice or a metal plate on dry ice.
Proceed to Methanol and/or acetone fixation or Formaldehyde and/or glutaraldehyde fixation.
Procedure 9. Freezing older embryos (from a mixed population)
Pipette M9 over the surface of a plate containing worms in food.
Allow the adults and larvae to thrash free of the food and into the fluid.
Tilt plate and pipette off the M9 with thrashing worms and discard.
If adults and larvae are still present on the plate, repeat the M9 wash.
When the plate contains only embryos in food, use a stream of M9 to rinse off the embryos.
Collect embryos into a 1.5 ml tube.
Spin the worms at 2000 rpm (<800 g) for 2-3 minutes.
Replace supernatant with dd water.
Repeat spin and rinse as needed until embryos are clear of bacteria.
Transfer embryos in a small drop of water to a lab-made poly-lysine slide.
Press down lightly and evenly on the top slide until it contacts the embryos.
Immediately and smoothly transfer the slide to a flat piece of dry ice or metal plate on dry ice.
Proceed to Methanol and/or acetone fixation or Formaldehyde and/or glutaraldehyde fixation.
Procedure 10. Methanol and/or acetone fixation
See Fixation conditions protocol for variations with organic solvent fixatives.
Place a covered coplin jar of 100% acetone on ice (or in dry ice).
Place a covered coplin jar of 100% methanol on ice (or in dry ice).
Let chill until very cold (>15 minutes).
Crack the slide sandwich by swiftly twisting apart the two slides; discard the top (unlabeled) slide.
[Optional (for multiple slides): Immediately place the wormless sides of the slides (smooth sides) back-to-back]
Immediately immerse in ice cold methanol for 2+ minutes.
Immerse in ice cold acetone for 4+ minutes.
[Optional: Filter the acetone and methanol through a Whatman #1 filter and reuse 3-4 times.]
[Use cold methanol or acetone alone for <10 minutes (see Fixation conditions protocol).]
[Optional: Air-dry the slides for 1-5 minutes before proceeding. This may increase adhesion of the worms to the slide, but may decrease antigenicity.]
Place the slides in a new coplin jar.
Pour PBS down the side of the jar (not directly onto the worms).
Optional: Rehydrate the worms with a series of alcohol solutions (95%, 70%, 50%, and 30%).
Proceed with blocking and staining (see Staining slides protocol).
Procedure 11. Formaldehyde and/or glutaraldehyde fixation: TOXIC
See Fixation conditions protocol and solutions (below) for fixatives.
Prepare FRESH TOXIC formaldehyde and/or glutaraldehyde solution in hood.
Pre-chill fixative on ice.
Crack the slide sandwich by swiftly twisting apart the two slides; discard the top (unlabeled) slide.
Quickly place the slides (worms up) flat in a dish (with lid) in the cold room or refrigerator.
Cover the worms on each slide with 100-200 ul fixative.
Fix the worms for 30 minutes to 24 hours at 4°C.
[Optional: Incubate the slides back to back in a coplin jar containing cold fixative.]
[Incubation in the jar increases loss of worms from the slide, but is less messy.]
After fixation, rinse the slides gently several times with PBS (until there is no fixative odor).
Proceed with blocking and staining (see Staining slides protocol).
Use plates containing healthy well-fed worms since starved worms have increased autofluorescence in the gut. Also, dauers seldom crack open.
If you use a mixed population, then most of the worms that stick to the slides will be the fatter adults, since they adhere best to the top and bottom slides. You can use synchronized populations of worms if you wish to recover larvae of a particular age.
Only a fraction of embryos will be cracked open when you use a mixed population. To specifically stain embryos, use a population of embryos that have been transferred to a poly-lysine slide (Procedure 19 or 20).
Clean (bacteria-free) worms will stick the best to the poly-lysine slides. However, bacteria-free worms also stick well to clean plastic or glass pipettes. Use the same glass pipette for the initial and final rinses when cleaning the worms free of bacteria, so that the very thin coating of bacteria left on the inside of the glass prevents worms from sticking to the pipette.
Slides can be stored before ‘cracking’ at -80°C for days to weeks before staining with some (but not all) antibodies. Let slides from -80°C ‘warm up’ on dry ice for 10 minutes before cracking.
If you do not have slabs of dry ice available, then you can use a pre-chilled conductive (metal) plate on top of crushed dry ice. You may also use a metal plate on the shelf of a -30°C or -80°C freezer. However, this later technique may not work as well as a slab of dry ice (and is not good for your freezer).
Some people use a coverslip as the top of the slide sandwich, instead of a commercial poly-L-lysine slide. This allows more delicate compression of the worms, but removal of the cover slip can be more difficult than separating the two slides. Removal of the cover slip should only be done when wearing goggles to protect your eyes from flying shards of glass.
Problems with recovering intact worms on the poly-lysine slides can arise from:
| Insufficiently cleaned worms. |
| Insufficiently cleaned or poorly coated or poorly dried poly-lysine slides. |
| Too much or too little or sideways pressure during compression. |
| You can monitor worm compression by examining your slides with a dissection scope. |
| Harder fixation conditions lead to more loss of worms. |
| Air drying the slides may improve adhesion, but decreases staining with some antibodies. |
| Pouring solutions directly over the worms may wash them off of the slides. |
You can make extra sticky poly-lysine slides (for hard fixes or precious worms) as follows:
| Place a small drop of Lab-made poly-L-lysine Solution directly onto a clean slide. Either let the drop evaporate as is OR use a second slide to carefully spread the drop before drying. In either case, you should get a very sticky spot on your slide. Unfortunately, the poly-lysine spot will often bind non-specifically to your antibody and give high background staining. |
| M9 (for 1 L) |
| 3 g KH2PO4 |
| 6 g Na2HPO4 |
| 5 g NaCl |
| 1 ml 1M MgSO4 |
Add dd water to 1 L and stir to dissolve fully.
Store at 4°C.
| "Lab-made" poly-L-lysine solution |
| 400 mg Sigma P1524 poly-L-lysine (very high molecular weight) |
| 200 ml dd water |
| 0.2 g Sodium azide (0.1%) TOXIC |
Mix together and store at 4°C.
Reuse solution to coat slides until it becomes noticeably less sticky.
"Lab-made" poly-L-lysine Slides:
Wipe ‘pre-cleaned’ frosted edge slides very clean with kimwipes.
Place slides back-to-back (frosted sides exposed) in slide holder.
Shake 30 minutes in dilute ionic detergent (e.g., squirt of dishwashing soap in water).
Rinse in running water > 1 minute.
Rinse in running distilled water > 1 minute.
Shake in 70% ethanol + 1% HCl for > 5 minutes.
Rinse in running distilled water > 5 minutes.
Dry in 60°C oven > 5 minutes.
Shake in "Lab-made" poly-L-lysine Solution for 5 minutes.
Dry in 60°C oven > 1 hr to overnight.
Wear safety goggles and work over a pad to avoid glass shards.
Crack the slides apart by sliding a scalpel between the slides.
Coated slides will last months if kept in a clean slide box at 4°C.
Commercially prepared poly-L-lysine slides:
Brands include Sigma poly-prep and ESCO polysine.
They are not as sticky as the "lab-made" slides so are used for the top slide of the sandwich.
| 10X PBS (for 1 L) |
| 80 g NaCl |
| 2.0 g KCl |
| 27 g Na2HPO4:7H2O |
| 2.4 g KH2PO4 |
| 2 g Sodium Azide TOXIC |
Allow salts to dissolve (with gentle heat and stirring) in 900 ml dd water.
Adjust pH to 7.2 with 10M NaOH.
Top to 1 L with dd water.
Autoclave and store at room temperature.
Formaldehyde solutions (for 40 ml of 4% formaldehyde) from liquid: TOXIC
Open a fresh 10 ml ampoule of 16% formaldehyde.
Use reagent grade 16% formaldehyde (e.g., Ted Pella brand for electron microscopy).
Pour into covered coplin jar on ice in hood.
Add 30 ml 0.1 M phosphate (Na2PO4-H2O, pH 7.2).
Use as soon as chilled or later the same day.
Discard used fix appropriately.
OPTIONS:Vary formaldehyde from 0.5% to 4%.
Mix formaldehyde with 50% methanol.
Mix 4% formaldehyde with 0.5-1.0% glutaraldehyde.
| Glutaraldehyde solutions: TOXIC |
| Dilute 25% glutaraldehyde in 0.1 M phosphate (Na2PO4-H2O, pH 7.2). |
| Pour into covered coplin jar in hood and pre-chill on ice. |
| Use as soon as chilled or later the same day. |
This protocol can produce worms with fairly permeable cuticles and nice morphology (Li and Chalfie, 1990, Garriga et al., 1993). The related Peroxide tube fixation protocol uses additional reducing and oxidizing agents and omits the collagenase treatment (Finney and Ruvkun, 1990). In either case, the fixed and treated worms can be stored for months at -20°C.
Treatment with collagenase can be quite variable and the fixation and permeabilization conditions disrupt many antigens. However, the overall structure of the worm is often well preserved.
Procedure 12. Fixation
Use 1-10 plates of healthy, well-fed worms.
Wash the worms from the plates with M9 buffer and collect in a 1.5 ml or 15 ml tube.
Spin the worms at 2000 rpm (~400 g) for 2-3 minutes.
[To enrich for adults, let the worms settle for 5 minutes at room temperature.]
Remove the supernatant and repeat M9 wash until ~ all bacteria are gone and solution is clear.
Transfer worms to a new screw cap 1.5 ml tube, using dd water.
Top tube with dd water.
Spin 2 minutes at 2,000 rpm (~400 g).
Remove all but 50-100 ul of solution.
Put on ice for 2-3 minutes.
Add 1 ml TOXIC Fix solution.
Put in beaker containing dry ice + 95% ethanol for 2-3 minutes to freeze worms solid and crack their cuticles.
[Optional: Use liquid nitrogen.]
Defrost with warm water.
Repeat the freeze and defrost steps 1-2 times (to crack as many worms as possible).
Put on shaker at 4°C to 37°C for 1-24 hr.
Spin at high speed, remove fixative (discard safely), and top with PBST.
Repeat PBST rinse 3-5 times, until the fixative is no longer detectable.
[Optional: Worms can be stored in PBST for up to one month at 4°C (or longer at -20°C).]
Reduction:
Add 1 ml β-mercaptoethanol solution (βME).
Shake at 100 rpm, 37°C for 2 hours (light fix) or up to 48 hours (hard fix).
The worms should be whole, but are more fragile and sticky than before treatment.
Spin at 5,000 rpm (~1,000 g) for 3 minutes, and then remove supernatant and top tube with PBST.
Repeat spin and PBST rinses as many as 8 times, until the fixative is no longer detectable.
[Optional: Worms can be stored in PBST for several days at 4°C (or longer at -20°C).]
Collagenase treatment
As early in the day as possible: Place worms in clear 0.5 or 0.25 ml tube.
Add 50-100 ul collagenase solution (1-2X volume of worms).
Put on 37°C shaker at 250 rpm.
Monitor the worms regularly (every 30 minutes) until many adults have broken in half.
Check the status of the worms under the dissecting microscope by transferring a small aliquot to a clear slide or, with experience, by peering through the side of the tube under the microscope.
The collagenase treatment can vary from 30 minutes to 36 hours depending upon the batch of collagenase, the fixation conditions, and the number of worms.
When the worms are sufficiently broken, put the tube on ice for 2 minutes.
Spin 2 minutes at 1,000 rpm (<400 g).
If necessary (if the worms are stuck to the side of the tube), turn the tube 180 degrees, and re-spin.
Remove the supernatant and top with PBST.
Repeat the rinse 2 times with PBS.
[Optional: Worms can be stored for several days at 4°C (or longer at -20°C).]
Proceed with blocking and staining (see Staining tube-fixed worms protocol).
After the fixation and rinsing is complete (but before the βME treatment), worms can be stored in PBST for up to one month at 4°C (or longer at -20°C).
After the βME treatment (but before the collagenase treatment), worms can be stored in PBST for a few days at 4°C (or longer at -20°C).
After treatment with βME, the worms are sticky and fragile. Cut the tip off of the fine plastic pipette tip and rinse the tip with antibody solution before using it to transfer worms. If your worms are very precious, you can do all of the treatments in glass tubes, which are less sticky than plastic tubes.
Fix solutions: TOXIC See Freeze-crack and Fixation conditions protocols.
The ‘default’ fix is 4% formaldehyde +/- 50% methanol at room temperature for 1 hour.
Incubate in βME for 1 hour at room temperature and in collagenase approximately 2 hours.
For serotonin: Fix 4% formaldehyde at 4°C for 24 hours.
Incubate in βME for 24 hours at 4°C and in collagenase several hours.
For GABA: Fix 4% formaldehyde + 1% glutaraldehyde (reagent grade) at 4°C for 24 hours.
Incubate in βME for 48 hours at 4°C and in collagenase several hours.
For octopamine, dopamine, or histamine: Use Picric acid + Glutaraldehyde fixation protocol.
| β-mercaptoethanol solution (βME; for 10 ml) |
| 500 ul β-mercaptoethanol (final 5%) |
| 100 ul Triton X-100 (final 1%) |
| 1.2 ml 1.0 M Tris pH 7.0 (final 120 mM) |
Add dd water to 10 ml.
Mix well and use fresh.
| Collagenase stock buffer (for 100 ml) |
| 1.2 g Tris base (final 100 mM) |
| 150 mg CaCl2 dihydrate (final 1 mM) |
| 100 ul Triton X-100 (final 0.1%) |
Add dd water to 90 ml.
Adjust pH to 7.4 with HCl.
Top to 100 ml with dd water.
Store at 4°C.
| Collagenase solution (for 2 ml) |
| 2,000 units Collagenase (Sigma type VII, #C-0773) |
| 2 ml Collagenase stock buffer |
Mix collagenase with buffer.
Immediately aliquot 50-100 ul per 0.5 ml tube.
Immediately freeze at -20°C.
Phosphate Buffered Saline (PBS)
Phosphate Buffered Saline with Triton (PBST)
PBS + 0.5% Triton X-100
This fixation procedure uses a relatively hard fix and is done on worms in tubes. Bouin's fix with methanol and β-mercaptoethanol works well with many antibodies to muscle proteins and some neuronal antigens (Nonet et al., 1997).
You can prepare a stock of worms fixed with this technique and store them at 4°C or -20°C until needed.
Wear gloves and a lab coat while working with fix and during the initial rinses.
Dispose of the used fix safely: Picric acid is toxic and explosive.
Procedure 13. Fixation
Use 1-10 plates of healthy, well-fed worms.
Wash the worms from the plates with M9 buffer and collect in a 1.5 ml or 15 ml tube.
Spin the worms at 2000 rpm (~400 g) for 2-3 minutes.
[Optional: To enrich for adults, let the worms settle for 5 minutes at room temperature.]
Remove the supernatant and repeat M9 wash until ~ all bacteria are gone and solution is clear.
Transfer worms to a new screw cap 1.5 ml tube, using dd water.
Top tube with dd water.
Spin 2 minutes at 2,000 rpm (~400 g).
Remove all but 50-100 ul of solution.
Put on ice for 2-3 minutes.
Add 1.0 ml Bouin's MB Fix (TOXIC).
[Optional: use plain Bouin's Fix (TOXIC).]
Shake vigorously for 30 minutes at room temperature.
Procedure 14. Permeabilization
Put tightly capped tube in liquid nitrogen for 1 minute (to crack the cuticles).
Option: Use a dry ice + 95% ethanol bath.
Defrost tube with warm tap water.
Shake vigorously for 30 minutes at room temperature.
Spin at 10,000 rpm (2,000+ g) for 1 minute.
Remove fix (discard safely) and change to BTB Solution.
Repeat spin and BTB rinse 3 times, leaving worms in 1 ml BTB.
Shake vigorously for 1 hour at room temperature.
Repeat spin, BTB rinse, and 1 hour shaking two more times (for a total of 3 hours).
Spin at 3,000 rpm (<1,000 g) for 2 minutes (low speed since the worms are more fragile).
Replace BTB Solution with BT.
Spin at 3,000 rpm (<1,000 g) for 2 minutes and change to fresh BT.
Spin at 3,000 rpm (<1,000 g) for 2 minutes and replace BT with Antibody buffer.
Spin at 3,000 rpm (<1,000 g) for 2 minutes and change to 1 ml fresh Antibody buffer.
Shake for 30 minutes at room temperature.
Repeat spin and Antibody buffer exchange.
Shake for 30 minutes at room temperature.
Spin at 3,000 rpm (<1,000 g) for 2 minutes and change Antibody buffer to Block.
Shake in block for 1 hour at room temperature.
Spin at 3,000 rpm (<1,000 g) and change to PBST (phosphate buffered saline with 0.5% triton).
Repeat spin and PBST exchange.
[Optional: Fixed worms can be stored for one month at 4°C or many months at -20°C.]
Proceed with blocking and staining (see Staining tube-fixed worms protocol).
| Bouin's fix with methanol/β-mercaptoethanol (Bouin's MB Fix) |
| 400 ul Bouin's Fix Stock Solution |
| 400 ul Methanol |
| 10 ul β-mercaptoethanol |
Mix ingredients in hood (wear gloves and lab coat).
Optional: Plain Bouin's fix solution
| 75 ml Saturated picric acid (kept under hood) |
| 25 ml Formalin (37% formaldehyde solution) |
| 5 ml Glacial acetic acid |
Mix ingredients in hood (wear gloves and lab coat) and store at 4°C.
| 40X Borate buffer stock |
| 6.2 g H3BO3 (1 M) |
| 2.0 g NaOH (0.5 M) |
Add dd water to 100 ml.
Store at room temperature.
Dilute with dd water to use.
| Borate triton solution (BT) (for 100 ml) |
| 2.5 ml 40X Borate buffer stock (final 25 mM) |
| 0.5 ml Triton X-100 (final 0.5%) |
| 93 ml dd water |
Mix well and store at 4°C.
| Borate triton β-mercaptoethanol solution (BTB) (for 100 ml) |
| 2.5 ml 40X Borate buffer stock (final 25mM) |
| 0.5 ml Triton X-100 (final 0.5%) |
| 2 ml β-mercaptoethanol (final 2%) |
| 95 ml dd water |
Mix well.
Make up fresh.
Phosphate Buffered Saline (PBS)
Phosphate Buffered Saline with Triton (PBST)
PBS + 0.5% Triton X-100
Antibody buffer
This fixation procedure uses formaldehyde as a fixative and is done on worms in tubes. It is similar to the Tube fixation and Bouin's tube fixation protocols, but uses relatively simple chemical treatments instead of collagenase to increase permeability of the cuticle (Finney and Ruvkun, 1990). This procedure is more reproducible and less expensive than the collagenase treatment, but does not work as well for some proteins.
You can prepare a stock of fixed and permeabilized worms and store them at 4°C or -20°C until needed.
Procedure 15. Fixation
Use 1-10 plates of healthy, well-fed worms.
Wash the worms from the plates with M9 buffer and collect in a 1.5 ml or 15 ml tube.
Spin the worms at 2000 rpm (~400 g) for 2-3 minutes.
[Optional: To enrich for adults, let the worms settle for 5 minutes at room temperature.]
Remove the supernatant and repeat M9 wash until ~ all bacteria are gone and solution is clear.
Transfer worms to a new screw cap 1.5 ml tube, using dd water.
Top tube with dd water.
Spin 2 minutes at 2,000 rpm (~400 g).
Remove all but 0.5 ml of solution.
Put on ice for 2-3 minutes.
Add 0.5 ml ice cold (TOXIC) Fixation Solution.
Put tightly capped tube in a dry ice + 95% ethanol bath for 1 minute (to crack the cuticles).
[Optional: Use liquid nitrogen.]
Defrost tube with warm water.
[Optional: Repeat freeze thaw up to three more times to crack more worms.]
Shake for 10 minutes to overnight at 4°C.
[Optional: Store frozen and fixed worms indefinitely at -20°C.]
Procedure 16. Permeabilization
Spin at 10,000 rpm (>2,000 g) for 1 minute.
Remove fix (discard safely) and change to Tris-Triton Solution (TT).
Repeat spin and TT rinse.
Remove TT and replace with Tris-Triton β-mercaptoethanol Solution (TTB).
Shake in TTB at 37°C for 1-12 hours (longer incubations after longer fixations).
Spin at 3,000 rpm (<1,000 g) for 2 minutes (low speed since the worms are more fragile).
Transfer worms to a 15 ml screw cap tube containing 10 ml Borate buffer solution (BB).
Spin at 3,000 rpm (<1,000 g) for 2 minutes and change to Borate buffer + DTT.
Shake gently for 15 minutes at 37°C.
Spin at 3,000 rpm (<1,000 g) for 2 minutes and change to Borate buffer.
Spin at 3,000 rpm (<1,000 g) for 2 minutes and change to Borate buffer + peroxide.
Shake gently for 15 minutes at room temperature.
Spin at 3,000 rpm (<1,000 g) for 2 minutes and change to Borate buffer.
Spin at 3,000 rpm (<1,000 g) for 2 minutes and replace Borate buffer with Antibody buffer.
Shake gently for 15 minutes at room temperature.
Spin at 3,000 rpm (<1,000 g) for 2 minutes and move worms to 1.5 ml tube with Antibody buffer.
[Optional: Store worms in Antibody buffer 1 month at 4°C or many months at -20°C.]
Proceed with blocking and staining (see Staining tube-fixed worms protocol).
| Fixation solution (for 1 ml) |
| 80 ul 2 M KCL (final 160 mM) |
| 20 ul 2 M NaCl (final 40 mM) |
| 20 ul 1 M Na2EGTA (final 20 mM) |
| 10 ul 1 M Spermidine HCl (stored in 100 ul aliquots at −30°C; final 10 mM) |
| 30 ul 1 M NaPIPES pH 7.4 (final 30 mM) |
| 240 ul dd water |
| 500 ul Methanol (final 50%) |
| 100 ul 16% formaldehyde (reagent grade from ampoule) |
Mix well in screw cap 1.5 ml tube, chill on ice, and use immediately.
Options: Vary formaldehyde concentration from 0.5 - 4 %.
| Tris Triton solution (TT) (for 10 ml) |
| 1 ml 1 M Tris pH 7.4 (final 100 mM) |
| 100 ul Triton X-100 (final 1%) |
| 20 ul 0.5 M EDTA, pH 8 (final 1 mM) |
| 8.9 ml dd water |
Mix well and store at 4°C.
| Tris Triton β-mercaptoethanol solution (TTB) (for 1 ml) |
| 1 ml Tris-Triton Solution |
| 1 ul β-mercaptoethanol (final 1%) |
Mix well and use the same day.
| 40X Borate buffer stock |
| 6.2 g H3BO3 (1 M) |
| 2.0 g NaOH (0.5 M) |
Add dd water to 100 ml.
Store at room temperature.
| 1X Borate buffer solution (BB) (for 100 ml) |
| 2.5 ml 40X Borate buffer stock (final 25 mM H3BO3) |
| 10 ul Triton X-100 (final 0.01%) |
| 95 ml dd water |
Adjust pH to 9.5 with NaOH.
Add dd water to 100 ml.
Store at room temperature.
| Borate buffer + DTT (for 10 ml) |
| 10 ml 1X Borate buffer solution |
| 100 ul 1 M Dithiothreitol (DTT, stored in aliquots in dark at -20°C) (final 10 mM) |
Mix well and use immediately.
| Borate buffer + peroxide (for 10 ml) |
| 10 ml 1X Borate buffer solution |
| 100 ul 30% stabilized H2O2 (final 0.3%) |
Mix well and use immediately.
Antibody buffer
This is a very “hard” fixation protocol that is used to crosslink the small diffusible neurotransmitters dopamine and octopamine (Monastirioti et al., 1995). Serotonin, GABA, and FMRFamide-related peptides do not require this fixative, but instead can be fixed with 4% formaldehyde or 4% formaldehyde/1% glutaraldehyde for 24 hours (Desai et al., 1988; Li and Chalfie, 1990; McIntire et al., 1992).
The fixation can be done on worms prepared on slides or in tubes.
The fixation procedure greatly increases autofluorescence of the cuticle and the entire worm, so it should only be used if absolutely required.
With either protocol, wear gloves and a lab coat while working with fix and during the initial rinses.
Dispose of the used fix safely: Picric acid is toxic and explosive.
Procedure 17. Using slides
Put PBS-S and PBS-S-Triton at 4°C, and leave PBS-S-Borate at room temperature.
In Hood: Put TOXIC fix into a covered coplin jar on ice.
Make frozen worm sandwiches on "Lab-made" poly-lysine slides (see Freeze-crack protocol).
Crack slides and immediately place into fix in jar on ice in hood for 1-4 hours.
Remove fix (discard safely) and top with PBS-S.
Rinse 5 X 15 minutes with PBS-S on ice; discard initial rinses in hood sink with water.
Incubate slides in PBS-S-Borate for 20-30 minutes at room temperature.
Rinse 2 X 20 minutes in PBS-S at 4°C.
Rinse 2 X 30 minutes in PBS-S-Triton at 4°C.
Proceed with blocking and with staining as described in Staining slides protocol.
Procedure 18. Using tube-fixed worms
Place TOXIC fixative on ice in hood.
Put PBS-S at 4°C, leave PBS-S-Borate at room temperature (no PBS-S-Triton needed).
Harvest and clean 1-10 plates of worms as usual, using M9 and ending with worms in a 1.5 ml screw cap tube in dd water (see Tube fixation protocols).
Spin 2 minutes at 2,000 rpm (<400 g).
Remove all but 50-100 ul of solution.
Put on ice for 2-3 minutes.
In hood: Add 1 ml TOXIC Fix Solution to tube.
Put in beaker containing dry ice + 95% ethanol for 2-3 minutes.
Optional: Use liquid nitrogen.
Defrost with warm water.
Repeat the freeze and defrost steps 1-2 times (to crack as many worms as possible).
Put on shaker at 4°C for 12-24 hours.
Spin at high speed for one minute.
In hood: Remove fixative (discard safely), and top with PBS-S.
Rinse 5 X 15 minutes with PBS-S on shaker at 4°C; discard initial rinses in hood sink with water.
Incubate for 20-30 minutes in PBS-S-Borate at room temperature.
Rinse 2 X 20 minutes with PBS-S on shaker at 4°C.
Spin 3 minutes at high speed and remove supernatant.
Add a volume of Collagenase solution similar to the volume of worms (50-100 ul).
Put on shaker at 37°C at 250 rpm for 24-36 hours.
After 12 hours, monitor the worms as described in Tube fixation protocol.
Continue with rinses and staining as in Tube fixation and Staining tube-fixed worms protocol.
| Picric acid + glutaraldehyde fix (for 40 ml for small coplin jar): TOXIC |
| 30 ml Saturated aqueous picric acid (store under hood) |
| 10 ml 25% glutaraldehyde (reagent grade) (final 6.25%) |
| 0.2 ml Glacial acetic acid |
| 0.4 g Sodium metabisulfite (Na2S2O5) (final 1%) |
Mix and use in hood. Wear gloves and a lab coat.
Glutaraldehyde is toxic and carcinogenic, picric acid is toxic and carcinogenic and dry picric acid is explosive!! Any picric acid spills must be immediately wiped up and the wet towels must be rinsed out well with water and discarded in the biohazard waste.
For fixing in 1.5 ml tubes, use 1/10th the amounts.
| PBS-S (for 1 liter) |
| 13.8 g NaH2PO4-H2O (0.1 M final) |
| 8.77 g NaCl (final 150 mM) |
| 10 g Sodium metabisulfite (Na2S2O5) (final 1%) |
Mix and add dd water to 900 ml.
Adjust pH to 7.4 with HCl or NaOH.
Add dd water to 1 liter.
Store at 4°C.
| PBS-S-Triton (for 100 ml) |
| 100 ml PBS-S |
| 300 ul Triton X-100 (final 0.3%) |
Store at 4°C.
| PBS-S-Borate (for 50 ml) |
| 50 ml PBS-S |
| 250 mg Sodium borate decahydrate (Na2B4O7-10H2O = Borax) (final 0.5%) |
| Store at 4°C. |
Collagenase solution:
The following procedures are used for purifying antibodies when you have a null mutant that does not produce the protein of interest. In some cases, your affinity purified antibody may be specific enough that you do not need to do affinity depletion (see Affinity purification protocol). However, if the antibody shows non-specific staining, you may be able to improve its specificity with this technique.
Start with serum that has been affinity-depleted with bacteria and/or affinity-purified with peptide/protein and/or is untreated. The more the serum is pretreated, the more likely it is to work nicely after affinity-depletion with null worms. The simplest way to deplete serum with bacteria is by incubation in commercially available bacteria acetone powder (Harlow and Lane, 1988). If you used a fusion protein to generate your antibody, you can deplete your primary antibody with a protein preparation from the same bacterial system expressing an unrelated fusion protein.
The exact protocol to follow for cleaning primary antibodies with worms depends upon the volumes of serum and worms you have and the fixation technique you plan to use. Match the fixation technique you use for depleting the serum with the fixation conditions you plan to use to stain worms.
Start with incubating the (treated) serum with a volume of worms approximately equal to the original volume of (untreated) serum. The actual volume of treated serum that you use may be much greater than the volume of the worms, since most serum treatments lead to more dilute antibody. For example, if you started with 1 ml of serum and affinity purified it and ended up with 4 ml of solution, you would like to use 1 ml of worms.
Worm-depleted antibody is not as stable as non-cleaned antibody. Freeze or use the depleted antibody as soon as possible.
If the worm depletion works, then you can try depleting with fewer worms.
If your worms are hard to grow, you should be able to improve the specificity of your antibody, even if you can only clean a tiny volume of serum with an even smaller volume of worms.
Procedure 19. For formaldehyde-fixed nulls
Grow several plates of null worms.
Try to use a volume of fixed worms equal to the original volume of the primary serum.
Rinse worms off plates with water (food can be present) and collect in screw cap 1.5 ml tubes.
Do not rinse more than necessary to collect the worms in the tubes.
Spin the tube(s) of worms 5 minutes at high speed in a tabletop centrifuge (breaks some worms).
Add 1 ml TOXIC Fix Solution (e.g., 1% Formaldehyde Solution).
Put in dry ice + 95% ethanol bath for 2-3 minutes.
[Optional: Use liquid nitrogen.]
Defrost with warm water.
Repeat the freeze and defrost steps 1-2 times (to crack as many worms as possible).
Leave tube shaking vigorously at room temperature for one hour.
Spin 2 minutes at high speed, remove fixative (discard safely), and top with PBS.
Spin 2 minutes at high speed, and exchange PBS.
Repeat rinse and spin.
Shake 15 minutes at room temperature.
Repeat rinse and spin 2 times.
[Optional: Store extra worms at -20°C until needed.]
Remove PBS and add serum.
If necessary, dilute serum up to 1:10 with Antibody buffer so the worms are surrounded by the fluid.
Incubate with vigorous shaking for 1-4 hours at room temperature.
Spin 2 minutes at high speed and remove supernatant and save for staining wild-type worms.
Use a small volume of antibody buffer to recover more of the serum: add to worms, shake, spin, remove supernatant, and add to previous supernatant.
Procedure 20. For methanol/acetone-fixed nulls
Follow above protocol except:
Replace formaldehyde with a 1:1 mixture of methanol and acetone.
Replace dry ice + ethanol bath with liquid N2 to freeze worms.
Methanol/Acetone does not freeze in dry ice + 95 % ethanol.
Incubate in fixation solution for only 15 minutes.
Only 4 PBS rinses need to be done to rinse out the fixation solution.
Procedure 21. For nulls that are difficult to grow
Follow above protocol except:
Pre-incubate the tube for collecting worms with Antibody buffer.
Be sure all spins are long enough and fast enough to collect all worms.
After freeze/thaws, use an Antibody buffer- soaked tiny pestle to grind up the worms.
[Optional: Use a micro sonicator.]
Use three rinses of Antibody buffer at the end to collect the worm depleted serum.
Procedure 22. For nulls that are extremely difficult to grow
Do all of the incubation and rinses on individual slides.
Generally follow the Freeze-crack protocol.
Collect worms in a drop of water on a very sticky lab-made poly-lysine slide.
Top with a commercial poly-lysine slide and place on dry ice.
Prepare a flat humidified dish with lid.
Crack slides and place bottom slide in the flat dish.
Carefully place fix (1% formaldehyde or 1:1 methanol:acetone) on top of slide.
Leave fix on for one hour (formaldehyde) or 5 minutes (methanol:acetone).
Carefully draw off fix, trying to leave any worm pieces on slide.
Rinse several times with PBS, trying to leave any worm pieces on slide.
Rinse once with Antibody buffer.
Make a well around the fixed worms with a grease pencil.
Put diluted serum on slide for one hour (keep dish covered to prevent evaporation).
Carefully remove serum with fine tipped pipette and save in a 1.5 ml tube.
Use depleted antibody on a new slide on wild-type worms.
| Formaldehyde solution |
| See Freeze-crack protocol. |
| Phosphate Buffered Saline (PBS) |
| See Freeze-crack protocol. |
| Antibody buffer |
| See Staining slides protocol |
| "Lab-made" poly-L-lysine Slides |
| See Freeze-crack protocol |
Some secondary antibodies contain a significant level of anti-worm antibodies and should be cleaned (affinity depleted) for the highest staining specificity.
You can determine whether you need to clean your secondary antibody by incubating some fixed worms with 1:100 dilution of your secondary. If you see significant staining of your worms with the secondary alone, you can clean the secondary as described below.
Start with a volume of fixed worms approximately equal to the volume of the secondary.
Incubation #1:
Put 0.5-1.0 ml secondary into a new 1.5 ml screw cap tube.
Add 0.5 volumes of ‘Fixed worms for cleaning’ and cap tightly.
Put in light tight canister (e.g., empty film canister).
Shake vigorously at 4°C for several hours to overnight.
Spin tube 2 minutes at high speed in a table-top centrifuge.
Transfer the secondary into a new tube.
Add 0.2 ml PBS to the original tube with worms and spin again 2 minutes.
Transfer any remaining worm-free liquid to the new tube of secondary.
Add 0.2 ml PBS to the original tube with worms and spin again 2 minutes.
Transfer any remaining worm-free liquid to the new tube of secondary.
Discard used worms.
Repeat spin and transfer as needed to remove any worms and recover all antibodies.
Incubation #2:
Repeat incubation #1 if you had a lot of staining with your secondary.
Fixed worms for cleaning:
Wash 10 or more plates with M9 and collect into a 15 or 50 ml conical tube.
Spin 2 minutes at 1,000 rpm (<400 g).
Use dd water to move worms to one or more 1.5 ml screw cap tubes.
Spin the tube(s) of worms 5 minutes at high speed in a tabletop centrifuge (breaks some worms).
Add 1 ml TOXIC Fix solution per tube (1% Formaldehyde solution).
Put in dry ice + 95% ethanol bath for 2-3 minutes.
[Optional: Use liquid nitrogen.]
Defrost with warm water.
Repeat the freeze and defrost steps 1-2 times (to crack as many worms as possible).
Leave tube shaking vigorously at room temperature for one hour.
Spin at high speed, remove fixative (discard safely), and top with PBS.
Spin at high speed, and exchange PBS two more times.
Shake 15 minutes at room temperature.
Repeat spin and exchange and 15-30 minutes shaking 2-3 more times.
Remove the PBS.
Add approximately 0.5 volumes PBS.
Aliquot worms into 1.5 ml screw cap tubes.
Drop the tubes into a dry ice and 95% ethanol bath (to crack worms again).
Store at -20°C until needed.
Fix solution
| See Freeze-crack protocol |
Phosphate Buffered Saline (PBS)
| See Freeze-crack protocol |
Antibody buffer
| See Freeze-crack protocol |
These techniques are for staining slides generated with the Freeze-crack protocol (Strome and Wood, 1982; Albertson, 1984; Miller and Shakes, 1995; Duerr et al., 1999). See the Staining tube-fixed worms protocol for staining worms in 1.5 ml tubes.
GFP plus antibodies: GFP fluorescence is partially preserved by some fixation techniques. Generally, it withstands formaldehyde better than glutaraldehyde, acetone, or methanol. If you wish to examine antibody staining in a GFP+ strain, use a red secondary antibody (e.g., Cy3) to label your protein to avoid possible cross-talk with the GFP. If you want to examine antibody staining and GFP in the same worms, you can use one of the commercially available anti-GFP antibodies (Chemicon chicken anti-GFP or BD #8367 rabbit anti-GFP) and a green (e.g., Alexa 488 or Oregon Green 488) secondary to examining the distribution of your GFP. In some cases, anti-GFP antibodies can be more sensitive than GFP fluorescence.
Procedure 23. Block non-specific protein binding
Put the slides into a dish with Block for 1 hour at room temperature or overnight at 4°C.
Filter and save Block (see notes).
Proceed to Staining with large volumes of primary antibody or staining with small volumes of primary antibody.
Procedure 24. Staining with large volumes of primary antibody
Staining slides in jars of antibody gives the best staining.
Pour Primary antibody solution into a coplin jar or a smaller staining vessel.
[Optional: Use small plastic holders designed to hold two slides or five slides.]
Transfer slides (back-to-back) from block into jar of primary.
Incubate overnight at 4°C.
Filter and save the primary antibody (see notes).
Pour in PBS.
Proceed to secondary antibody step.
Procedure 25. Staining with small volumes of primary antibody
Placing antibodies directly on slides uses much less antibody, but gives less uniform staining.
Place slides in a very flat sealable ‘box.’ Two stacked 96-well plate lids work well as a ‘box’ to hold ~3 slides each.
Humidify the ‘box’ with dd water (and damp towels, if necessary).
Be sure the dish is flat on the counter in its final resting place.
Remove a slide from the block.
Completely dry the back and outer edges of the slide with a kimwipe.
Draw a circle around the worms with a grease pencil (available at art stores).
The surface that you draw on needs to be dry or the wax will not stick.
Option: You may also use a PAP pen, but the grease pencil is much cheaper.
Put the slide with the circle face up in the ‘dish.’
Slides must not be in contact with water or with each other.
Put on primary (20-100 ul per slide) as quickly as possible.
Cover the ‘box’ with another 96-well plate lid.
Leave overnight at room temperature on counter (do not move).
If the antibody is especially precious, it can be recovered the next day using a micropipette.
Antibodies have been reused up to 2 times on new slides.
Rinse slides gently with PBS from a squirt bottle (do not squirt directly on worms).
Put slides back-to-back in a new coplin jar of PBS.
Proceed to secondary antibody step.
Procedure 26. Secondary antibody
Pour out PBS from jar.
Add antibody buffer to jar and leave at room temperature for 30 minutes.
[Optional: Gentle rocking will increase specificity, but will shake lose some worms.]
Exchange Antibody buffer and leave at room temperature for 30 minutes (optional shaking).
Repeat Antibody buffer exchange and 30 minutes of incubation.
Remove Antibody buffer.
Add secondary antibody solution.
Option: Use small plastic holders designed to hold two or five slides.
Cover well to protect from light.
Let sit 4 hours at room temperature (MAb or PAb) or overnight at 4°C (PAb).
Pour off, filter, and save secondary antibody.
Pour in, then immediately pour out, PBS.
Add Antibody buffer to jar and leave at room temperature for 30 minutes (optional shaking).
Exchange Antibody buffer and leave at room temperature for 30 minutes to overnight at 4°C.
Overnight incubation may improve staining of high affinity antibodies, but may decrease staining with low affinity antibodies.
Change solution to PBS.
After at least 5 minutes, the slides are ready for ‘mounting.’
Procedure 27. Mounting slides
Remove a slide from the PBS and place on a dry paper towel.
Work quickly so that the top of the slide stays wet.
Dry the back of the slide with a kimwipe.
Place 2 small drops (~20 ul) of TOXIC mounting medium over worms.
There should be approximately equal volumes mounting medium and PBS on the slide.
Tilt slide to mix the mounting medium with the PBS.
Gently put down edge of 24 × 60 mm coverslip on the slide starting near the frosted edge.
Use fine forceps or your fingertips to hold and lower the cover slip.
Slowly let coverslip down; try not to let any air bubbles form.
If air bubbles form, lift the edge of the coverslip slowly, add more PBS and then lower the coverslip again without disturbing the worms.
Carefully dry off the edge of the slide (without moving the coverslip).
Seal the coverslip with two to three layers of nail polish.
Store slides in a flat dark holder while nail polish is drying.
After the polish is dry, if needed, carefully clean off the outer surfaces of the slide and coverslip.
Keep the slides dark and cold to preserve staining.
Antibody staining in sealed slides persists for days at 4°C or months at -20°C.
DAPI staining of DNA fades and spreads after weeks at -20°C.
Reseal the coverslip with more nail polish as needed, e.g., after using any oil immersion lens.
Exposure to air will cause the fluorescence to fade.
Procedure 28. Antibody controls
The following work well on tissues fixed with a variety of different protocols:
| Mouse anti-DNA (Chemicon Mab030 anti-DNA). |
| Mouse anti-tubulin (Amersham N357 anti-beta tubulin). |
| Mouse anti-actin (Calbiochem Ab-1 anti-actin; ICN Biochemicals C4 anti-actin). |
If your antibody was made in mouse, try rabbit polyclonal anti-actin antibodies.
Test your fixation conditions and tissue permeability with known specific antibodies.
Always test the specificity of your primary and secondary antibodies.
Possible tests:
| Pre-absorb your primary antibody with your antigen. |
| You can use the eluate from the Antibody purification protocol. |
| Block specific binding by adding antigen to the primary antibody on slide during incubation. |
| Examine null mutants or, if unavailable, partial loss of function mutants for decreased staining. |
| Generate RNAi worms and examine staining. |
| Examine transgenic over-expressing lines for increased staining. |
If your worms were lightly fixed (e.g., methanol and acetone), you can do just two rinses of 20-30 minutes each after the primary and secondary antibodies incubations. Even shorter incubations and rinses may be attempted, but will decrease the signal to noise ratio for some antibodies.
If you need to use two antibodies that have both been generated in the same species, then double staining with both antibodies may be problematic. It is possible that the two antibodies will be different subtypes (e.g., IgG vs. IgM) and you can use subtype specific secondary antibodies. If not, you can easily directly label the primary antibodies with an activated fluorescent dye (available from Molecular Probes). Unfortunately, this removes one round of signal amplification, so only abundant proteins are likely to be detectable with directly labeled primaries.
You may stain filamentous actin with fluorescent phalloidin (Molecular Probes). After the secondary antibody and the rinses in Antibody buffer, but before the final PBS rinse, remove the slide from the jar and place in a humidified dish. Cover the worms with 100 ul PBS containing 1 unit of fluorescent-phalloidin and incubate 30 minutes in the dark. Place the slide in a coplin jar of PBS for 20 minutes in the dark before mounting. Be sure to pick a color of fluorescent phalloidin that is compatible with your secondary antibodies.
To see DNA with DAPI, you will need to illuminate the tissue with UV light. UV bleaches some fluorescent probes, especially green dyes such as fluorescein. Therefore, examine your green (and red) fluorescent staining before looking at the DAPI.
You may use propidium iodide (fluoresces red) to label DNA and RNA instead of DAPI (which fluoresces blue and binds DNA specifically).
For more comments on block, secondaries, and mounting medium, see below under the individual solutions.
Avoid repeated rounds of freezing and thawing of antibodies (or any other proteins). If you do refreeze a protein solution, be sure that it contains 1% or more protein.
| Antibody buffer (for 1 L) |
| 100 ml 10X PBS (see Freeze-crack protocol) |
| 5 ml Triton X-100 (0.5% final) |
| 2 ml 0.5 M EDTA, pH 8 (1mM final) |
| 1 g Bovine serum albumin (BSA) (0.1% final) |
| 0.3 g Sodium azide (0.05% final)-TOXIC |
Add ~700 ml dd. water to 10X PBS.
Add Triton X-100, EDTA, BSA, and sodium azide.
Adjust pH to 7.2 with HCl.
Add dd water to 1 L.
Store at 4°C.
| Block (for 100 ml) |
| 1 bottle Lyophilized serum albumin (for 10 ml) |
| 10 ml dd water |
| 90 ml Antibody buffer |
Use 10 ml dd water to reconstitute the serum albumin.
Add to 90 ml Antibody buffer.
Store at 4°C (or long term at -20°C).
Filter after each use by pouring through a funnel lined with a Whatman #1 filter.
Filter sterilize it with a low protein-binding filter to prolong shelf-life (1+ month at 4°C).
| Primary antibody solution |
| Antibody buffer with 1% BSA |
| OR Block (Antibody buffer with 10% serum) |
| 1:50-1:2,000 purified polyclonal antibody |
| OR 1:1- 1:100 monoclonal antibody supernatant |
| OR 1:10-1:10,000 monoclonal antibody ascites fluid |
Store at 4°C (or long term at -20°C).
| Secondary antibody solution |
| Antibody buffer with 1% BSA |
| OR Block (Antibody buffer with 10% serum) |
| 1:500-1:2,000 fluorescent Donkey anti-(mouse/rabbit/chicken/goat/etc.) |
Store in dark at 4°C (or long term at -20°C).
| Mounting medium (for 10 ml) |
| 200 mg n-Propyl gallate |
| 0.3 ml 1 M Tris pH 9 |
| 2.7 ml dd water |
| 7 ml Glycerol |
| 8 ul DAPI (TOXIC) (2.5 mg/ml in dd water; stored in 8 ul aliquots at -20°C) |
Mix n-Propyl gallate, dd water, and Tris in 15 ml conical tube.
Heat at 65°C for ~10 minutes (until dissolved).
Add glycerol and DAPI and vortex well.
Wrap in foil; store in dark at 4°C.
Aliquot into 1.5 ml tubes for use (to minimize exposure to air and light).
Use this protocol for staining worms prepared with the Tube fixation, Bouin's tube fixation, Peroxide tube fixation protocol, and Picric acid + glutaraldehyde fixation protocols (Finney and Ruvkun, 1990). See comments at the end of this protocol for possible variations in the procedure with different fixation conditions.
For more comments on using antibodies to stain worms, including primary controls, choice of secondaries, double staining, etc., see the Staining slides protocol.
Procedure 29. Block non-specific protein binding
Put 250 ul Block into a 0.5 ml tube.
Add 5-10 ul fixed worms.
Shake for 1 hour at room temperature or overnight at 4°C.
Procedure 30. Primary antibody
Make up 50 ul Primary antibody solution (in Block).
You may use less primary if it is precious.
Spin the tube of worms in Block at 3,000 rpm for 2 minutes.
Remove Block and add Primary antibody solution.
Shake overnight at 4°C.
Spin at 2,000 rpm for 2 minutes.
Remove primary antibody solution and save for reuse, if desired.
Top tube with Antibody buffer.
Shake 15 minutes at room temperature.
Repeat spin, rinse with Antibody buffer and 15 minutes of shaking two more times.
Procedure 31. Secondary antibody
Add 50-100 ul Secondary antibody solution.
From this point on, shield worms and fluorescent Secondary antibody solution from the light.
Shake tube in a film canister or similar light-tight container overnight at 4°C.
[Option: If your worms were only lightly fixed, incubate 2-4 hours at room temperature.]
Spin at 2,000 rpm for 2 minutes, and remove Secondary antibody solution.
Top tube with Antibody buffer.
Shake 15 minutes at room temperature.
Repeat spin, rinse with Antibody buffer, and 15 minutes of shaking two more times.
Spin at 2,000 rpm for 2 minutes, remove Antibody buffer, and top with PBS.
[Option: Worms can be stored in the dark at 4°C for a day if the antibodies have high affinities.]
Procedure 32. Mounting worms
Spin tube of stained worms in PBS at 2,000 rpm for 2 minutes.
Remove most of the PBS.
Place a small (10 ul) drop of worms on a clean slide.
[Option: If the worms are fragile (collagenase treated and/or lightly fixed), use wire slides. Apply a similar size drop of Mounting Medium and cover with a (20 mm x 20 mm) cover slip.]
Be sure that there are no air bubbles, since they will decrease the longevity of the fluorescence.
Dry edges of slide around cover slip.
Seal cover slip with two to three layers of nail polish.
Store slides in a flat dark holder while nail polish is drying.
After the polish is dry, if needed, carefully clean off the outer surfaces of the slide and coverslip.
Keep the slides dark and cold to preserve staining.
Antibody staining in sealed slides persists for days at 4°C or months at -20°C.
DAPI staining of DNA fades and spreads after weeks at -20°C.
Reseal the coverslip with more nail polish as needed, e.g., after using any oil immersion lens.
Exposure to air will cause the fluorescence to fade.
Antibody controls
See Staining slides protocol for controls.
If the worms are relatively fragile (e.g., collagenase-treated or fixed in 0.5% formaldehyde), then do the spins at 1,000 rpm (~200 g) and shake gently or rock during incubations.
If the worms are tough (e.g., fixed with glutaraldehyde), then do the spins at 3,000 rpm (~1,000 g) and shake vigorously during incubations.
You may stain filamentous actin with fluorescent phalloidin (Molecular Probes) by adding it to the secondary antibody (<1 unit per tube).
Use wired slide to prevent fragile worms from being compressed by the coverslip.
Phosphate buffered saline (PBS)
Block solution
Primary antibody solution
Secondary antibody solution
Wire slides
These slides are designed to keep fragile worms from being compressed by the cover slip.
Clean regular ‘clean’ microscope slides with kimwipes.
Line up a number of slides on the counter in columns (with labels of the left).
Place two strands of fine (30-75 um) wire (e.g., from WPI), so that the wire goes down the columns.
The two wires go over the clear part of the slide ~20 mm apart.
Tape the wires down at the top and bottom of the columns.
Glue the wire with tiny drops of nail polish at the top and bottom of each slide.
After the polish has dried, cut the wire above and below each slide with a razor.
This is a simple procedure to crack washed nematodes in a solubilizing and denaturing buffer (Francis and Waterston, 1985). For very abundant proteins, 10 minutes at 95°C in 1X protein dye (i.e., no special buffer) may be sufficient.
The need for each inhibitor in the protease inhibitor mix has not been carefully examined. The detection of some, but not all, antigens is enhanced in the presence of the inhibitor mix. You can test your individual protein to see if the inhibitor mix is necessary.
Be sure all reagents and tools are on hand before starting.
Procedure 33. Sucrose wash worms
Wash 10 plates with M9 and collect into a 15 or 50 ml conical tube.
Spin 2 minutes at 1,000 rpm (~200 g).
Change to fresh M9.
Repeat spin and exchange 2 more times, ending with a spin.
Place worms on ice 2 minutes.
Remove M9.
Add Sucrose solution.
Immediately spin at 4°C at 1,000 rpm (~200 g) for 5 minutes.
Immediately aspirate worms from top of fluid into new 15 ml conical tube.
Immediately add water to dilute residual sucrose.
Spin 1,000 rpm (~200 g) for 2 minutes.
Retain pellet of intact worms in small amount of fluid.
Use M9 to transfer worm ‘pellet’ to a screw cap 1.5 ml tube.
Wash 3X with M9 (alternate 2 minute 2,000 rpm spins and exchange of M9).
Remove fluid and leave worm pellet.
Procedure 34. Expose worm proteins
Add a volume of Nematode solubilization buffer that is equal to the volume of the worm pellet.
Immediately cap tightly and microwave 25 sec on high (for ~100 ul worms).
Immediately add equal volume 2X protein dye + 2 ul 100X (extra) protease inhibitor.
Immediately place in boiling water bath for 7 minutes.
Quickly draw lysate into a syringe through a 26 gauge needle.
Quickly force the lysate back through the needle into a new 1.5 ml tube (on ice).
Spin 1 minute at high speed to remove insoluble components.
Quickly transfer supernatant into a new tube (on ice).
Immediately run on gel or store aliquots at -80°C.
NSB aliquots can be defrosted and refrozen two times (mark tubes before refreezing).
If your protein is robust, you may be able to omit the protease inhibitor.
If your protein is abundant and robust, you may be able to omit the NSB and protease inhibitor.
See Worm protein gel protocol for running your protein out on a mini-gel apparatus
| M9 |
| See Freeze-crack Protocol |
| Sucrose solution |
| 35 g Sucrose |
| Add dd water to 100 ml and stir and heat to dissolve fully. |
| Store at 4°C. |
| Nematode solubilization buffer (for 10 ml) |
| 30 ul Ethanolamine (final 0.3%) |
| 40 ul 0.5 M EDTA (final 2 mM) |
| 100 ul 0.1 M PMSF (in isopropanol or DMSO) (final 1 mM) |
| 50 ul 1 M Dithiothreitol (DTT, stored in aliquots in dark at −20°C) (final 5 mM) |
| 100 ul 100X protease inhibitor (final 1x) |
Mix ingredients and add dd water to 10 ml.
Aliquot 100 ul per tube and keep frozen at -80°C.
100X protease inhibitor (for 10 ml)
Have labeled tubes ready for aliquoting before mixing solutions.
Make DMSO stock (5 ml)
Put together in small tube:
| 17.4 mg PMSF (final 0.1 mM) |
| 1 mg Pepstatin A (final 1 ug/ml) |
| 1 mg Leupeptin (final 1 ug/ml) |
| 1 mg Chymostatin (final 1ug/ml) |
Add DMSO to 5 ml and vortex.
Make EDTA stock (5 ml)
| 157 mg Benzamidine (final 1 mM) |
| 1 mg TAME (N-α-p-Tosyl-L-arginine methyl ester HCl) (final 1 ug/ml) |
| 0.1 mg Aprotinin (final 0.1 ug/ml) |
| 1 ml 1 M EDTA (final 0.5 mM) |
| 1 ml 1 M EGTA (final 0.5 mM) |
| 3 ml dd water |
Mix fluids (EDTA, EGTA, and dd water) and add inhibitors and vortex briefly to mix.
Mix 5 ml DMSO stock and 5 ml EDTA stock.
Aliquot quickly into 5-10 ul aliquots and store frozen at -80°C.
This solution is really more of a suspension, so re-vortex as needed.
Be sure to suspend well by pipette before use.
Aliquots can be defrosted and refrozen several times.
| 2X protein dye (for 10 ml) |
| 0.5 ml dd water |
| 2.5 ml 0.5 M Tris, pH 6.8 |
| 2.0 ml Glycerol |
| 4.0 ml 10% SDS |
| 1.0 ml β-mercaptoethanol |
| 40 mg Bromophenol blue |
Mix ingredients and store in a capped conical tube at room temperature in hood.
This is a standard SDS-PAGE denaturing protein gel protocol (Harlow and Lane, 1988) for the Biorad Mini-PROTEAN II. Mini-gels provide simple and rapid separation of worm proteins. For transferring low abundance proteins to membranes for Westerns, a relatively thick (1.5 mm or 3.0 mm) gel can be useful.
| Assemble apparatus |
Check for clean, unscratched plates. Clean as needed with soapy water, kimwipes, and 70% ethanol.
For each gel, assemble 1 large and 1 small glass plate and 2-4 spacers as follows.
Place the spacers at the outside edges between the large and small plates.
Slide the plates in a gel holder (a.k.a. sandwich clamp assembly, see picture below).
Place the flat bottom of the gel holder on the counter.
Even up the bottom edges of the plates with the bottom of the holder.
Option: Use alignment card(s) between glass plates and spacers.
Screw in the 4 white screws of the holder so that the plates and spacers are held evenly.
If you turn the screws too tightly, you can break the glass; too loosely and the gels will leak.
Place a folded kimwipe over the red washer, and then place a thick gray washer over the kimwipe.
Snap the gel holder into the casting stand so that the bottom is over the washers.
| Make the bottom (separation) gel |
For two 9.4% gels, mix in order in a 50 ml beaker
| 0.75 mm thick | 1.5 mm thick |
| 4.2 ml dd water | 8.5 ml dd water |
| 2.5 ml 1.5 M Tris, pH 8.8 | 5 ml 1.5 M Tris, pH 8.8 |
| 100 ul 10% SDS | 200 ul 10% SDS |
| 3.1 ml 30% acrylamide/bis 29:1-TOXIC | 6.3 ml 30% acrylamide/bis 29:1-TOXIC |
| 50 ul 10% APS | 100 ul 10% APS |
| 5 ul TEMED -TOXIC- ADD LAST | 10 ul TEMED -TOXIC- ADD LAST |
Pour gel mix into space between plates, up to the level of the inner plastic edges (~1.5 cm from top).
Use pipette to drop a small amount of isopropanol on top of gel mix to even their top surfaces.
Let sit until set (so you can see a line between the gel and isopropanol, approximately 30 minutes).
Tilt apparatus and wick out the isopropanol with a kimwipe.
| Make the top (loading) gel |
For two top (loading) 4% gels, mix in order in 50 ml beaker
| 0.75 mm thick | 1.5 mm thick |
| 2.4 ml dd water | 6.1 ml dd water |
| 1.0 ml 0.5 M Tris, pH 6.8 | 2.5 ml 0.5 M Tris, pH 6.8 |
| 40 ul 10% SDS | 100 ul 10% SDS |
| 0.5 ml 30% acrylamide/bis 29:1-TOXIC | 1.3 ml 30% acrylamide/bis 29:1-TOXIC |
| 20 ul 10% APS | 50 ul 10% APS |
| 4 ul TEMED -TOXIC- ADD LAST | 10 ul TEMED -TOXIC- ADD LAST |
Pour gel mix on top of previous gel until it is near or even with the top of the glass plates.
Remove bubbles with fine pipette tip or kimwipe.
Carefully insert combs, introducing no new bubbles, so the combs' sides rest on the spacers.
After 5-10 minutes, you may pipette on more top gel to compensate for shrinkage.
Gel will be set and ready to use after 20-30 minutes.
[Optional: Wrap gel well in damp paper towel and plastic wrap and store at 4°C for <1 month.]
| Run gels |
Prepare 300 ml running buffer.
Check positions of gray washers in inner cooling core (flat for no gel or bumped for gel).
Snap two gel holders (with 1-2 gels) into inner cooling core.
Put inner cooling core with gels into tank.
Pour running buffer into central region of inner cooling core and check for leaks.
In case of leaks, examine the washers and tighten the screws. Reassemble, if necessary.
Pour excess running buffer into the bottom of the tank (it should reach the bottom of the plates).
Prepare the sample and marker:
See Worm protein preparation protocol.
For other samples, mix with equal parts 2X dye in screw cap 1.5 ml tube.
Heat samples (and aliquot of marker) at 100°C for 5 minutes.
[Optional: Heat sensitive proteins at 90°C for 10 minutes or 70°C for 20 minutes.]
Load samples (10-well combs have 5 mm wide wells; 15-well combs have 3 mm wide wells).
For 0.75 mm x 3mm wells, use up to 10 ul per well.
For 1.5 mm x 5mm wells, use up to 35 ul per well.
For double width prep well (one large well) use up to 300 ul.
Load 1-5 ul marker for each marker well (larger amount for Westerns).
Cover the tank and plug the leads into a power supply (be sure to match red leads).
Set the power supply for constant voltage.
Run the gel at 100-200 V for 35-60 min.
For concentrated worm protein, use 100 V.
The dye will run off the bottom with proteins of approximately 10 kD.
Stop power and remove the gel holders and slide out the glass plates + gel.
Use the gray spacers to separate the large and small glass plates.
Remove the gel.
Proceed to step Stain gel for protein fix and stain the gel OR Western Transfer to transfer protein from the gel to a membrane.
Procedure 35. Stain gel for protein
Place gel in dish and barely cover with Gel fixative with dye.
Put on shaker for 30 minutes.
Save and reuse or discard Gel fixative with dye.
Rinse gel and dish 1-2 times with dd water.
Pour in Gel destain and shake for >30 minutes (up to 3 hours), changing as needed.
Replace Gel destain with 5% glycerol in dd water.
Incubate gel overnight.
Take a picture of the gel.
Thick gels often crack during drying, so it is good to take a picture first.
Dry gel between clear cellophane using clamping apparatus or in a gel dryer.
Store dried gel in seal-a-meal bag.
Vary the percent acrylamide to optimize the separation of your protein (see below). Higher percentage acrylamide gels are better for resolving smaller proteins; lower percentage acrylamide gels are better for resolving larger proteins (but are fragile).
Protein preparations that have been added to protein dye and heated can be stored at 4°C or -20°C. Many preparations (but not all) will last weeks at -20°C. To run, defrost and load without reheating.
| 5X running buffer (for 1 L) |
| 15g Tris base |
| 72 g Glycine |
| 50 ml 10 % SDS |
| Add dd water to 1 liter |
| 5X running buffer (for 1 L) |
| 60 ml 5X Running Buffer |
| 240 ml dd water |
| Separation gels - variable % acrylamide |
For two 0.75 mm gels with 7.5% acrylamide
| 4.9 ml dd water |
| 2.5 ml 1.5 M Tris, pH 8.8 |
| 100 ul 10% SDS |
| 2.5 ml 30% acrylamide/bis-TOXIC |
| 50 ul 10% APS |
| 5 ul TEMED-TOXIC |
Mix in order.
| For two 0.75 mm gels with 12% acrylamide |
| 3.4 ml dd water |
| 2.5 ml 1.5 M Tris, pH 8.8 |
| 100 ul 10% SDS |
| 4.0 ml 30% acrylamide/bis-TOXIC |
| 50 ul 10% APS |
| 5 ul TEMED-TOXIC |
Mix in order.
2X protein dye
See Worm protein preparation protocol.
| Gel fixative with dye (for 1 L) |
| 500 ml dd water |
| 1 g Coomassie blue R-250 |
| 400 ml Methanol |
| 100 ml Acetic acid |
Mix well, store at room temperature.
Can be reused.
| Gel destain (for 1 L) |
| 500 ml dd water |
| 400 ml Methanol |
| 100 ml Acetic acid |
Mix well, store at room temperature.
For general information on Western Transfer protocols, see Harlow and Lane (1988) and Harlow (1999). These protocols are for transfer with two popular brands; the Biorad Mini-Protean II Trans-Blot (wet) Transfer Cell and the Owl Semi-Dry Apparatus.
Most (worm) proteins are relatively low in abundance. This is especially true if you are examining a tissue- specific protein, but are using protein from the entire worm.
Methods to increase sensitivity:
| Use a membrane with high binding capability. Nitrocellulose generally has higher binding than PVDF and different brands of nitrocellulose have different binding abilities. |
| A traditional ‘wet’ transfer apparatus may work better than a ‘semi-dry’ transfer apparatus. |
| Transfer slowly at a relatively low current, e.g., overnight at 4°C. |
| Use long incubation times in the antibody solutions to maximize staining. |
| Use a sensitive enzymatic substrate or a chemiluminescent substrate. |
Mouse anti-tubulin (e.g., Amersham N357 mouse monoclonal anti-beta tubulin) or mouse anti-actin (e.g., Calbiochem Ab-1 mouse monoclonal anti-actin) may be used as a positive control for protein loading and transfer.
Primary and secondary antibodies may bind non-specifically to many worm proteins. If you have a null mutant, you should make a Western Blot using protein from the mutant and compare staining with that seen with wild-type worms. You can also use the membrane from the null worm to affinity deplete your primary antibody (see Affinity purification protocol). If no null mutant is available, a partial loss-of-function mutant, RNAi strain or a (transgenic) over-expressing strain may be useful in determining which bands are specific for the protein of interest.
Membranes containing Western blots of worms may be used to pre-absorb the secondary antibody.
See the Staining slides protocol for more discussion of using antibodies to stain worm proteins, including primaries, secondaries, and controls.
Procedure 36. Transfer in Biorad Mini-Protean II Apparatus
Wear gloves (to protect the membrane from you and to protect you from the methanol).
Chill 1 L Transfer buffer to 4°C.
Fill a 600 ml beaker with ~100 ml dd water.
Gently take out 1-2 pieces of high quality nitrocellulose, holding only the edges with forceps.
Never touch the center of the membrane, this will cause blotchiness.
Cut the membrane slightly larger than the gel and mark a corner with pencil.
Set the nitrocellulose on edge in the beaker of water and let the water wick up the membrane.
Collect the following:
| 2 pieces of Whatman #3 filter paper about 3"X4" per gel. |
| 2 coarse white spongy filters per gel. |
| 9"X13" or similar size glass or plastic pan. |
| Conical tube or pipette to use as rolling pin. |
| Transfer holder, tank, lid, and black and white cassettes. |
Pour about half of the cold transfer buffer into the large pan.
Presoak the Whatman filters and white spongy filters in the large pan.
Open one cassette and place the black side down on the bottom of the pan.
Place a spongy filter on the black side of the cassette.
Roll the pipette repeatedly over the filter to remove any air bubbles (air bubbles prevent transfer).
Place a soaked Whatman filter over the spongy filter and roll to remove air bubbles.
Remove the gel from the running apparatus so that it is lying on one of the glass plates.
Holding the glass plate, place the gel down evenly on the Whatman filter.
Peel back the corners of the filter so that the gel adheres to the filter.
The gel should be placed on the filter close to the fold in the cassette (deeper in the tank).
Slowly remove the glass.
Drop a few drops of transfer buffer onto the gel.
Roll the gel to make it smooth and remove air; do not roll hard enough to deform the gel.
Pick up the totally wet nitrocellulose with forceps and place it in the transfer buffer.
The nitrocellulose must be totally wet; if the top is dry, rotate and keep in water until wet.
Gently place the membrane on the gel with the pencil mark on the upper left corner of the gel.
Roll gently to remove air bubbles, do not deform gel.
Top the membrane with a soaked Whatman filter.
Roll to remove air bubbles.
Top with a soaked spongy filter.
Roll to remove air bubbles.
Close and ‘lock’ the cassette.
Place the cassette in its holder so that the black side is facing the black side of the holder.
Repeat with a second gel, if desired.
Place the holder in the tank and pour in transfer buffer to the top of the middle region of the holder (this is less than 1 L). Solution will pour out the sides if it is too full.
Put on lid (matching red leads) and plug into a small power supply.
Be sure your power supply can provide the necessary current.
Turn on the power supply and set it for constant current.
Start the transfer: you should see fine bubbles coming up from the black side of the holder.
Run at 50 mAmp overnight in the cold room.
Proceed to Staining membrane step.
Procedure 37. Fixation transfer in Owl© semi-dry apparatus
Wear gloves (to protect the membrane from you and to protect you from the methanol).
Chill 200 ml Transfer Buffer to 4°C.
Fill a 600 ml beaker with ~100 ml dd water.
Gently take out 1-2 pieces of high quality nitrocellulose, holding only the edges with forceps.
Never touch the center of the membrane, this will cause blotchiness.
Cut the membrane slightly larger than the gel and mark a corner with pencil.
Set the nitrocellulose on edge in the beaker of water and let the water wick up the membrane.
Cut 6 pieces of filter (blotting) paper so that they are the same size as the nitrocellulose.
Presoak the filter paper in a shallow dish of transfer buffer.
Fill the lower ‘chamber’ of the transfer apparatus with transfer buffer.
Stack 3 pieces of the presoaked filter paper.
Using the glass plate and a few ml of transfer buffer, transfer the gel to the top of the filter stack.
Use a glass pipette to roll out any air bubbles (air bubbles prevent transfer).
Using forceps, dip the hydrated nitrocellulose into the shallow dish of transfer buffer.
Carefully place the nitrocellulose over the gel stack, using buffer and a pipette as needed to align the gel and nitrocellulose and filter paper.
Place the mark on the membrane so it is over the upper left corner of the gel.
Carefully add 3 pieces of presoaked filter paper, maintaining the alignment of the sandwich.
Hold the stacks in place while you drain excess buffer from the plate.
Wipe away any droplets around the edge of the stack.
Place on the lid and loosely screw down to hold in place (do NOT tighten screws).
Attach the power leads (red to red and black to black).
Put on lid (matching red leads) and plug into a small power supply.
Be sure your power supply can provide the necessary current.
Turn on the power supply and set it for constant current.
Run overnight at 4°C, using ~2 mAmp of current per square cm of membrane.
Proceed to Staining membrane step
Procedure 38. Staining membrane
After transfer, put on gloves, unplug apparatus, remove ‘sandwiches’ and discard buffer.
Carefully remove the membrane from the sandwich with forceps.
If the transfer has worked properly, you should see the markers on the membrane.
Save the gel and fix and stain it to check for complete transfer (see Worm protein gel protocol).
Put membrane (marked side up) in flat bottomed dish with PBS, no azide.
Rinse the membrane 5 times with PBS, no azide.
Cover membrane with membrane block.
Shake for 1-2 hours at room temperature.
Rinse membrane 2 X 5 minutes in PBS on shaker.
Cover membrane with Primary antibody solution.
Leave membrane on shaker at 4°C overnight.
Rinse membrane 4 X 5 minutes in PBS (no azide).
Cover membrane with HRP-conjugated Secondary antibody solution.
Shake for 1-2 hours at room temperature.
Pour a small amount of TMB substrate into a small flat covered dish to warm to room temperature.
Option: Warm up a chemiluminescent substrate.
Fill a 600 ml beaker with dd water.
Rinse membrane 4 X 5 minutes in PBS (no azide).
With forceps, put the membrane into the dish with TMB and shake well to cover.
Option: Use the chemiluminescent substrate, following the manufacturer's directions.
Let react for 1-15 minutes, checking for nice dark bands (dry membranes are fainter).
To stop the reaction, transfer the membrane with tweezers to the beaker of dd water.
Leave in dd water > 1 minute.
Place wet membrane on a clean glass plate and take a photo.
Air dry the membrane, protected from bright light.
Seal the membrane in plastic and store in the dark.
You will need a lot of pre-stained marker to see it well after transfer (5 ul per well).
For abundant proteins, PVDF membranes may be used instead of nitrocellulose. PVDF is easier to use, but it holds less protein. PVDF should be presoaked briefly in methanol, not water.
You can vary the percentage of methanol in the transfer buffer: lower percentages help large proteins transfer out of the gel; higher percentages help small proteins stick to the membrane.
Membranes after transfer and before primary can be stored at -20°C in membrane block in a sealed container protected from mechanical disturbance for up to 2 months.
To increase sensitivity, react with a chemiluminescent substrate instead of TMB after incubation in secondary, following manufacturer's directions.
Membrane discolorations after TMB:
| If you touched the membrane or stressed it while cutting or moving it, you may see dark blobs. |
| If the membrane was not totally within the transfer buffer, then the edge may be dark blue. |
| If the transfer gets too hot, faint circles may appear on the membrane. |
| If there are air bubbles, sharp white areas will appear on the membrane after TMB. |
Worm Westerns often have nonspecific bands from the primary or secondary antibodies.
To check for nonspecific primary binding, try to compare binding in normal versus mutant strains.
To check for nonspecific secondary binding, try a no-primary control. To eliminate nonspecific secondary bands, you can pre-incubate diluted secondary antibody with a membrane that has worm protein on it.
| 2L of 5X transfer buffer (also called blotting buffer) |
| 30 g Tris base |
| 144 g Glycine |
Add dd water to 2 L.
Mix well and store at 4°C.
| 1X transfer buffer (for 1 L) |
| 200 ml 5X blotting buffer |
| 200 ml Methanol |
| 600 ml dd water |
| Mix well and chill before using. |
| 10X PBS, no azide (for 1 L) |
| 80 g NaCl |
| 2.0 g KCl |
| 27.2 g Na2HPO4:7H2O |
| 2.4 g KH2PO4 |
Allow salts to dissolve (with gentle heat and stirring) in 900 ml dd water.
Adjust pH to 7.2 with 10M NaOH.
Top to 1 L with dd water.
Autoclave and store at room temperature.
| Membrane block (for 50 ml) |
| 5 ml 10X PBS, no azide (final 1X) |
| 250 mg Non-fat dry milk (final 0.5%) |
| 45 ml dd water |
Mix and stir with gentle heat (the milk takes time to dissolve).
Store at 4°C and use within 2-3 days.
| Antibody dilution buffer (for 100 ml) |
| 10 ml 10X PBS, no azide |
| 100 mg Non-fat dry milk (final 1%) |
| 90 ml dd water |
Mix and stir with gentle heat (the milk takes time to dissolve).
Store at 4°C and use within 2-3 days.
Primary antibody solution
Add 1:10 - 1:5,000 Primary Antibody to Antibody dilution buffer.
Secondary antibody solution
Add 1:1,000 - 1:5,000 HRP-conjugated Secondary Antibody to Antibody Dilution Buffer.
Options: You can use AP-conjugated Secondary Antibodies.
Albertson, D.G. (1984). Formation of the first cleavage spindle in nematode embryos. Dev. Biol. 101, 61–72. Abstract Article
Christensen, M., Estevez, A., Yin, X., Fox, R., Morrison, R., McDonnell, M., Gleason, C., Miller, D.M., III, and Strange, K. (2002). A primary culture system for functional analysis of C. elegans neurons and muscle cells. Neuron 33, 503–514. Abstract Article
Crittenden, S.L., Troemel, E.R., Evans, T.C., and Kimble, J. (1994). GLP-1 is localized to the mitotic region of the C. elegans germ line. Development 120, 2901–2911. Abstract
Desai, C., Garriga, G., McIntire, S.L., and Horvitz, H.R. (1988). A genetic pathway for the development of the Caenorhabditis elegans HSN motor neurons. Nature 336, 638–646. Abstract Article
Duerr, J.S., Frisby, D.L., Gaskin, J., Duke, A., Asermely, K., Huddleston, D., Eiden, L.E., and Rand, J.B. (1999). The cat-1 gene of Caenorhabditis elegans encodes a vesicular monoamine transporter required for specific monoamine-dependent behaviors. J. Neurosci. 19, 72–84. Abstract
Finney, M., and Ruvkun, G. (1990). The unc-86 gene product couples cell lineage and cell identity in C. elegans. Cell 63, 895–905. Abstract Article
Francis, G.R., and Waterston, R.H. (1985). Muscle organization in Caenorhabditis elegans: localization of proteins implicated in thin filament attachment and I-band organization. J. Cell Biol. 101, 1532–1549. Abstract Article
Garriga, G., Desai, C., and Horvitz, H.R. (1993). Cell interactions control the direction of outgrowth, branching and fasciculation of the HSN axons of Caenorhabditis elegans. Development 117, 1071–1087. Abstract
Gassmann, M., Thommes, P., Weiser, T., and Hubscher, U. (1990). Efficient production of chicken egg yolk antibodies against a conserved mammalian protein. FASEB J. 4, 2528–2532. Abstract
Harlow, E. (1999) Using Antibodies: A Laboratory Manual (New York: Cold Spring Harbor Laboratory Press).
Harlow, E., and Lane, D. (1988). Antibodies: A Laboratory Manual (New York: Cold Spring Harbor Laboratory Press).
Li, C., and Chalfie, M. (1990). Organogenesis in C. elegans: positioning of neurons and muscles in the egg-laying system. Neuron 4, 681–695. Abstract Article
McIntire, S.L., Garriga, G., White, J., Jacobson, D., Horvitz, H.R. (1992). Genes necessary for directed axonal elongation or fasciculation in C. elegans. Neuron 8, 307–322. Abstract Article
Mello, C., and Fire, A. (1995). DNA transformation. Methods Cell Biol. 48, 451–482. Abstract
Miller, D.M., and Shakes, D.C. (1995). Immunofluorescence microscopy. In: Caenorhabditis elegans: Modern Biological Analysis of an Organism, H.F. Epstein and D.C. Shakes, eds. (San Diego: Academic Press), pp. 365–394.
Monastirioti, M., Gorczyca, M., Rapus, J., Eckert, M., White, K., and Budnik, V. (1995). Octopamine immunoreactivity in the fruit fly Drosophila melanogaster. J. Comp. Neurol. 356, 275–287. Abstract Article
Nonet, M.L., Staunton, J.E., Kilgard, M.P., Fergestad, T., Hartwieg, E., Horvitz, H.R., Jorgensen, E.M., and Meyer, B.J. (1997). Caenorhabditis elegans rab-3 mutant synapses exhibit impaired function and are partially depleted of vesicles. J. Neurosci. 17, 8061–8073. Abstract
Roehl, H., Bosenberg, M., Blelloch, R., and Kimble, J. (1996). Roles of the RAM and ANK domains in signaling by the C. elegans GLP-1 receptor. EMBO J. 15, 7002–7012. Abstract
Smith, D.E., and Fisher, P.A. (1984). Identification, developmental regulation, and response to heat shock of two antigenically related forms of a major nuclear envelope protein in Drosophila embryos: application of an improved method for affinity purification of antibodies using polypeptides immobilized on nitrocellulose blots. J. Cell Biol. 99, 20–28. Abstract Article
Strome, S., and Wood, W.B. (1982). Immunofluorescence visualization of germ-line-specific cytoplasmic granules in embryos, larvae, and adults of Caenorhabditis elegans. Proc. Natl. Acad. Sci. USA 79, 1558–1562. Abstract
*Edited by Oliver Hobert. WormMethods editor, Victor Ambros. Last revised February 16, 2005. Published June 19, 2006. This chapter should be cited as: Duerr, J. S. Immunohistochemistry (June 19, 2006), WormBook, ed. The C. elegans Research Community, WormBook, doi/10.1895/wormbook.1.105.1, http://www.wormbook.org.
Copyright: © 2006 Janet S. Duerr. This is an open-access article distributed under the terms of the Creative Commons Attribution License, which permits unrestricted use, distribution, and reproduction in any medium, provided the original author and source are credited.
§To whom correspondence should be addressed. E-mail: duerr@ohio.edu
 All WormBook content, except where otherwise noted, is licensed under a Creative Commons Attribution License.