Embryo series courtesy of Einhard Schierenberg
Table of Contents
Through genetic analyses, the function of genes is investigated by studying organisms where gene function is altered. In classical forward genetic screening, individuals are treated with mutagens to induce DNA lesions and mutants with a phenotype of interest are sought. After a mutant is found, the gene mutated is identified through standard molecular techniques. Detailed studies of the mutant phenotype coupled with molecular analyses of the gene allows elucidation of the gene's function. Forward genetics has been responsible for our understanding of many biological processes and is an excellent method for identifying genes that function in a particular process.
In reverse genetics, the functional study of a gene starts with the gene sequence rather than a mutant phenotype. Using various techniques, a gene's function is altered and the effect on the development or behaviour of the organism is analysed. Reverse genetics is an important complement to forward genetics. For example, using reverse genetics, one can investigate the function of all genes in a gene family, something not easily done with forward genetics. Further, one can study the function of a gene found to be involved in a process of interest in another organism, but for which no forward genetic mutants have yet been identified. Finally, the vast majority of genes have not yet been mutated in most organisms and reverse genetics allows their study. The availability of complete genome sequences combined with reverse genetics can allow every gene to be studied.
This chapter gives detailed protocols for the two main methods of perturbing gene function in C. elegans: RNA interference and the creation of deletion mutants. Either technique can be applied to the study of individual genes. With less than a day of actual work, RNAi creates a knockdown of gene function without altering the organism's DNA (see below). In contrast, with about a month of work, a deletion mutation permanently removes all gene function. Deciding which technique to use will depend on the nature of the experiment. The techniques can also be combined, where RNAi is used for rapid screening of loss of function phenotypes and then deletion mutants are made to study genes of particular interest. RNAi can also be carried out on a global scale, where knockdown of (nearly) every gene is tested for inducing a phenotype of interest. In this case, the reverse genetics technique of RNAi can be thought of as a forward genetic screening tool.
The Gurdon Institute, University of Cambridge, Cambridge CB2 1QN, UK
In 1998, Fire and Mello discovered that injection of double stranded RNA (dsRNA) into worms leads to specific degradation of the corresponding mRNA, a process termed RNA interference (RNAi; Fire et al., 1998). Soon afterwards, it was found that either soaking worms in dsRNA solution or feeding worms bacteria engineered to produce dsRNA also could induce a robust RNAi response (Tabara et al., 1998; Timmons and Fire, 1998). The technique of RNAi, coupled with the availability of the complete genomic sequence of C. elegans (Consortium, 1998), has made possible the rapid study of gene function, both on a single gene level and at a global scale. This section discusses general features to consider when using this technique. Sections following this give detailed protocols for RNAi by injection, soaking and feeding.
There are three ways to carry out RNAi in C. elegans: injection (Fire et al., 1998), soaking (Tabara et al., 1998), and feeding (Timmons and Fire, 1998). All three can produce efficient gene knockdowns. Which method to use will depend on your particular experiment.
RNAi by injection: dsRNA produced in vitro is injected into young adult hermaphrotides and the progeny scored for mutant phenotypes. RNAi by injection gives very reliable gene inhibition from worm to worm, but is more labor intensive than other methods. A small transcription reaction produces 5–10 μg dsRNA, which is sufficient to conduct many experiments.
RNAi by soaking: worms are soaked in a high concentration dsRNA solution and then subsequently they or their progeny scored for phenotypes. RNAi by soaking is useful for treating a moderately large number of animals (e.g., tens to hundreds) or for high throughput screening in 96 well format. Worms of any stage can be soaked. More dsRNA is needed for soaking than for injection (5–10 μg per experiment).
RNAi by feeding: bacteria producing the desired dsRNA are fed to worms and either they or their progeny are scored. RNAi by feeding is the least labor intensive and most inexpensive method, but produces slightly more variable results than RNAi by soaking or injection. RNAi by feeding can be used to treat a large number of animals at once or for high throughput screening, both on agar plates and in liquid culture. Worms of any stage can be subjected to RNAi by feeding.
This will depend on the nature of the experiment. Worm strains and tissues differ in their sensitivity to RNAi. For many phenotypes and assays, using wild type worms will give good results. However, in some cases, phenotypes are seen in RNAi supersensitive strains [e.g., rrf-3 (Simmer et al., 2002) eri-1 (Kennedy et al., 2004) or eri-1; lin-15B (Wang et al., 2005)] but not in wild-type, or are stronger in RNAi supersensitive strains, so it is a good idea to try these as well. rrf-3 and eri-1 have lower brood sizes than wild-type and are sterile at 25°C, so they require a bit more attention. The sterility can be overcome by mating with males.
Again, this will depend on your experiment and assay. RNAi by injection is usually carried out on adult hermaphrodites, and the progeny assayed. Injecting younger worms is possible but more difficult. Any stage of worms can be fed or soaked, but one of two stages are usually used: L3/L4s or starved L1s. For feeding, it is desirable to allow the worms to feed for 2–3 days before they or their progeny are assayed. In general, feeding or soaking L3/L4 worms is used if the assay will be carried out on the progeny. If the assay will be on the RNAi treated worms, then starved L1s or later stages can be used. It is also possible to assay the progeny of RNAi treated L1s. However, it is important to keep in mind that phenotypes observed can differ depending on which stage is used. For example, RNAi of some genes causes sterility of the fed worm if L1s are used whereas embryonic lethality is induced if L4s are used. (S. Woods, D. Rivers, and J. Ahringer, unpublished). Therefore, if the assay will be on embryos, then it may not be a good idea to use L1s.
Induction of a phenotype is a reliable indication of a positive RNAi result, as the level of false positives is extremely low (<1%, Kamath et al., 2003). However, it is more difficult to draw conclusions from a negative RNAi experiment; the false negative rate is about 30% over all genes, and varies depending on the tissue (Kamath et al., 2003). Using RT-PCR, you can test whether the mRNA has been knocked down. However, the protein product could still be present even if the mRNA is undetectable. Some proteins are stable over many days. An antibody can be used to measure the level of protein reduction. It is important to be cautious when drawing conclusions following a negative RNAi experiment, as it is possible that a small amount of residual protein is sufficient for gene activity.
When targeting more than one gene by RNAi, the efficiency of knockdown may be reduced when compared to targeting each gene separately (e.g., see Table 1 in Gonczy et al., 2000). This may not be a problem for some experiments. For example, if two genes each have no detectable RNAi phenotype, but targeting them together causes a phenotype, then this would show some overlap in function. However, if you are carrying out an epistasis experiment, reduced RNAi efficiency may lead to an inaccurate result, if only one of the two genes is efficiently knocked down. Therefore, it is ideal to target one gene by RNAi in the mutant background of the other gene. If it is not possible to use a mutant, then use antibodies to test that the level of protein knockdown is the same in the double and single RNAi experiments for both genes. Use of rrf-3 or eri-1 RNAi supersensitive strains (Simmer et al., 2002; Kennedy et al., 2004; Wang et al., 2005) enhances the effectiveness of targeting multiple genes (S. Woods, D. Rivers, and J. Ahringer, unpublished; A. Fraser, pers. comm.).
It is essential to optimize screening conditions before embarking on a large-scale screen. If at all possible, assemble a set of control genes that you expect to be positive in your screen, and a set of genes you expect to be negative. Test these under different conditions (e.g., different temperature, stage of worm fed, background, plate configuration, etc) to find the highest hit rate and fastest screening time. Carrying out these controls will save time and make your final list of positive candidates more specific. Positive hits should be rescreened to ensure reproducibility. If possible, is it a good idea to design and carry out a different, second assay on your positive candidate genes to ensure they are involved in the process you are studying.
There are currently two RNAi feeding libraries for C. elegans. One is from the Ahringer lab and has 16,757 clones, made by cloning gene-specific genomic fragments between two inverted T7 promoters (Fraser et al., 2000; Kamath et al., 2003). The inserts contain exons and introns and sizes vary from 500 bp to 2.5 kb. The other is from the Vidal lab and has 11,511 clones, made by the Gateway cloning of full-length open reading frame (ORF) cDNAs into a double T7 vector (Rual et al., 2004). Both libraries use the HT115 bacterial strain as a host for the plasmid RNAi clones; HT115 has IPTG inducible T7 polymerase and a disruption of the RNAse III gene (a dsRNAse), the latter marked with Tetracycline resistance (Timmons et al., 2001). There is some overlap between the two libraries; together they can target about 94% of C. elegans genes. Individual clones and whole libraries are available from Geneservice. The Vidal library is also available from Open Biosystems.
As there are some errors in any library, you should sequence any clone you are going to work with to ensure you know which gene is being targeted (single genes or positives from a screen). It is also a good idea to look for potential cross interference (where RNAi of one gene inhibits the intended target gene as well as a closely related gene) using BlastN to compare the sequence of the RNAi template with C. elegans genes. So far, there is no hard and fast rule for predicting cross interference. A reasonable guide is that if there is 80% nucleotide identity over 200bp, cross-interference is likely. Wormbase Gene Summary pages give information on which gene(s) an RNAi clone is likely to target.
The Gurdon Institute, University of Cambridge, Cambridge CB2 1QN, UK
Synopsis: Prepare dsRNA corresponding to gene of interest by in vitro transcription. Inject dsRNA into young adult hermaphrodites, wait for RNAi to take effect, then score progeny of injected mother. This is a modification of the protocol in Zipperlen et al. (2001).
Use PCR to prepare a gene specific fragment containing bacterial polymerase promoter sequences (T7 or T3) at each end. Fragments of 500 bp – 2kb can be used, though dsRNA yields decrease over 1 kb. If possible, use the same bacterial promoter sequence at both ends, then only one transcription reaction is necessary for dsRNA preparation. There are several ways to obtain a template:
Use T3 and T7 primers to PCR amplify a gene specific fragment cloned into a Bluescript or similar vector that has these primer sequences flanking the insert site.
Design gene specific primers and add T7 promoter sequences to the 5' ends. Use primers to PCR amplify desired fragment directly from cDNA or genomic DNA.
Use T7 primers to amplify the insert from a clone in a double T7 feeding vector (e.g., L4440); 5'-CGTAATACGACTCACTATAG-3'.
Below is a general method for making a template from an RNAi feeding clone:
With a yellow tip, pick a small amount of a bacterial clone into 100 μl of water.
Use 1 μl of bacterial solution as a template for PCR using a standard Taq enzyme in a 25 μl reaction, with 1 μM T7 oligo, 0.2 mM dNTPs and the following cycling conditions: 95°C 50s, 52°C 30s, 72°C 90s for 25 cycles. For a good transcription reaction in the next step, the PCR reaction should yield ~200ng/ul of product.
For high efficiency high yield transcription reactions, we recommend using an in vitro transcription kit (e.g., Promega RiboMAX or equivalent). Use 1 μl of unpurified template from the PCR reaction above in a 5 μl in vitro transcription reaction, incubating 4.5hrs at 37°C. If different polymerase promoters are at each end, carry out each transcription reaction separately.
Dilute the transcription reaction 4X with 20 μl sterile DEPC water or 10mM Tris 8.0, 0.1mM EDTA and run 2 μl on a gel for quantification. The concentration should be 0.2 – 1.0 μg/ul. If two separate reactions were performed, pool them together, heat to 72°C for 10 minutes and allow to cool to RT for annealing.
Inject the dsRNA solution without purification (see note 1) into the intestine, body cavity or gonad of young adult hermaphrotides (see note 2).
Put injected worms onto plates. Move to new plates every 24 hours and score progeny produced at different times after injection (see note 3).
Note 1:
Many investigators purify their dsRNA prior to injection, either by ethanol precipitation or using an RNA purification kit. However, we obtain equivalent RNAi injection results with purified and unpurified dsRNA. For RNAi by soaking, purification is necessary to prevent death during the soaking process.
Note 2:
In general, equivalent results are seen irrespective of the site of injection, but some RNAi phenotypes might be stronger after a gonad injection. For example, progeny might inherit more dsRNA with a gonad injection, which might be helpful if the gene is active in mid-embryogenesis. This can be tested empirically for your gene. If the needle clogs during injection, try diluting the dsRNA a further 2X or more. Strong RNAi effects are seen by injection at quite low dsRNA concentrations (e.g., 50 ng/ul). However, mixing dsRNAs together can significantly reduce the RNAi effect for a given gene (see Table 1 in Gonczy et al., 2000). Therefore, it is important to use care in experiments where two or more genes are to be inhibited simultaneously by RNAi (e.g., use antibodies to confirm that the knockdowns have been successful).
Note 3:
Typically, 24 hours post-injection is a good starting point for a good RNAi effect. For many genes, the strength and penetrance of RNAi phenotypes are increased in progeny laid more than 24 hours post-injection, especially for genes with a strong maternal contribution. It is a good idea to do a time course to find the optimum time of scoring post-injection, looking for a time when the phenotype is strongest and most penetrant. For some genes, shorter times post-injection will give a stronger effect, particularly for genes with a zygotic but not a maternal function. If antibodies are available, it can be helpful to stain progeny at different times post-injection to see when the protein is maximally reduced. In order to maintain progeny production at later time points, mate the injected hermaphrodites with N2 males after injection. Using an RNAi supersensitive strain can increase the strength and penetrance of phenotypes. rrf-3 and eri-1 both display sterility at 25°C and smaller broods than N2 at lower temperatures (Simmer et al., 2002; Kennedy et al., 2004), but this can be overcome by mating with N2 males after injection, as they are cross fertile at all temperatures (J. Ahringer, unpublished).
Laboratory of Developmental Genomics, RIKEN Center for Developmental Biology, Kobe, 650-0047, Japan
DNA template for dsRNA synthesis can be prepared by PCR with primers designed to add T7 promoter sites at both ends. Below are examples of the primer sets for yk cDNA clones (available from Yuji Kohara).
yk001-yk699: These clones are in lambdaZAP II vector, which can be converted to pBluescript plasmid by in vivo excision. A phage suspension or plasmids can be used as the PCR templates.
| T7: 5' - GTAATACGACTCACTATAGGGC-3' |
| Cmo422: 5'-GCGTAATACGACTCACTATAGGGAACAAAAGCTGGAGCT-3' |
(T7 sequences are underlined.)
yk700 and up: These clones are in pME18S-FL3 vector.
| T7ME774FW: 5'-TAATACGACTCACTATAGGGCTTCTGCTCTAAAAGCTGCG-3' |
| T7-ME1250RV: 5'-TAATACGACTCACTATAGGGTGTGGGAGGTTTTTTCTCTA-3' |
(T7 sequences are underlined.)
Perform PCR reaction at a 30μl scale; reactions will typically produce ~0.4 μg/μl of DNA fragment. The PCR reaction can be used for in vitro transcription without purification.
Use 7μl of the PCR reaction mixture (above) for in vitro transcription with T7 RNA polymerase (e.g., Thermo T7 polymerase: TOYOBO (#TRL-201)) in a 100μl scale reaction. Both sense and antisense RNAs are transcribed from the PCR product in this single reaction. An annealing step is unnecessary. Typical yields are ~0.4 μg/μl of RNA (40μg total).
Digest the DNA template with DNase I.
Extract the reaction with phenol/chloroform. Repeat 2–4 times.
Alternatively, “Wizard Plus SV Miniprep DNA Purification System” (Promega #A-1330) can be used for dsRNA purification. Add 700 μl 0.01 M Tris/HCl pH 7.5 to 100 μl transcription reaction mixture before putting onto the column. Follow the supplier's instruction for washing and elution.
EtOH precipitate the extracted reaction. Rinse with 70% EtOH.
Resuspend pellet in 40μl H2O. A concentration of 0.5–5 μg/μl dsRNA is suitable for RNAi by soaking. dsRNA can be stored at −20°C.
Check the concentration and integrity of dsRNA by agarose gel electrophoresis.
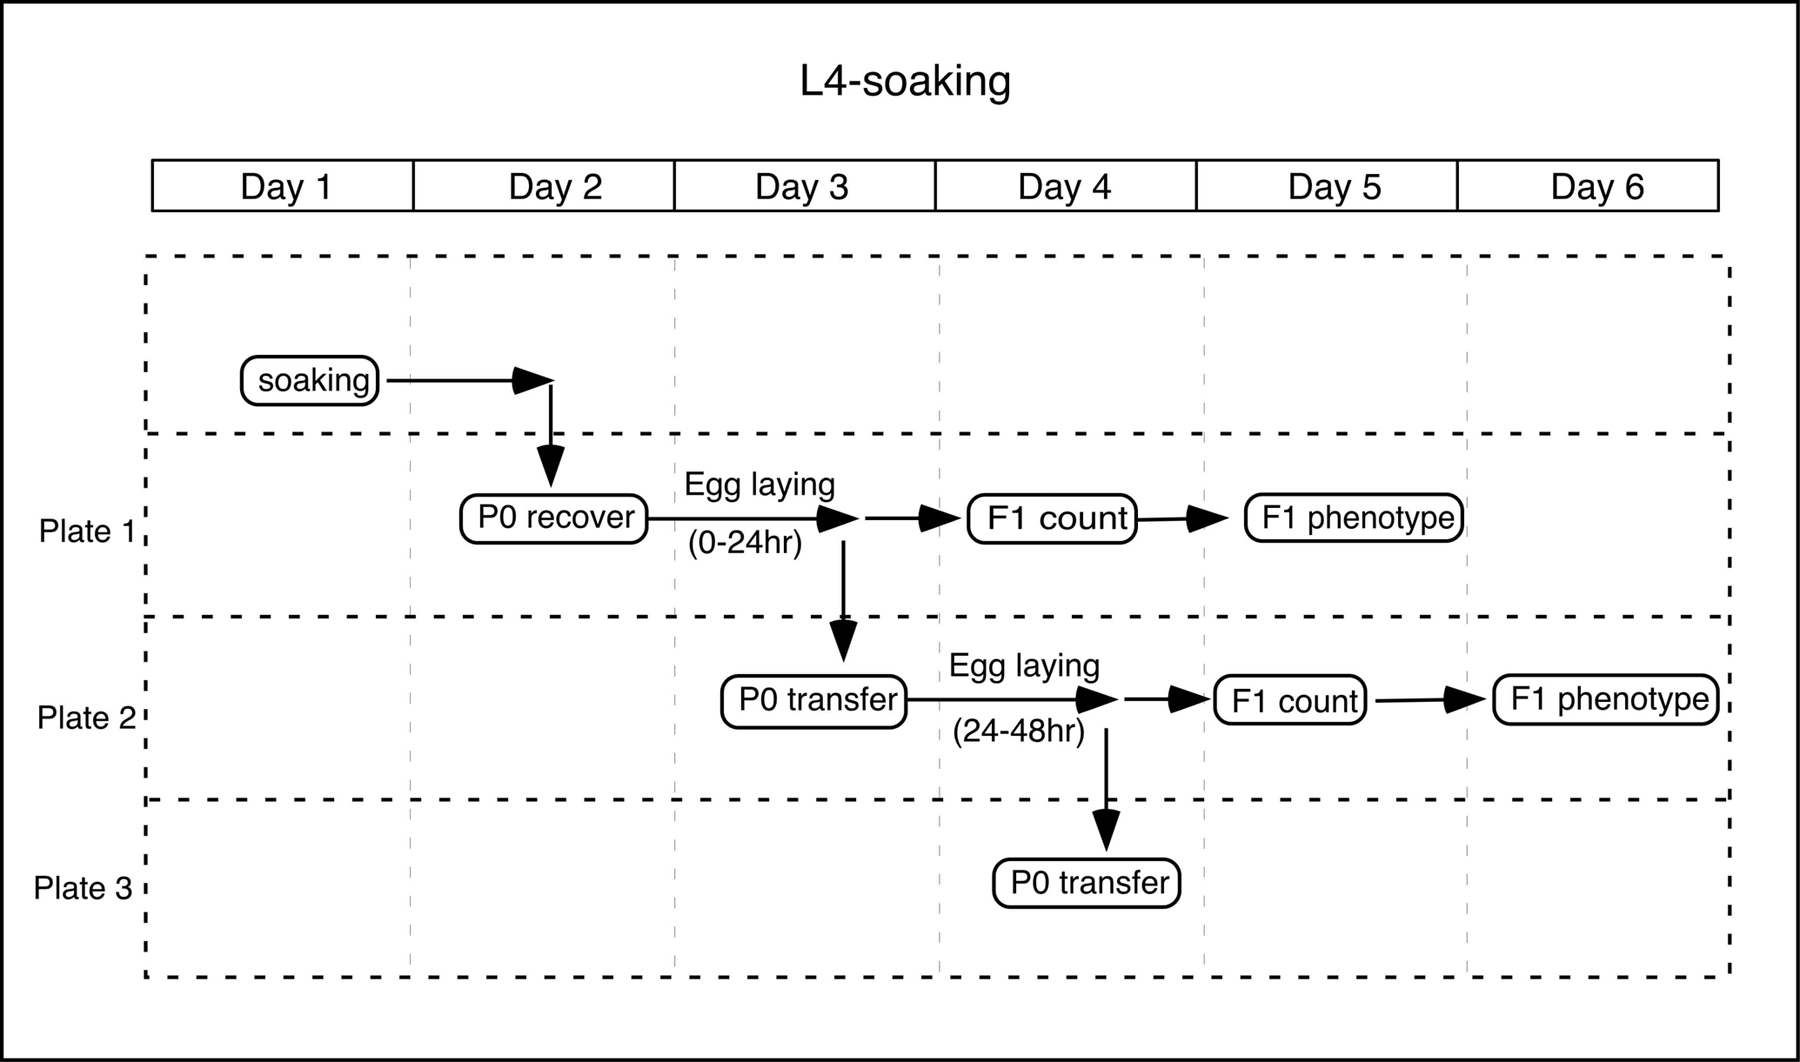
By allowing investigators to select the developmental stage for dsRNA delivery, the soaking method can be used to conduct stage-specific RNAi experiments.
L4-soaking: L4 worms are soaked in dsRNA, and their progeny (as well as soaked worms) are examined for phenotypes. In many cases, the first embryo laid is already fully affected by RNAi.
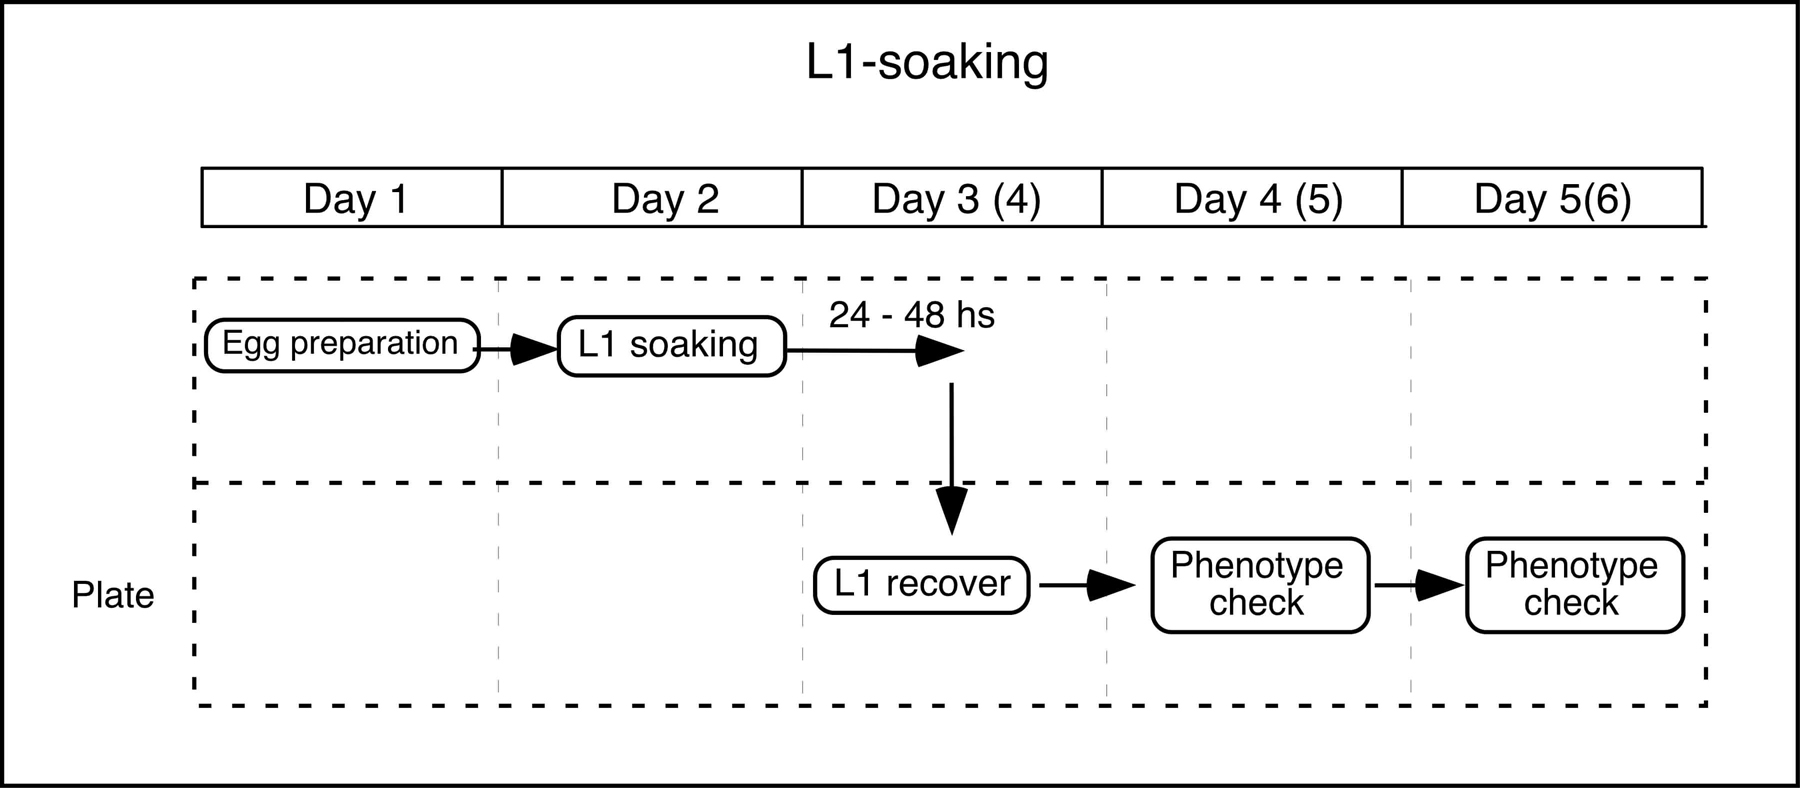
L1-soaking: To perform post-embryonic development specific knockdowns, L1 larvae are soaked in a dsRNA solution. During soaking (which is done in the absence of food), the development of the L1 larvae is arrested but the RNAi response continues, making it possible to suppress gene function from the onset of post-embryonic development.
Day 1: Soaking
In a 200μl PCR tube, put 2μl 5X soaking buffer and 8μl dsRNA solution (prepared as above).
| 5X soaking buffer |
| 1.25 X M9 (Mg2+ free) |
| 15 mM spermidine (SIGMA S2626) |
| 0.25 % gelatine |
| (Store at −20°C) |
Pick L4 worms to a fresh NGM plate without bacteria, and let them crawl for several minutes to remove bacteria completely.
Put 6 - 10 L4 worms (=P0 worms) in the dsRNA solution, and incubate at 20°C for 24 hours.
Day 2: Recovery
Transfer the soaked worms on a 6cm NGM plate with OP50 (max. 4 worms/plate). This is Plate 1.
Incubate at 25°C for 24 hours. (Other temperature can also be used.)
Day 3
Transfer the P0 worms to a new NGM plate with OP50. This is Plate 2.
Check the condition of the P0 worms (they may also show phenotypes).
Incubate Plate 1 and 2 at 25°C for 24 hours.
Day 4
Transfer the P0 worms on Plate 2 to a new plate (Plate 3).
Check the condition (and phenotypes) of the P0 worms.
Count the F1 embryos and larvae on Plate 1.
Day 5
Count the F1 embryos and larvae on Plate 2.
Examine the phenotypes of F1 worms on Plate 1.
Day 6
Examine the phenotypes of F1 worms on Plate 2.
|
Day 1: Egg preparation
| Collect gravid adult worms in a 15 ml tube. Collect the embryos by hypochlorite/NaOH treatment. Wash eggs with M9 several times. Let the eggs hatch at 20°C in 1ml M9, or on a NGM plate without bacteria. |
Day 2: Soaking
Collect the L1 larvae at a concentration of ~100 larvae/ ~l M9.
In a 200 ~l PCR tube, put 2 ~l 5X soaking buffer and 8 ~l dsRNA solution.
Add 1 ~l L1 larvae suspension to the tube.
Incubate at 20°C for 24–48 hours.
Day 3 or 4: Recovery
| Recover L1 larvae on a NGM plate with OP50. Incubate at 25°C. |
Day 4–6: Phenotype observation
| Check the growth and phenotype of the soaked worms. |
|
More than one gene can be targeted simultaneously by the soaking method in wild-type animals. Because the efficiency of double RNAi might be lower than that of single RNAi for each gene, protein or mRNA levels for each gene should be assessed whenever possible.
Some RNAi supersensitive strains (e.g., rrf-3) exhibit developmental phenotypes, such as temperature-sensitive sterility, at a low penetrance. Because these background phenotypes tend to be enhanced by the soaking process, be cautious about interpreting results when these strains are used.
If the soaked worms die, become sick, or sterile, check the following points:
Worms may be physically damaged when they are picked and transferred into the tube. Pick them gently!
dsRNA may not be clean enough. Use highly purified RNA. Do not use DEPC-treated water for soaking method.
The P0 generation can also be affected by RNAi—P0 sterility or lethality may be THE phenotype. Always perform control experiments in parallel (soaking buffer only, dsRNA that cause no phenotype, and dsRNA that cause a known phenotype).
The Gurdon Institute, University of Cambridge, Cambridge CB2 1QN, UK
Synopsis: Grow RNAi bacteria and seed plates. Feed worms with RNAi bacteria and score for phenotypes. The following is based on the protocol in Kamath et al. (2001).
Pour plates: make standard NGM agar and add carbenicillin to 25 μg/ml and IPTG to 1mM just prior to before pouring. Pour plates 4–7 days before seeding, to allow them to dry. If plates are too wet, the bacteria won't dry after seeding and RNAi phenotypes will be weaker. Feeding can conducted using any format plates (e.g., single plates, 6-well, 12-well).
Spot individual desired bacterial strain(s) from glycerol stock to an LB plate containing 50 μg/ml ampicillin (or 25 μg/ml carbenicillin) and 10 μg/ml tetracycline. Use a 96-pin replicator to spot on a rectangular flat plate if growing in 96-well format. Grow overnight at 37°C.
Grow cultures in LB medium containing 50 μg/ml ampicillin. If using 96-well format, add 800 μl medium to each well of a 96-well deep well plate. To inoculate the cultures, use individual yellow tips or tips in a multichannel pipettor to scrape bacteria from a row or column and eject tips into the correct row or column of medium. When finished innoculating, remove the tips and cover the plates with plastic microtitre lids. Grow cultures with shaking at 300rpm for 6–8 hours.
Seed NGM agar feeding plates the bacterial culture. Use two 30 μl drops if using 12-well plates, and three 50 μl drops if using 6-well or individual plates. Let dry and induce overnight at room temperature.
Grow desired worm strain on standard NGM plates seeded with OP50 bacteria. Carry out standard bleaching/washing protocol to obtain embryos, and leave to hatch into L1s overnight in M9 buffer. These starved L1s will be synchronized at the beginning of the L1 stage. If feeding will be done with larvae older than L1, then put hatched L1s onto standard NGM plates containing OP50 and grow to the desired stage.
Wash worms off plates using M9 buffer, then wash 3X to remove bacteria. It is critical to remove OP50 as residual non-RNAi bacteria will interfere with the feeding results. Resuspend final worm pellet in M9 buffer containing 0.1% Tween-20 to prevent them from sticking to plastic. Adjust the volume of buffer so that the number of worms you want to aliquot per plate is in 10–15 μl.
This part of the protocol will differ slightly depending on your assay. After feeding, either the aliquoted worms or their progeny can be scored. For some assays, scoring is easier if progeny are synchronized. In this case, fed gravid mothers are allowed to lay eggs on a new plate, then removed, and the progeny subsequently scored. This step is time consuming and not always necessary.
In this protocol, a semi-synchronized population of progeny laid in a 24-hour window are scored.
Aliquot 10–15 μl of L3/L4 worms per plate or well (10–20 worms).
Leave 72 hours at 15°C (or 36–40 hours at 22°C) for RNAi to take effect, then replica plate single adults onto other plates or wells seeded with the same bacteria.
After 24 hours, remove the adults from the replica and score the progeny for phenotypes at appropriate time points.
In this protocol, all the progeny laid by fed mothers are scored. It has the benefit of being quick as there is no replica plating involved. Progeny laid early and late in the feeding protocol are in a single well, producing a range of RNAi knockdowns, from weak to strong. This can be helpful if screening for post-embryonic phenotypes, where a strong knockdown might cause embryonic lethality. Low percentage embryonic lethality is difficult to score using this method.
Aliquot 10–15 μl of L3/L4 worms per plate or well. As the adults and all the progeny will remain in this initial plate or well, it is important not to have too many worms for the food available. The optimal number should be determined empirically. For 6-well plates, using 10 worms per well should allow scoring of adult progeny in most cases.
Score when the progeny reach the desired age.
L1s can be used instead of L4s in either of the above protocols. An advantage of using L1s is that some phenotypes can be scored in the fed worms instead of the progeny, allowing an easily scored synchronized population to be used. However for some genes, inherited maternal product will be sufficient for gene activity, preventing induction of a phenotype in the fed worms. Also, as many genes are required at multiple times in development, different phenotypes may be seen when using L1s compared to L4s. For example, RNAi of some genes induces sterility of the fed L1s whereas L4 feeding induces embryonic lethality of the progeny. This will preclude scoring of progeny for these genes if L1s are fed. In contrast, using L1s is beneficial if the assay is for any form of lethality (e.g., sterility, larval lethality, or embryonic lethality).
Notes: Aliquoting bleached embryos directly onto feeding plates instead of hatching them into starved L1s first is not recommended because it is more difficult to aliquot the same number of animals/well due to embryos sticking together. Also, variable hatching rates between bleached preparations will cause inter-experiment variation.
The protocol is identical to feeding a single bacterial strain except that the two bacterial cultures are mixed prior to seeding. Double feeding works much better and more reproducibly in an RNAi supersensitive strain (e.g., rrf-3; Simmer et al., 2002; eri-1; Kennedy et al., 2004 or eri-1; lin-15B; Wang et al., 2005; S. Woods, D. Rivers, and J. Ahringer, unpublished; A. Fraser, pers. comm.). In a test of 17 control double feedings, 4 were successful in eri-1, 7 in rrf-3, and 14 in eri-1; lin-15B (S. Woods, D. Rivers, and J. Ahringer, unpublished). Double feeding is less reliable than single feeding, so in some cases, only one gene may be significantly inhibited, or both genes may be only slightly knocked down. Controls should be carried out to test for knockdown of each gene.
I thank members of the lab for comments. This is a modification of the protocol developed by Ravi Kamath (Kamath et al., 2001), with modifications from Gino Poulin, David Rivers, and Shane Woods.
The Gurdon Institute, University of Cambridge, Cambridge CB2 1QN, UK
RNAi feeding in liquid is a good method to use when the assay is growth or lack of growth. High embryonic lethality, sterility, larval lethality, and severe slow growth phenotypes are easy to score in liquid culture. Scoring a population for a large change in expression of a GFP reporter can also be done in liquid culture. Screening for post-embryonic phenotypes or low percentage lethality (e.g., under 30%) is better done using RNAi by feeding on plates.
Synopsis: Grow bacteria in 96 well format, spin, resuspend in feeding buffer, and aliquot into 96 well plates. Synchronize worms by bleaching and grow to desired stage. Wash and aliquot worms into 96 well plate containing RNAi bacteria using a 96-well plate dispenser. Incubate for desired length of time and score.
Use a 96-pin replicator to spot bacteria from a glycerol stock to a flat LB plate containing 50 μg/ml ampicillin (or 25 μg/ml carbenicillin) and 10 μg/ml tetracycline. Grow overnight at 37 degrees.
Add 500μl of LB medium containing 50 μg/ml ampicillin into each well of a 96-well deep well plate. To inoculate the cultures, use tips in a multichannel pipettor to scrape bacteria from a row or column and eject tips into the correct row or column of medium. When finished innoculating, remove the tips and cover with a plastic microtitre plate, taped on. Grow cultures with shaking overnight (300 rpm).
Add IPTG to 1mM final concentration. Shake at 37°C for 1 hour.
Spin the 96 well plate cultures in centrifuge at 4000 g for 20 minutes.
Discard the supernatant.
Resuspend bacteria in 160 μl S-Basal containing standard S-Basal additives plus 100 μg/ml ampicillin and 1mM IPTG.
Aliquot 30μl into each well of shallow flat bottomed 96 well plates with lids.
Notes: Some investigators leave the bacteria in LB amp then add IPTG to the worms in M9 buffer before aliquoting, instead of spinning the bacteria down and resuspending in S-Basal. In our hands, this has variable success. There is a higher incidence of contamination and bacteria continue to grow, making scoring more difficult, as the wells do not clear. We find that removing the LB and resuspending the bacteria in S-Basal produces more reproducible and easier to score results.
Bleach adult worms using standard procedure and leave eggs to hatch into L1s in M9 buffer overnight.
If feeding a stage later than L1, aliquot the worms onto plates with OP50 bacteria and grow to the desired stage.
Wash synchronized worms off plates using M9 buffer, spin 600g for 2 minutes. Repeat wash 2X.
Resuspend worms in S-Basal (containing standard S-Basal additives plus 1mM IPTG, 100ug/ml Amp + and 0.01% Tween -20) at a concentration of 10 worms/20 μl and transfer to a tube compatible with your dispenser.
Use 96-well plate dispenser to aliquot 20 μl worm solution into each well of 96-well plates containing the RNAi bacteria from above. The number of worms/well will probably range from 5–15.
Put plates in a humid chamber at the desired temperature with no shaking. Score 4–7 days later for phenotypes. Depending on your assay, this can be done directly in the microtitre plates (e.g., lethality) or worms can be transferred to agar plates or other assay containers.
Note 1: The number of worms and the amount of bacteria suggested above are a good starting point. These may need to be adjusted to suit your screen.
Note 2: Feeding of different larval stages may give different results. For example, many genes that induce an embryonic lethal RNAi phenotype from an L4 feeding induce sterility with L1 feeding. Which stage or stages to use will depend on the assay and your specific phenotype and should be determined empirically using controls.
Note 3: If you want to use a larger volume of media per well (e.g., 150 μl), the plates will need to be shaken for aeration or worms may die due to lack of oxygen.
The choice of strain will be somewhat limited by your assay, but it is a good idea to try several different backgrounds. In particular, we recommend testing whether your phenotype is induced more strongly in an RNAi supersensitive strain e.g., rrf-3 (Simmer et al., 2002), eri-1 (Kennedy et al., 2004) or eri-1; lin-15B (Wang et al., 2005).
It is possible to carry out a liquid culture screen feeding two bacterial strains at once. For example, one common bacterial strain can be mixed with each individual strain to look for interacting genes. The bacteria should be grown separately, mixed in equal amounts, then spun down and resuspended in S-basal feeding buffer as above, or else prepared completely separately before mixing. In most cases, the use of an RNAi supersensitive strain is necessary for the success of feeding two RNAi bacterial strains together (S. Woods, D. Rivers, and J. Ahringer, unpublished; A Fraser, pers. comm.).
Department of Genetics, Yale University, New Haven, Connecticut 06520 USA
Department of Genetics, Yale University, New Haven, Connecticut 06520 USA
Department of Molecular Biophysics & Biochemistry, Yale University, New Haven, Connecticut 06520 USA
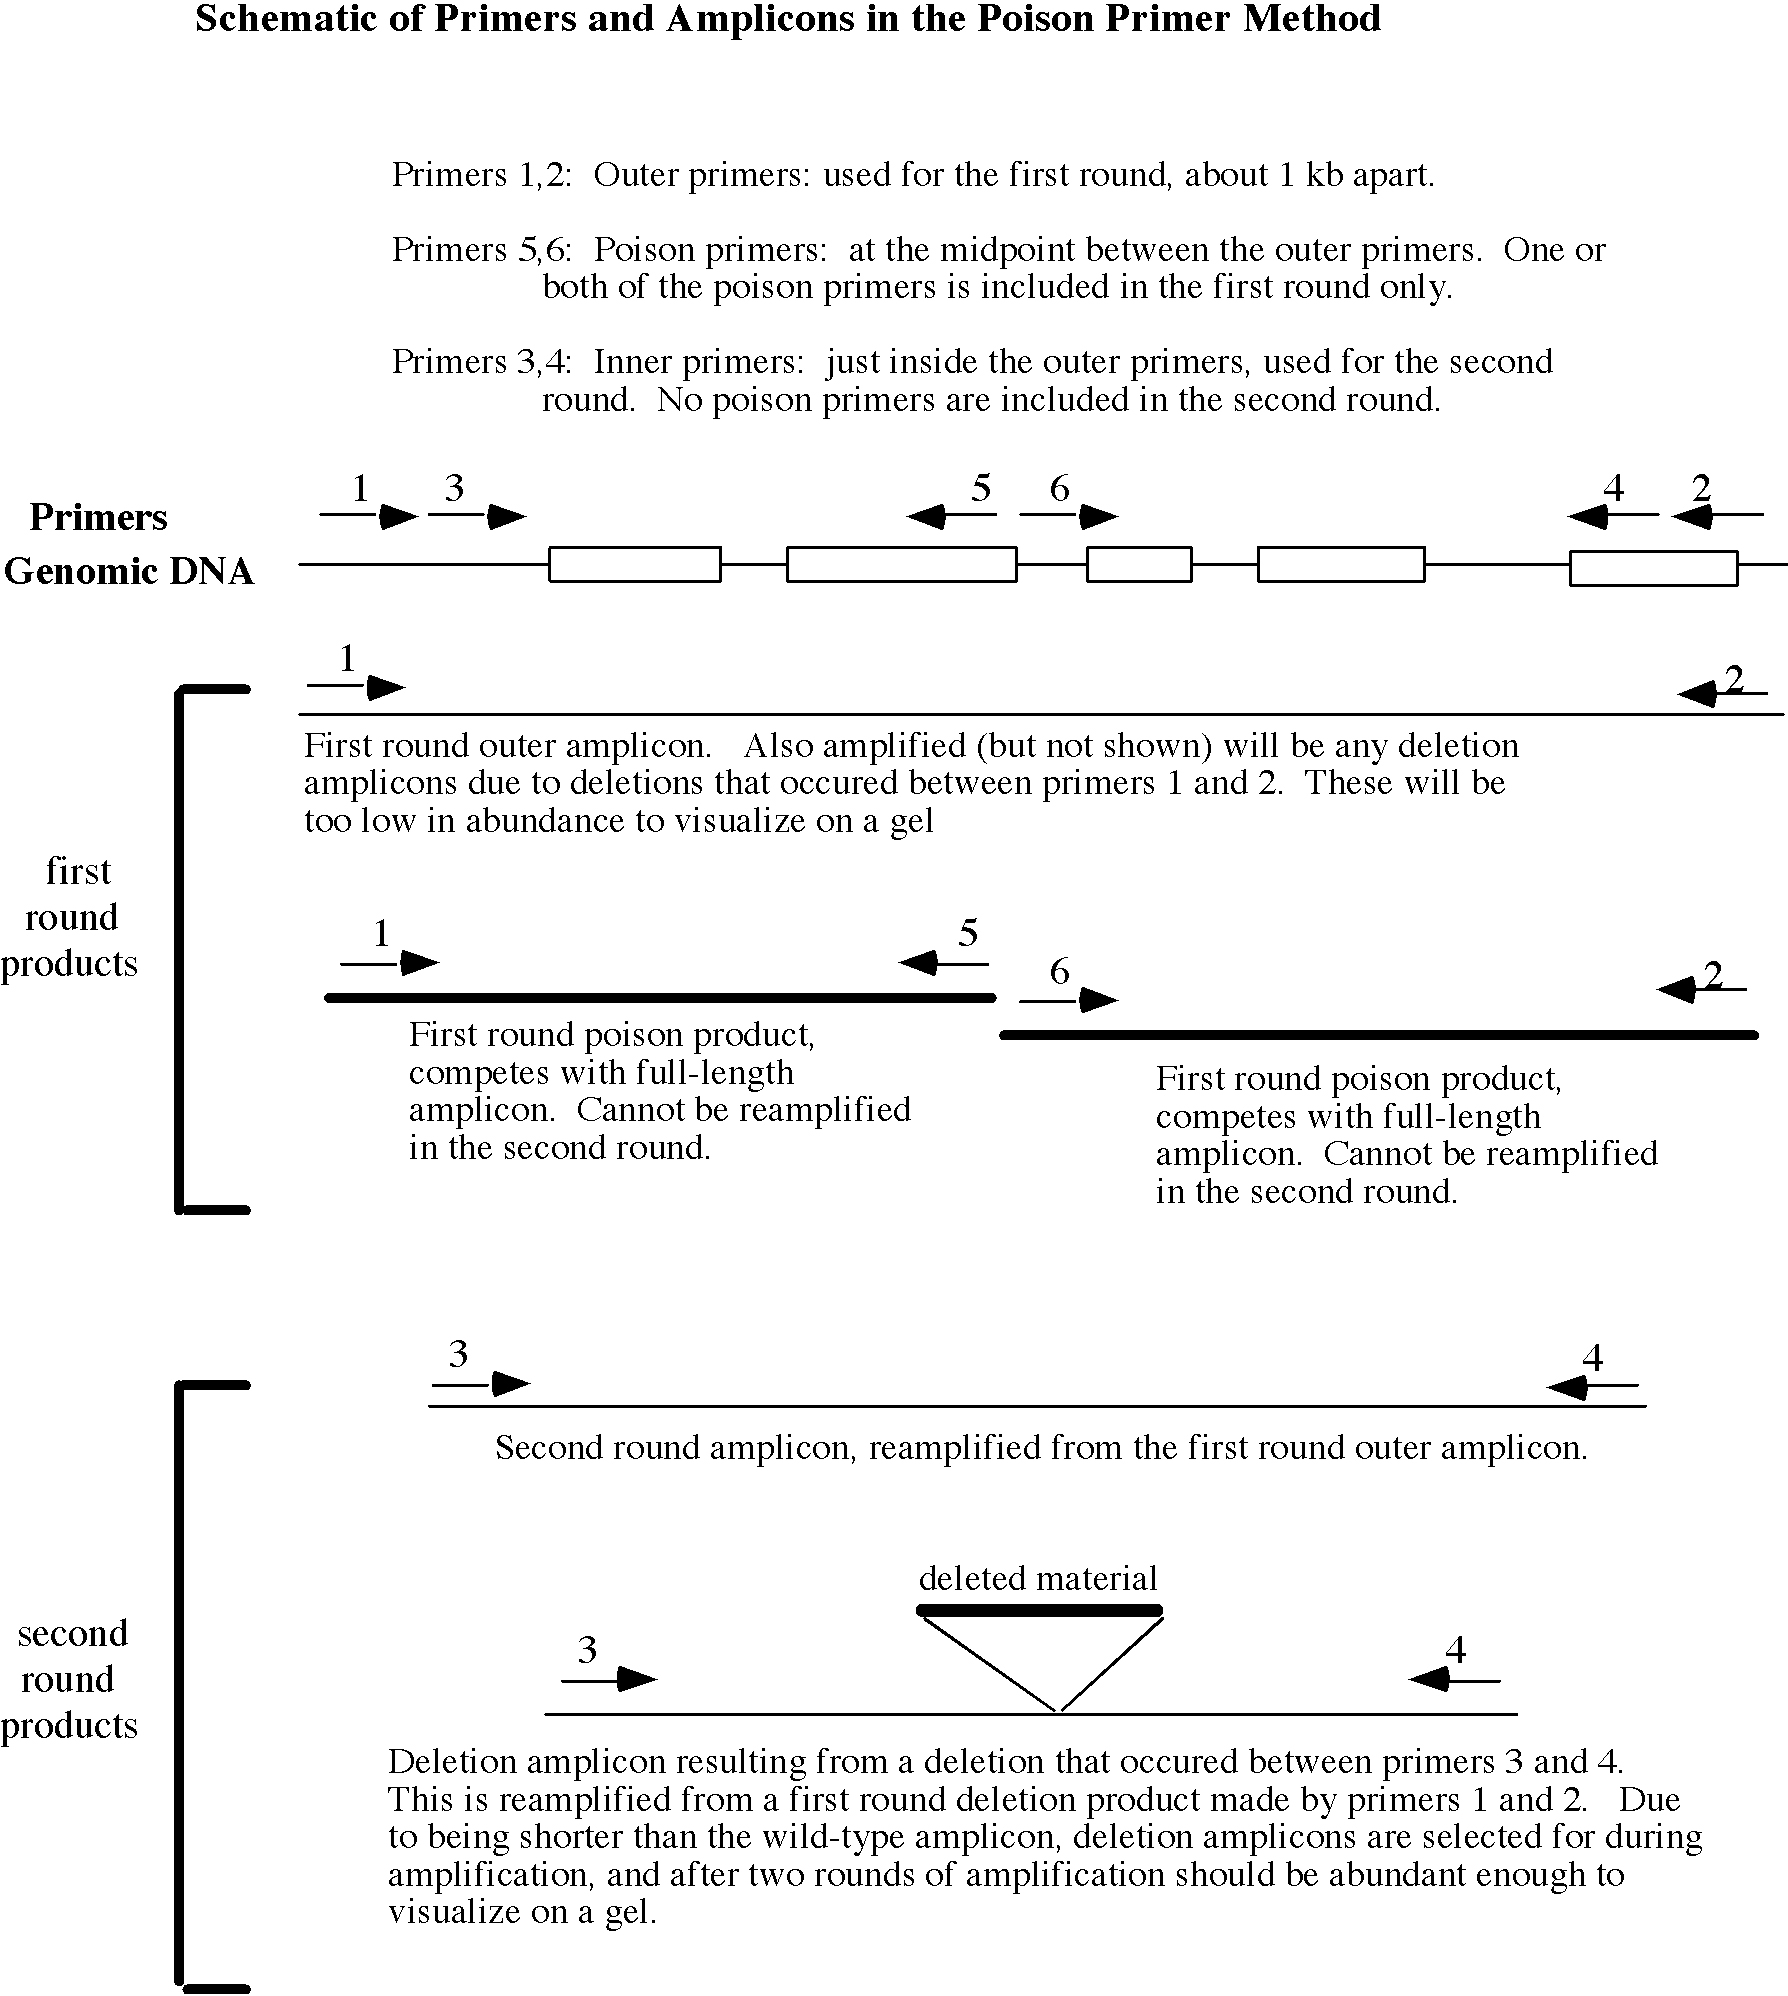
This gene knockout strategy uses a random mutagen, trimethylpsoralen (psoralen) to mutagenize a very large number of worms. The worms are divided into many small subcultures and allowed to have progeny. A portion of each subculture is stored alive in the freezer, and genomic DNA is made from the rest of the culture. This DNA is thus made from the siblings of the frozen worms and carries the same mutations as the frozen worms carry. At a very low frequency (~1/200,000 mutagenized genomes) the mutagenesis will produce a small deletion (100-1000 bp) in any gene of interest. If PCR primers flanking an area of the gene of interest are used to amplify from the genomic DNA samples, deletions between the primers can be detected since they will bring the primer sites closer together and thus will generate a PCR amplicon smaller in size than that amplified from wild-type genomic DNA. When the PCR reaction is carried out under appropriate conditions, smaller deletion amplicons are amplified much more efficiently than the larger wild-type amplicon. Thus DNA representing several thousand mutagenized genomes can be amplified in a single reaction and a deletion amplicon generated from just one of those genomes will still be detected on an ethidium bromide-stained agarose gel. Once a DNA pool containing a deletion is identified, one can work back to identify the subculture of worms in which the deletion occurred. The frozen worms from that subculture are thawed, and individual live animals carrying the deletion mutation can be identified. It is important to note that deletion mutations are detected and recovered in heterozygous form, so recessive mutations that cause lethality or sterility are not selected against and can easily be obtained.
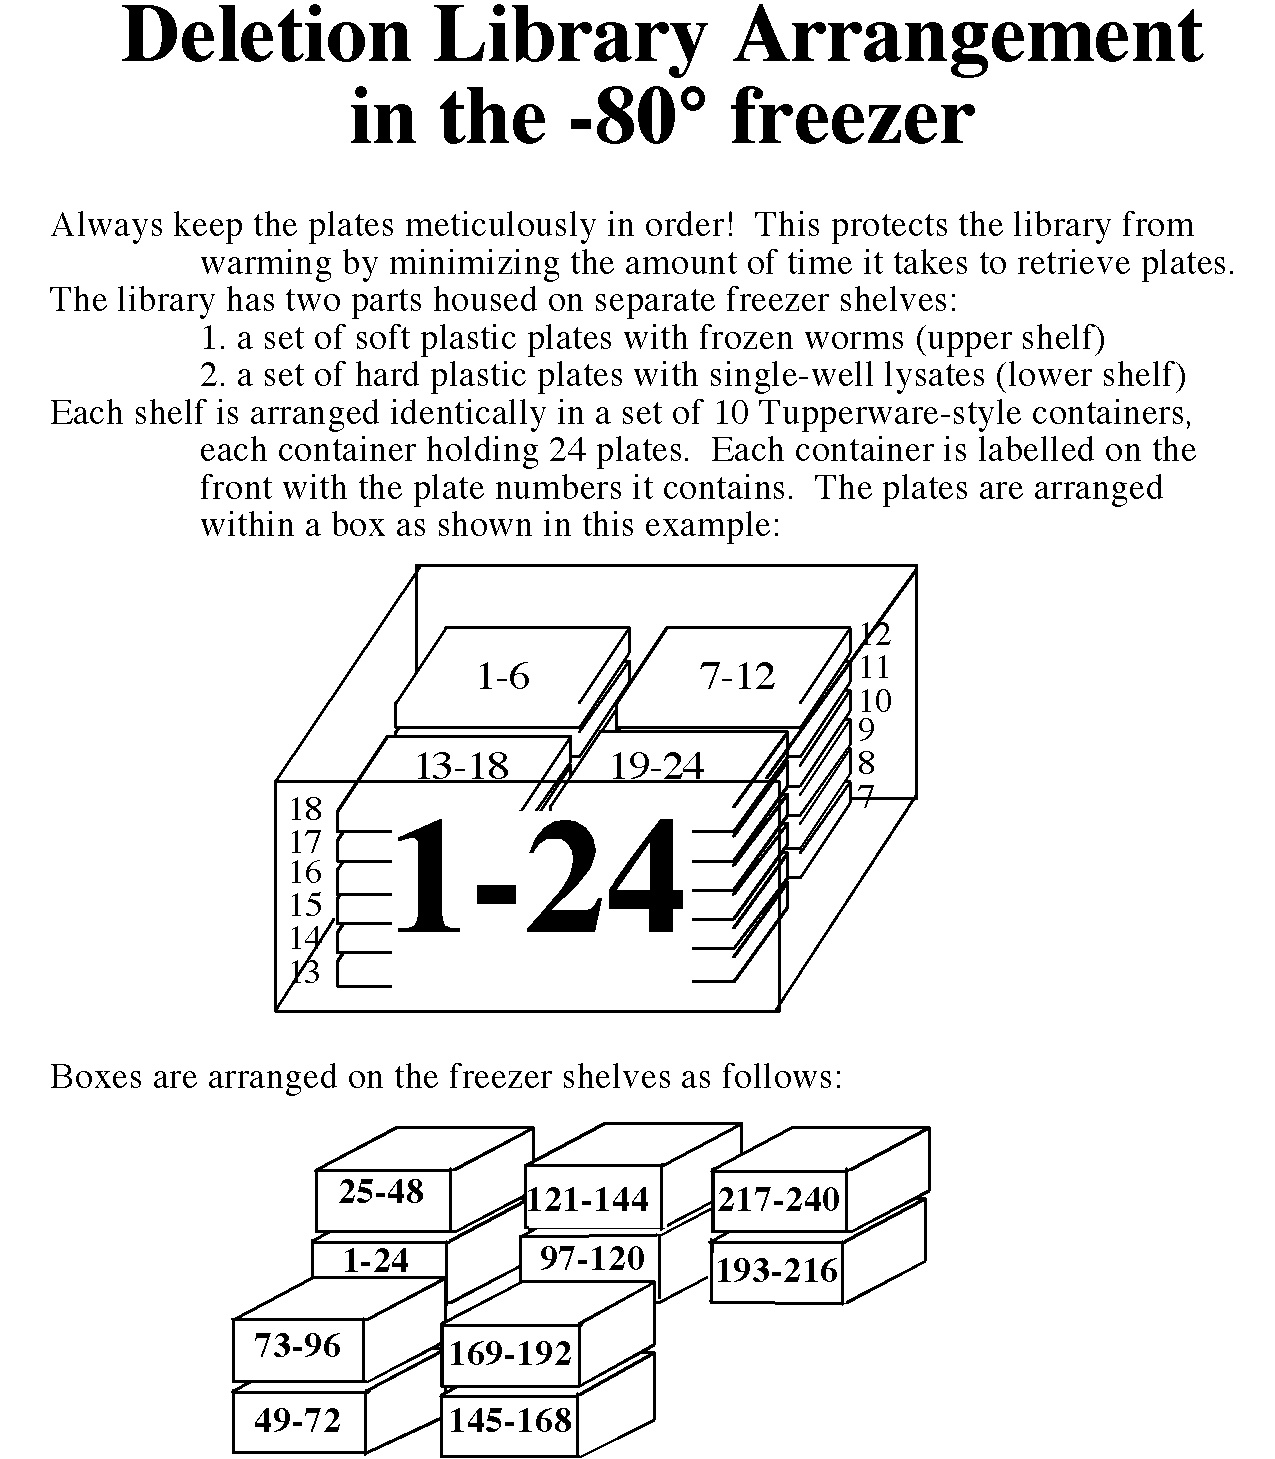
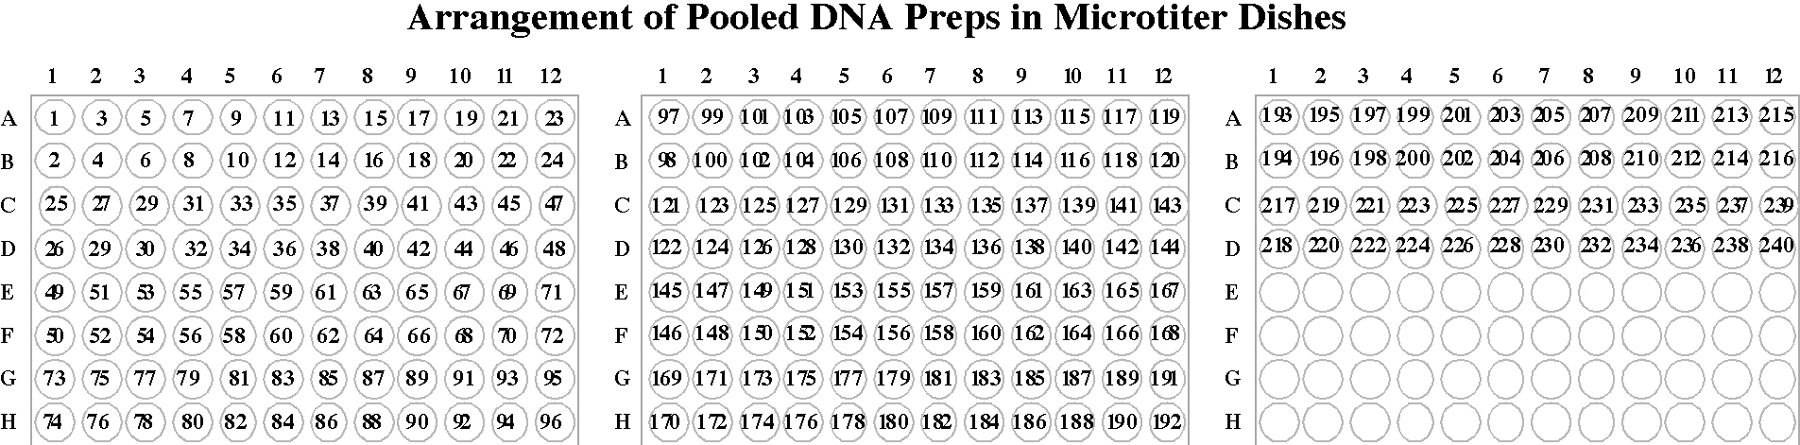
A standard mutant library consists of psoralen-UV mutagenized worms representing about 920,000 haploid genomes. Twenty F1 progeny of mutagenized worms are cultured and allowed to have F2 progeny in each well of 240 96-well microtiter plates. Half of each culture is frozen (generating a 240 microtiter plate frozen library of live animals), 1/4 of each culture is used to generate genomic DNA preps from pools of 96 wells: these pooled DNA preps are used as PCR templates for first level screening. The remaining 1/4 of each culture is lysed in the original culture well and frozen for use as PCR templates in second level screening (generating a second set of 240 plates that must be stored in a freezer). 240 microtiter plates fit on one shelf of a standard -80 degree freezer, so two freezer shelves are required to store the library.
This procedure requires an initial investment of about two weeks of part-time work to pilot the methods followed by ~three weeks of full-time work (if two individuals work together) to construct a frozen mutant library. The library can be stored indefinitely and can be screened at least 400 times. Once the library is constructed one can isolate a live mutant in a gene of interest in only 2–3 weeks of work.
We suggest that no more than two people should do the actual work of library construction. Spreading the work among a larger number of people may sound appealing, but the amount of work involved is not so much that more than two people are needed, and a larger group can be detrimental to quality control. We also suggest that at least one of the individuals constructing a deletion library should have several years of bench experience. These protocols are written based on the assumption that the reader has some familiarity with C. elegans and standard worm culture methods. If you have no experience with C. elegans we do not recommend you attempt this method without help.
The time, manpower, space, and financial resources required to use this procedure are modest enough that this technology is suitable for even a small laboratory that needs to generate several knockout mutations in several genes. However, we do not recommend it for labs that only need to knockout a single or just a few genes. For such laboratories, requests can be made to two C. elegans gene knockout consortiums. Information about such knockout requests can be found online at: http://celeganskoconsortium.omrf.org/ or http://shigen.lab.nig.ac.jp/c.elegans/ index.jsp.
A key feature of these protocols is that they include quantitative quality control assessments at each stage of library construction. Thus the success of each part of the procedure can be verified along the way, and any unsuccessful batches can be discarded immediately if a failure occurs. The production of a successful deletion library can be essentially guaranteed as long as the individuals constructing the library are committed to meeting all the quality control criteria. Every failure we are aware of resulted from individuals failing to take the quality control targets seriously and forging ahead without meeting them.
A standard 920,000 mutagenized genome library is adequate to identify at least one deletion allele in most genes. The size of the library can easily be increased to improve the success rate and average number of alleles obtained per gene. At Yale we have two mutant libraries representing a total of about two million genomes. Since completing the second library, we have succeeded in isolating at least one deletion mutation for every gene we have attempted to knock out. Two publications that contain examples of using this technology to knock out whole families of genes are Hess et al. (2004) and Chase et al. (2004).
These protocols are based on methods originally developed and described previously by three different groups: 1) Bob Barstead's lab at the Oklahoma Medical Research Center (Edgley et al., 2002); 2) the NemaPharm Group at Axys Pharmaceuticals (Liu et al., 1999); and 3) Ron Plasterk's lab at the Netherlands Cancer Institute (Jansen et al., 1997; Jansen et al., 1999). The library construction methods described here are most similar to those originated at NemaPharm, and include the microtiter culture/frozen worm strategy pioneered there. Rajesh Ranganathan and Peter Reddien in the Horvitz lab developed the special container used to freeze worms in microtiter plates. The library screening protocols are based on the “poison primer” method described in Edgley et al. (2002). Most aspects of the procedure have been varied to improve efficiency and success rate. Thus, these methods differ from those of others in a number of details.
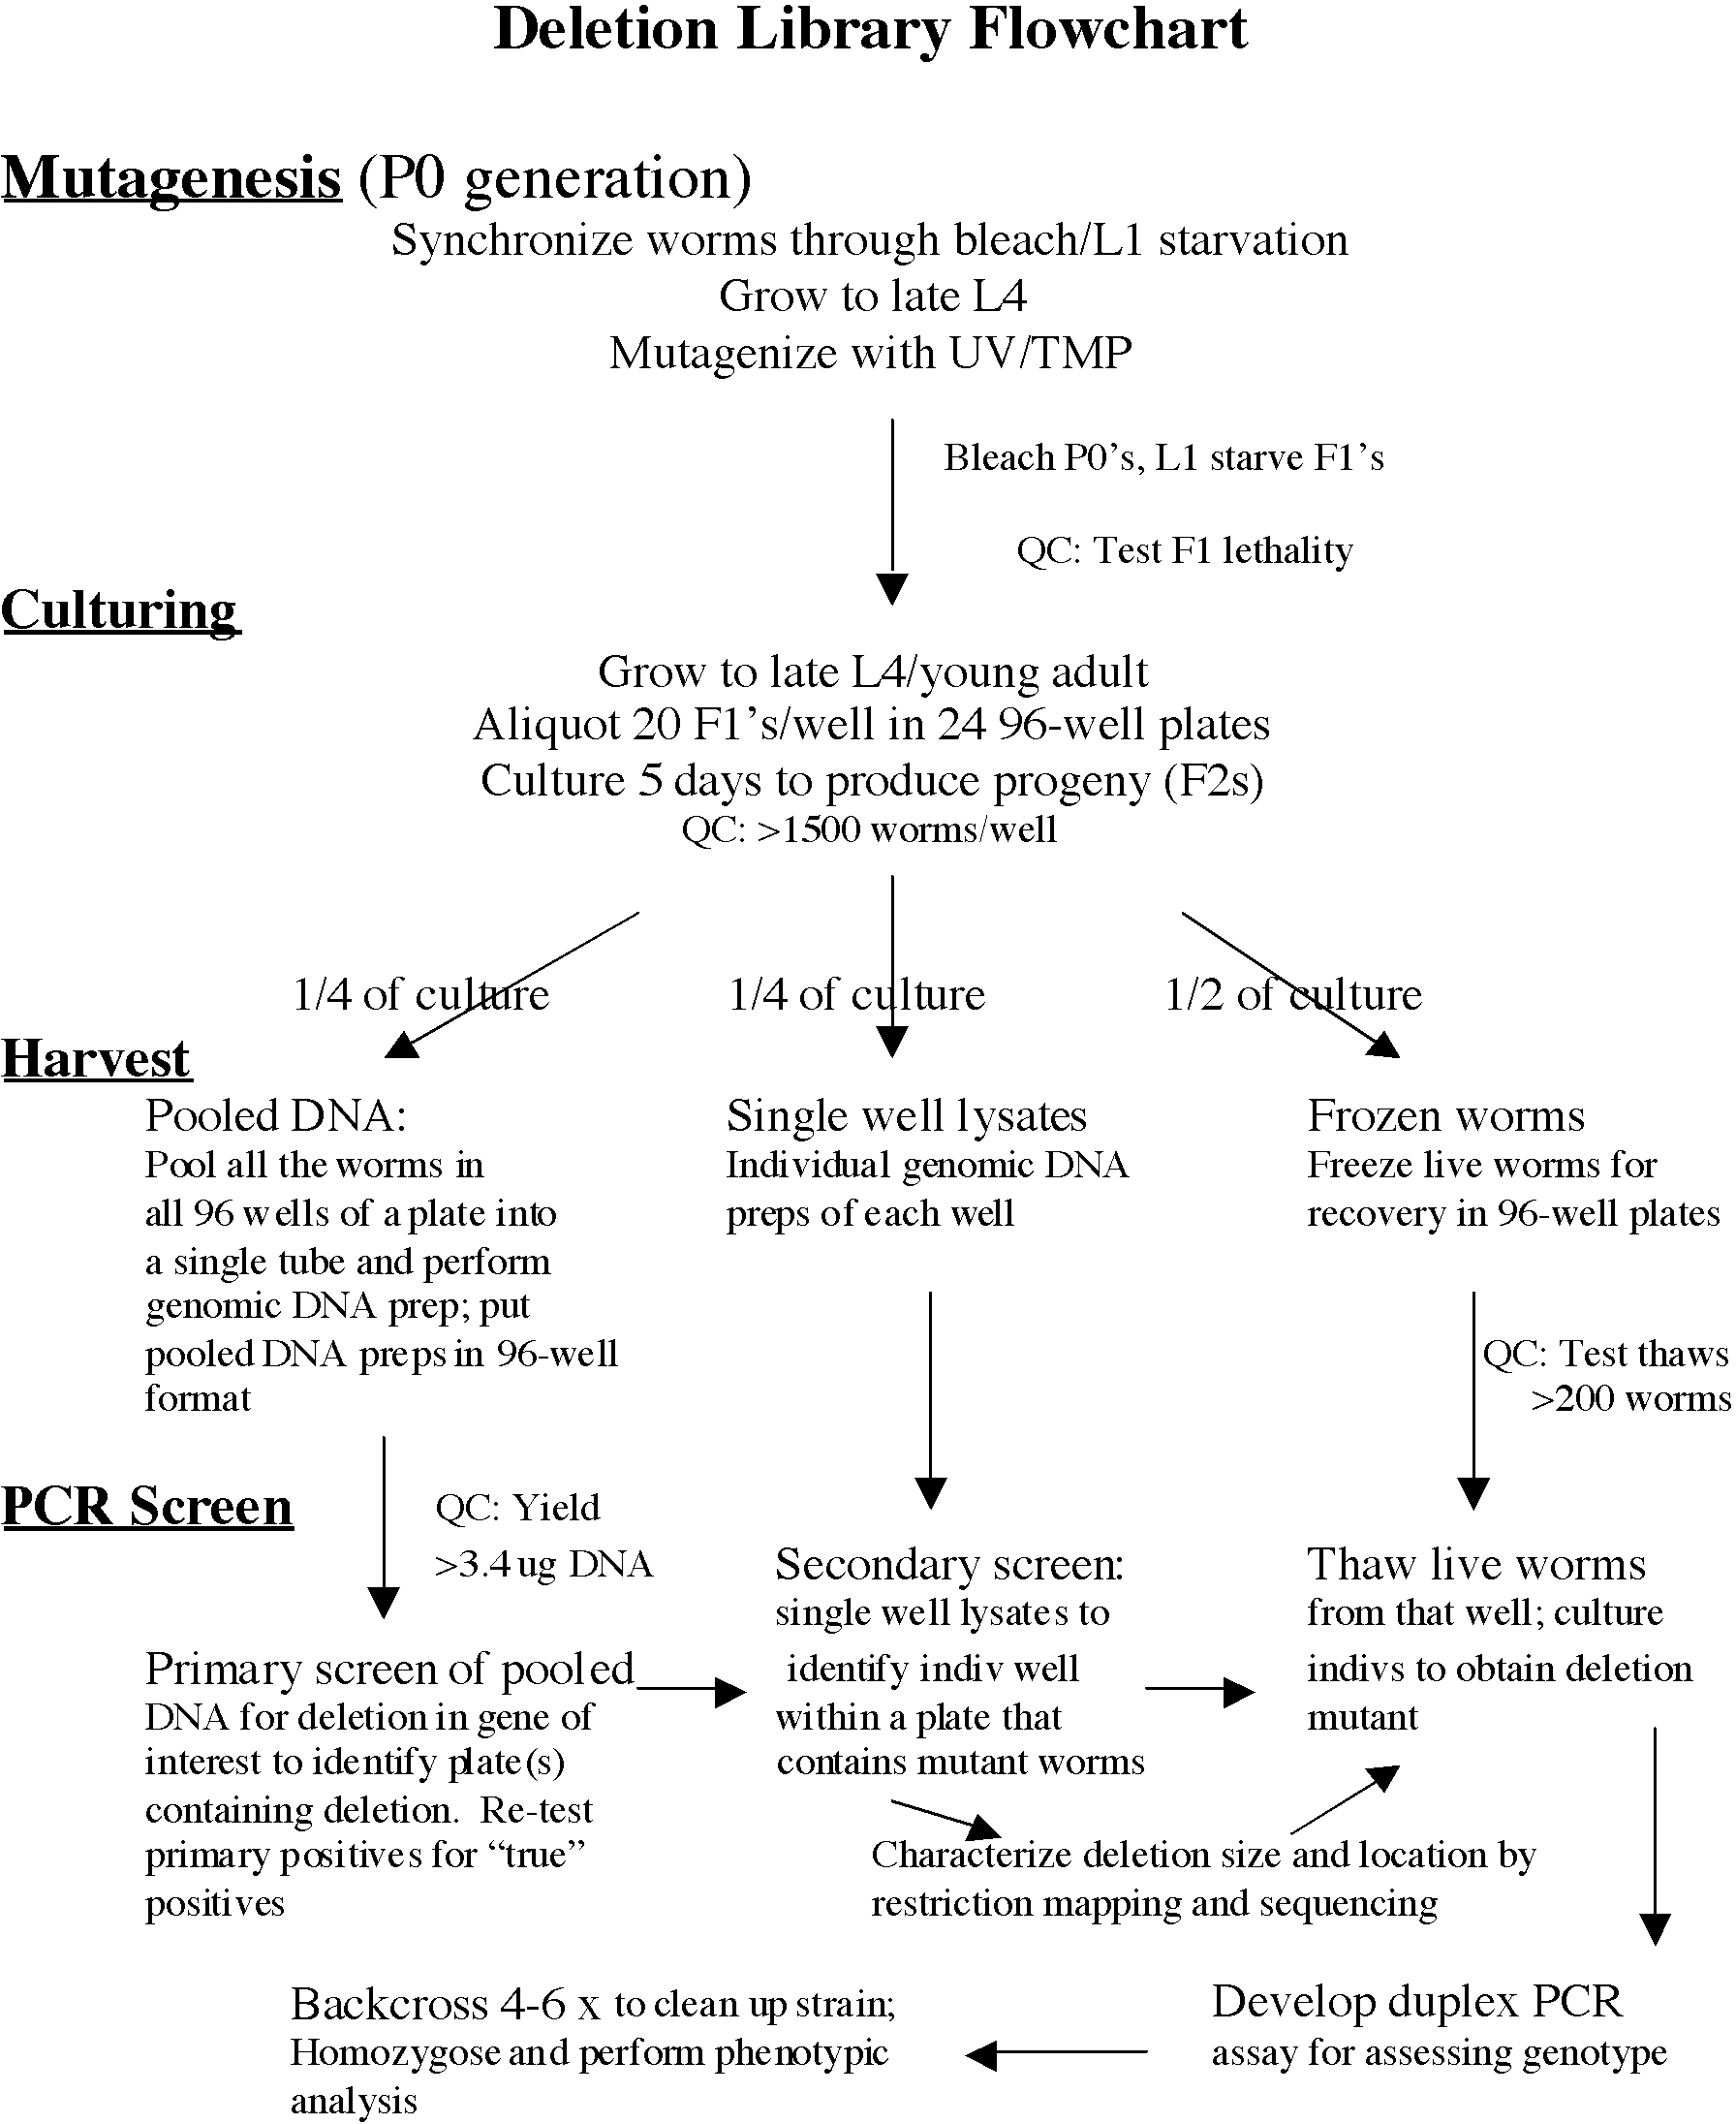
The protocols below describe in detail each aspect of library construction and screening, but they are so lengthy that it can be difficult when initially reading them to get the overview needed to start organizing the necessary efforts. Therefore, described first is a brief outline and flowchart of the actions required while constructing the library. The purpose and logic of each of the various activities described will become clearer after having read the detailed protocols. Therefore, first become familiar with the strategy by reading through the whole document and then return to the overview and flowchart (Figure 1).
For mutagenesis, order psoralen and find or buy an appropriate UV illuminator and a UV dose meter.
For microtiter culture of worms, buy 96-well culture plates and Tupperware-style boxes.
For freezing of worms in 96-well format, order flexible plastic 96-well plates and film to seal the tops of the plates. Obtain four or more New England Bioloabs styrofoam coolers and construct the foam rubber pieces that will go inside to make the specialized freezing boxes.
For storing the library, clear two shelves of a -80° C freezer. The library is stored in Tupperware-style boxes that hold 24 plates each, and ten such boxes must fit on each freezer shelf. Find freezer boxes that will hold 24 plates and which are the right dimensions to fit 10 per shelf in your freezer.
Obtain two 12-channel pipettors, one for small volumes (5-50μl) and one for larger volumes (up to 200 μl).
For library construction, an oven is needed for 55°C and 95°C incubations (a hybridization oven can be used for 55°C, but a high temperature oven is required for 95°C).
For screening the library, at least one 96-well format PCR machine is needed.
There are other minor supplies required that are described in the detailed protocol.
|
Figure 1. Deletion library flowchart. Each step in the construction and screening of the library is shown underlined on the left. The protocols are briefly summarized in the order in which they are carried out. Use this flowchart as a reference when following the more detailed library construction and screening protocols.
Optimize the psoralen-UV mutagenesis of C. elegans. Monitor the success of the mutagenesis by quantitating the percent lethality in the F1 progeny of the mutagenized animals.
Optimize the growth of 96-well liquid cultures of the F1 progeny of mutagenized animals. Monitor the success by 1) counting the number of F1 animals per well to make sure the target of about 20 animals per well is attained; 2) counting the number of F2 progeny produced per well to make sure the target of >1500 per well is obtained; 3) making sure the cultures starve with F2 animals that are predominantly arrested as L1 and L2 larvae; and 4) making sure the cultures are not contaminated. The appropriate amount of bacteria supplied to the worms as food must be empirically determined in order to optimize the culturing conditions.
Optimize the freezing of live animals in 96-well format. Using the practice 96-well cultures as tests, construct and test the special freezing containers. Monitor the success by counting the number of viable animals recovered after thawing test aliquots. A successful freeze/thaw should recover >200 live animals per frozen culture.
The library is produced in batches of 24 96-well plates. A total of 10 batches are required to produce the entire 240 plate library.
Each 24-plate batch requires a mutagenesis, five days of culturing the animals in microtiter dishes, and then one day for processing the grown cultures. Processing involves 1) producing a set of 24 microtiter plates of frozen worms, stored at -80°C; 2) producing a corresponding set of 24 “single well lysates” that can be used as PCR templates, also stored at −80°C; and 3) producing 24 “pooled DNA” preps, one for each plate, that are also used as PCR templates. The day a batch is harvested, do items 1 and 2 from this list. When all the growths are done, complete the DNA preps for all the batches at the same time.
It is recommended to start by just setting up one batch and processing it from beginning to end to make sure all the technical steps work before beginning full-scale production. Proceed to full-scale production by setting up five batches, one per day for five days, and then spending five days harvesting those batches, one per day. Repeat this procedure once more to produce enough batches for a complete library. At the end, complete the processing of the pooled DNA preps for all the batches. This schedule distributes the work over a three-week period in a fairly even fashion.
Grow N2 worms on three 15 cm NGM plates with thick bacterial lawns. Use a healthy bacterial strain like HB101 rather than the more sickly standard strain OP50 to get a thick lawn. For instructions on standard C. elegans culture and media there are several reference books, such as Wood et al., 1988. The library is constructed in batches of 24 microtiter plates, and the three NGM plates will provide enough animals for several batches. Let the plates grow until there are a large number of gravid adults but the plates have not yet starved.
Add 10 mls sterile S medium to each of the three plates and use a sterile Pasteur pipette to transfer the worm suspension to three sterile 15 ml centrifuge tubes. (The recipe for S medium is given below in section 7.2.2). Spin the tubes in a clinical centrifuge (30 sec at ~1000 rpm) and remove the supernatant.
Add 5 mls alkaline bleach solution to each tube. Incubate at room temperature for 3 minutes with occasional gentle agitation. This kills all adults and larvae, while leaving the eggs alive. The eggs must be washed from the bleach solution in less than 5 minutes to prevent them from dying.
| Alkaline bleach solution |
| 0.25 M NaOH |
| 20% (by volume) commercial Chlorox (final concentration = 1% hypochlorite) |
Spin as before and remove the supernatant. Add 10 mls S medium (within 5 minutes after adding the bleach solution), mix, spin, and remove the supernatant. Repeat this wash twice more. Fill the tubes one last time with S medium and pour the contents of all the tubes into a sterile 250 ml Erlenmeyer flask containing ~50 mls S medium.
Place the flask on a 20°C shaker overnight (or longer). All the eggs will hatch and the animals will arrest as starved L1 larvae. This step produces almost perfect synchrony of the population. The worms can be left on the shaker for up to two weeks. During library construction several 24-plate batches can be started from this same flask of L1's. The following steps describe how to restart growth of L1's for a 24-plate batch.
Late in the afternoon, pour some of the L1 solution into sterile 15 ml centrifuge tubes, spin the animals down, remove most of the supernatant, and combine all the animals into one tube.
Quantitate the concentration of L1's. Use serial dilutions to reduce the L1 concentration to something easier to count: be sure that you shake up the suspensions of animals immediately prior to any pipetting, as the animals settle rapidly. To count the animals in a suspension, use a P20 pipetteman to remove 10 μl of suspension and then place it onto an unseeded NGM plate in a long, thin line. Count the worms under a dissecting microscope. The long thin line makes it easy to count the worms without skipping any or counting any twice.
Pipette a volume containing 10,000 worms onto each of six 15 cm NGM plates with thick bacterial lawns. There should be enough food on the plates to allow the animals to grow to the L4 stage without starving. Set the plates at 20°C.
Psoralen-UV mutagenesis is less used and somewhat more difficult than EMS mutagenesis, which is the standard method for most C. elegans genetics. However, psoralen-UV mutagenesis is thought to produce a higher frequency of the class of small deletions detected by the deletion screening methods described below.
Animals should be mutagenized at the late L4 stage. Use a dissecting microscope to verify the staging: almost all the animals should have a white crescent visible where the vulva is undergoing morphogenesis; a few will be just past this stage. This should be at about 43–48 hours after they were put on plates with food. The animals should be almost perfectly synchronous.
Keep all solutions of psoralen and worms treated with psoralen in the dark; ordinary room light has ~3-4 μW/cm2 of 360 nm UV light.
Wash the worms off the NGM plates with M9 medium, using sterile glass pipettes, and transfer the worms to a sterile 15 ml plastic centrifuge tube. Spin the worms down (1000 rpm in a clinical centrifuge for 30 sec.) and remove the supernatant or add M9 until the total volume of the worm suspension is 7 mls.
| M9 Medium |
| 5.8 g Na2HPO4 |
| 3.0 g KH2PO4 |
| 0.5 g NaCl |
| 1.0 g NH4Cl |
Bring to 1 liter w/ dH20. Dispense into 100 ml bottles and autoclave.
Place 7 mls M9 in a separate 50 ml tube that is covered with aluminum foil to block out light. While working in a hood and wearing gloves, add 210 μl of 2 mg/ml psoralen in DMSO (this requires heating and stirring to get into solution). Follow proper procedures for disposing of psoralen waste. Our experience suggests that psoralen solutions go bad over time. Therefore, make a fresh solution of psoralen, store frozen aliquots at −80°C, and use these aliquots for no more than a few weeks before discarding them.
Transfer the 7 mls of worms into the tube of psoralen and rock on a rocker at 20°C for 15 minutes. In the meantime, turn on the UV light of the UV illuminator to warm up for >10 minutes. Note that an appropriate UV illuminator and dose meter, along with specifics on other equipment and supplies, are described at the end of this document.
Pour the worms into a 15 cm sterile plastic petri dish. Use a UV dose meter to monitor the 360 nm UV dose (through a petri dish bottom) on the UV box. For example, if the machine gives an intensity of 3.05–3.2 mW/cm2, expose the worms for ~7–8 seconds. Quickly place the petri dish at the center of the machine, time the 7–8 seconds, and remove the dish. Afterward transfer the worms with a Pasteur pipette back to a 15 ml tube and spin down in a clinical centrifuge. Remove the supernatant to a psoralen liquid waste container. Wash the worms twice in ~5 mls of M9. Remove all of the last supernatant except for ~200 μl. Using a sterile glass pipette, transfer the worms to the edge of the bacterial lawn on 15 cm NGM plates. Eight 15 cm plates should suffice to give enough food to allow the worms to grow to gravid adults. Place plates at 25°C in the dark.
This is a very heavy mutagenesis and results in significant lethality of the F1 progeny of the mutagenized animals. Raising the UV dose even slightly leads to a rapid increase in the F1 lethality, so the UV dose must be monitored and controlled carefully. The best way to monitor the mutagenesis is to measure the F1 lethality and adjust the UV dose until you reach the desired range of 10–15% lethality, as described below.
A more convenient way to carry out the psoralen mutagenesis is as follows. After the 15 minute incubation in psoralen solution, spin down the worms and remove the supernatant. Transfer the animals in a small amount of liquid to the surface of unseeded NGM plates. Place the plates in a “Stratalinker” (Stratagene) equipped with long-wave (360 nm) UV bulbs (note that the standard bulbs in these machines are for short-wave UV). The Stratalinker can then be used to deliver a measured dose of UV radiation. While this method has been very successful for psoralen mutagenesis for other purposes, it has not been used to generate a deletion library and thus this method of mutagenesis cannot be guaranteed to work for library production.
When the mutagenized P0's are gravid adults, about 24–30 hours after the end of mutagenesis, they are ready for processing. The plates should be recently starved, there should be lots of F1 L1's on the plate, and the P0 adults should be bloated with unlaid eggs.
To assess the success of mutagenesis, remove ~20 worms to a freshly-seeded plate at 25°C for a few hours, remove the adults, and then replace the plates at 25°C overnight. The next day count the number of hatched larvae and dead eggs among the F1. The mutagenesis worked well if there is ~10–15% lethality in the F1's. This is the first quantitative quality control criterion to be met for each batch. Keep a set of records noting the numbers measured at each quality control point for each batch during the library construction.
After setting up the quality control check, treat the remainder of the mutagenized worms with alkaline bleach as described earlier. Plate the surviving eggs on two unseeded 6 cm NGM plates. The hatched eggs will arrest as starved and perfectly synchronized L1's that will then be ready to transfer to liquid culture.
An alternative method of getting gravid adults bloated with eggs prior to the second bleaching may be used to greatly increase the yield of F2 animals. At 24–30 hours after the end of the mutagenesis, while the 15 cm plates are not close to starvation, wash off the worms with 5 mls of M9 per plate and transfer to a 15 ml centrifuge tube. Spin the worms down, remove the supernatant, and wash twice with S medium, leaving 14 mls final volume. Pour the worms and S medium into an empty, sterile 15 ml plastic petri dish (not filled with agar) and let sit on the lab bench for 4–5 hours. Shake the dish occasionally to keep the worms aerated, and to avoid them sticking to the bottom of the dish. Inspect the culture periodically. When the worms appear bloated with eggs (they do not lay eggs well in M9 medium) transfer the liquid to a 15 ml centrifuge tube, spin, remove the supernatant, and bleach the eggs as stated in section 7.2.1.1 and above. Transfer the pellet of eggs to two unseeded plates. Add 10 mls of S medium to the remaining empty petri dish, which will still have eggs stuck to its surface. Incubate the three petri dishes overnight in the 25°C incubator. This technique will produce reliable yields of about 80–100 thousand L1 animals.
Commentary: The synchrony induced by starving the F1 animals is critical to the success of the procedure. It guarantees that an F1 animal carrying a deletion mutation of interest will be the same age as the ~19 animals it is cultured with (see section 7.2.2). If the animal of interest is younger than the others in the well it will have few F2 progeny and the deletion will therefore be difficult to detect and recover.
Use sterile technique when culturing the mutagenized worms. The growth medium contains an antibiotic/antimycotic to reduce contamination. Visually inspect some of the plates for contamination when the cultures are harvested. Contaminated plates must be discarded.
The three critical parameters for growth in microtiter wells are 1) amount of bacteria added, 2) adequate aeration, and 3) growth temperature. If too much bacteria is added the worms will die; if too little bacteria is added the worms will produce few progeny before the culture starves. With the proper amount of food, 1000–2000 progeny will be obtained from the 20 worms added to each microtiter well, and these progeny will starve as L1, L2, and L3 larvae 4–5 days after the culture is started. Inadequate aeration causes the cultures to grow slowly or not at all. Cultures grow slowly at temperatures below 20°C or above 25°C.
| S-medium (4 liters) |
| 23.2 g NaCl |
| 200 ml 1M potassium phosphate, pH 6.0 (136.1 g KH2PO4 per 1000 ml; start with 800 ml and adjust to pH 6.0 with solid KOH (approx. 15g) before bringing up to volume.) |
| 3.8 L dH20 |
| 4 ml 5 mg/ml cholesterol in 95% EtOH. Warm to 37°C to dissolve. |
| Aliquot 400 ml into each of 10 bottles; autoclave. |
Just before use, supplement each sterile 400 ml aliquot of S Medium with six solutions (I-VI). These must be added after the S Medium has been autoclaved. Each supplement should be sterile and added to the S medium using sterile technique.
1.2 ml 1M MgSO4
1.2 ml 1M CaCl2
4 ml 100X trace metals solution
| 0.346 g FeSO4.7H2O |
| 0.930 g Na2EDTA |
| 0.098 g MnCL2.4H2O |
| 0.144 g ZnSO4.7H2O |
| 0.012 g CuSO4.5H2O |
| bring up to 500 ml final volume with dH20 |
| Autoclave. Store trace metals solution in the dark. |
4 ml 1M potassium citrate, pH 6.0 (21.01 g citric acid monohydrate per 100 ml; start with 80 ml and adjust to pH 6.0 with solid KOH (approx. 17 g) before bringing up to volume. Autoclave.)
4 ml Gibco 100X penicillin/streptomycin
4 ml 100X nystatin suspension 10,000 units/ml.
| L broth (2 liters) |
| 20 g tryptone (Difco) |
| 20 g NaCl |
| 10 g yeast extract (Difco) |
| dH20 to 2 liters |
| Autoclave. |
Set up a bacterial culture each day before worm cultures are to be set up.
Prepare several aliquots of 400 ml of L broth in 1 L flasks (see above for L broth recipe).
Inoculate HB101 bacteria into a flask; grow overnight @ 37°C with shaking. (Note: DH5alpha bacteria, a standard strain used for cloning, has also been used. For growing worms a healthy E. coli strain that will grow to high density is needed). To ensure reproducibility, use freshly grown bacteria each day the worms are cultured.
Spin down the bacteria in a 500 ml bottle (6,000 RPM for 6 minutes) and resuspend the bacterial pellet in 6 mls of S medium by vortexing.
Quantitate the amount of bacteria by diluting a small amount of the suspension 1000-fold (using serial dilutions) in S medium and measuring the OD550. The OD of the diluted solution should be around 0.2.
Once the F1 lethality has been confirmed to be 10–15% from the test plate, as described earlier, it is time to generate the 96-well microtiter plate cultures.
Wash the mutagenized F1 L1 larvae off of the plates using 5–10 mls of S medium. Transfer the suspension to a 15 ml centrifuge tube. If the F1s have been hatched into a liquid culture from a petri dish as described in the last part of part 7.2.1.4, simply transfer this liquid to a 15 ml centrifuge tube.
Quantitate the concentration of worms in the suspension: mix the suspension well, remove 10 μl to an unseeded plate (apply to plate as a long thin line of liquid to facilitate counting the worms), and count the number of larvae using a dissecting microscope. Repeat two times and average the three numbers.
Prepare a suspension of 130 ml of S medium with HB101 at OD550=6.6 using an appropriate volume for the desired batch size. To this add a sufficient quantity of the suspension prepared in step 7.2.1.4 (above) so as to bring the final worm concentration to 20 worms/50 μl. Check carefully that the worms are at the targeted concentration by removing 50 μl aliquots to unseeded plates and counting the worms. The concentrations of both bacteria and worms must be reproducible and accurate; the success of the cultures (and of the library) depends on this.
Mix the bacteria/worm suspension well prior to each transfer or pouring to be sure the worms are uniformly suspended. Pour some of the suspension into a sterile reagent reservoir, and use a 12-channel pipettor to pipette 50 μl into each well of a Corning “cell well” microtiter plate. (These are standard, flat-bottomed 96-well tissue culture plates, and other brands may be substituted). Agitate the reservoir frequently to ensure the worms are not settling. Repeat to set up a total of 25 plates. 24 of these plates will be used for the library, and the 25th plate will be used to monitor the success of the cultures.
Cover the plates with their lids and place them in a loosely covered plastic Tupperware box lined with wet paper towels. The lids and wet towels help reduce the loss of volume from the cultures due to evaporation.
Set the box in a 20°C incubator for five days, after which the cultures should have starved. Determine that the worm cultures have starved by checking that all or most of the wells have turned “clear”- look at the plate from below to see that the cloudy bacteria are gone. At the same time, check plates for mold and discard any plates with mold growing in the wells.
It takes about 2 hours to harvest the bacteria and set up 24 microtiter dishes of worm cultures.
An important quality-control check is carried out at the time of harvesting to ensure that culturing has gone well. One of the 25 plates in the batch is used as a “test plate”. 20 μl are withdrawn from each of four wells in the test plate (pipette up/down several times first to get a uniform suspension of worms) and combined in a tube containing 320 μl of S medium. Plate 10 μl of the diluted sample (again, removed after mixing well) on an unseeded NGM plate. Count the number of F2 larvae under a dissecting scope to calculate the average number of F2 worms per μl of culture. Repeat this measurement several times in each early batch to feel confident that it is calculated accurately. Try to obtain >1500 per well. Less than 1000 is absolutely unacceptable. Record the number of worms calculated per well for each batch. When piloting and in early batches, also use a P200 pipetteman to withdraw all the liquid and thus measure the volume of liquid in several wells of the test plate. Some evaporation may have occurred, but there should be at least 40 μl left in each well. If not, increase the moisture added to the wet paper towels in the Tupperware container used for culturing.
It is critical to the success of the overall procedure that the culturing go as well as possible–this is the major factor affecting the reliability of recovering mutant animals. It is best if all cultures have >1500 F2 animals per well. When the number of F2 per well goes much below this, most of the F2 animals do not run out of food and arrest their development until after they are past the L1 stage. Because these older animals do not survive freezing well, the relatively few live animals recovered from thawing a positive culture may not be sufficient to guarantee that a live animal carrying the deletion of interest will be recovered.
Before scaling up to production level batches of 24 plates, run pilot worm cultures to make sure the target of 1500 starved L1 F2 animals per well is being met or exceeded. During the piloting, ensure that 20 F1 animals are placed in each well. Also, try culturing worms by varying the concentration of bacteria up and down within a two-fold range. It is critical to empirically optimize the culturing step, and also to empirically determine that the target of 1500 F2 per well is met. Please note that psoralen-mutagenized animals grow very differently from non-mutagenized animals. It is thus critical to optimize growth conditions using animals mutagenized with psoralen following the same procedure as will be used for the library. This will also provide an opportunity to optimize the UV dose during psoralen mutagenesis.
When a batch is ready to harvest, four things must be done in order. These are here briefly summarized. Detailed protocols for each procedure are given in the subsequent sections.
Half the volume of each well is frozen so that live worms can be recovered from wells of interest. This generates a set of 24 frozen plates of live worms for each batch processed that will be stored at −80°C.
A “pooled DNA prep” is prepared from each plate (i.e. a DNA prep from a mixture of animals in all 96 wells). These pools are generated from 1/4 of the volume of each culture well in a plate and they will be used as PCR templates in screens for deletion mutations. Each pool has a complexity of 4,000 mutagenized haploid genomes. For convenience, the pooled animals from each plate are frozen immediately after each batch of cultures has grown. Then, after growing all the batches, the DNA preps from the frozen pools of animals are completed as the last step of library construction.
The remaining 1/4 volume in each well is lysed with proteinase K, and these “single-well lysates” are frozen. When a pooled DNA prep scores positive for a deletion, the single-well lysates from that plate will be tested by PCR to identify the well containing the mutant.
Diluted DNA templates are prepared for the primary PCR screen. Each template used for the primary PCR screens consists of a diluted pooled DNA prep prepared from a 96-well plate of cultured mutagenized worms.
After the cultures have passed the quality control check, label the plates before proceeding with the harvest. The plates making up the library are numbered 1–240. Label each plate twice to ensure at least one number will remain legible, since these plates are going to be kept and used for years. Stick-on labels (e.g., “Tough-tags”) can come off in the freezer, so use these for no more than one of the two labels. Write directly on the plate (not the lid) with a good marker for one or both of the labels.
Quality control: The 24 plates in the batch will be initially frozen in four containers, each containing six plates. Each container must contain a test sample to monitor the viability of the frozen animals. Thus a small PCR tube containing worms from a well in the test plate plus freezing solution should be nestled in the stack of 6 plates within each freezing container, as described below. After overnight in the freezer, the PCR tubes are test-thawed to measure the viability after freezing for each styrofoam box. Record the number of live thawed worms recovered for this test-thaw from each box of worms frozen in order to have a quality-control record for the viability of the frozen cultures.
Add S medium using a 12 channel pipettor to each well of the culture plates to bring the final volume in each well up to 150 μl (i.e. if there was no evaporation, add 100 μl/well; if there was some evaporation, add more).
For each plate to be frozen, label a new freezing plate: a 96-well Falcon 3911 “Microtest III flexible assay plate”. These special, soft plastic plates will allow you to cut out individual wells with a razor blade so that an individual microtiter well can be thawed without having to thaw (and throw away) an entire plate. Label each plate twice to ensure that at least one label will be legible - these plates must be identified correctly possibly years later. There are special sticky tags (e.g., “sidewall tough-tags”) that are easy to write on that can be put on the sides of plates. These can come off in the freezer, so if you use these only do so for one of the two labels per plate.
Add 70 μl freezing solution (see recipe below) to each well of the freezing plates.
| Freezing solution |
| 200 ml 1M NaCl |
| 100 ml 1M KPO4, pH 6.0. |
| 600 ml glycerol |
| Bring to 2 liters with dH2O |
| Distribute to 200 ml bottles |
| Autoclave |
| Add 0.06 ml sterile 1M MgSO4 per 200 ml bottle |
Withdraw 70 μl from each culture well using a 12 channel pipettor and pipette into the corresponding well of the freezing plate. Withdraw the worms by pipetting up/down several times to mix the well before withdrawing liquid. Dispense the liquid by pipetting down/up to mix the solution in the freezing plate. Once the worms are in the freezing solution work quickly to get them in the freezer: the freezing solution damages worms at room temperature.
To speed the work, use the same tips for all the pipetting - it is faster to rinse them between use than to switch them. To minimize contamination of worms from inappropriate wells into the freeze plates, wash out the tips by pipetting dH20 up/down several times between uses. Also, add worms to just six plates at a time, and get those plates into the freezer before putting worms from the next six plates into freezing solution.
Cover the freezing plates with Rainin thermalseal film (ordering information for these and all other specialized materials are at the end of this document).
Put a stack of six freezing plates with the test thaw PCR tube nestled in among them in a special cooler (described below) and place at −80°C overnight. The test thaw tube is prepared by adding 100 μl of S medium to a well from the test plate, withdrawing 70 μl into a 200 μl PCR tube, and adding 70 μl of freezing solution. The next day the plates can be quickly removed from the cooler and stored in the −80°C freezer in an appropriately labeled Tupperware container.
The rate at which worms cool during freezing is critical for their viability. You must freeze the worms in the freezer using an insulated container to slow the cooling rate. The container must be constructed exactly as described here and as diagramed in Figure 2. Exactly six plates must be included in each container as the plates themselves contribute to the proper heat capacity and cooling rate. The cultures need to have grown well in order to get good viability. Only the cultures that have starved when the F2 animals are predominantly L1 larvae will survive freezing well.
|
Figure 2. Assembly for freezing six microtiter plates of worms. Cut the foam rubber from a New England Biolabs Styrofoam container as directed and assemble the foam rubber pieces, six microtiter plates and single tube of test frozen worms as shown. It is critical that the pieces fit together tightly to ensure proper freezing of the worm suspensions.
The outer container is the small, cubical styrofoam package in which New England Biolabs ships enzymes. These containers are packaged with a gel-ice pack and one soft foam rubber block inside. Discard the gel-ice and save the foam rubber - two foam rubber blocks are needed to construct the inner insulation for each styrofoam container. Also, as the foam rubber tends to get torn with use (it is very brittle when frozen at −80°C), it is necessary to have a supply of replacement foam rubber. Although the foam rubber shipped by New England Biolabs works well, any other foam rubber of similar density and consistency seems to also work.
Cut a foam block lengthwise in two. These pieces fit exactly into the top and bottom of the cooler, and will be above and below the stack of six freezing plates placed inside. Cut a second foam block lengthwise into thirds. These pieces will fill all the rest of the space inside the cooler. Two pieces fit along the two sides of the stack of plates. Cut the third piece in half; one half fits in front of the stack, one behind. Finally, place other small pieces of foam in the unoccupied corners of the cooler to fill the air spaces. See Figure 2 for a diagram of this assembly. Handle the plates carefully to avoid splashing the liquid worm suspensions onto the plate sealing film. This could cause some worms to be lost when a well is later thawed from one of the plates.
The stack of plates and foam assembly are held together with two rubber bands placed around the circumference of the foam pieces. These serve the dual purpose of holding the corner pieces in place, and securing an airtight seal among the many pieces. Close the cooler, and use about twelve rubber bands (or some sturdy tape) to hold it tightly shut. Place the cooler in the −80°C freezer.
The next day, transfer the plates to a properly labeled plastic Tupperware box in the freezer. It is important to place the plates in their final spot in the appropriate order, so that they don't have to be re-arranged later. Test thaw the loose PCR tube: thaw the sample by holding it between your fingers, and pipette the liquid onto a seeded NGM plate, and after 24 hours in a 20°C incubator, count the number of live animals. If fewer than 100 live worms survive the test thaw then the set of six plates from the corresponding freezing container should be discarded. Survival of greater than 200 worms is the minimum necessary to allow adequately reliable recovery of mutant animals. Good batches have more than 400 live worms from the test thaw.
It takes two people about 1 hour to do the pipetting to freeze worms from 24 microtiter plates.
Make one pooled DNA prep from each 96-well culture plate that has starved (five days after set up). Each prep has a complexity of 4,000 mutagenized genomes. Label each tube of DNA with the plate number from which it is derived.
| Pooled DNA prep worm lysis buffer |
| 20 mM Tris pH 7.5 |
| 50 mM EDTA |
| 200 mM NaCl |
| 0.5% SDS |
| Add Proteinase K to 100μg/ml just prior to use |
| Proteinase K |
| 10 mg/ml in water; store aliquots at –20°C |
Using the 12 channel multipipettor, move 1/4 the original volume (i.e. 35 μl) from each of the 96 wells to be pooled into a single sterile reservoir. Pipet up and down several times to resuspend the worms before removing the liquid from the wells. Reuse the same tips over and over, but rinse by pipetting up and down twice in a trough of water between each use of the tips for actual samples. Pasteur pipette the liquid from the reservoir to a 1.5 ml snap-cap Eppendorf tube, washing both the pipette and the reservoir in between each prep so they can be reused. Spin briefly at 3000 rpm to pellet the worms, and use an aspirator to remove as much of the supernatant as possible without losing worms. The total volume of worms in liquid needs to be reduced from >3 mls in the reservoir to 1.5 mls in the Eppendorf tube, so repeat the spin and removal of the supernatant a couple of times. Label each tube with the number of the corresponding culture plate. Numbering the tubes without error is critical for success: errors will make it impossible to trace mutants initially identified by PCR.
It takes two people about an hour to do the pipetting to make pooled worm samples from 24 microtiter plates.
Add 200 μl Pooled DNA prep worm lysis buffer (see above) to which proteinase K has freshly been added to 100 μg/ml.
Freeze the tube for >10 min. at −80°C to crack open the worms. The tubes can sit in the freezer for weeks at this step if needed. Then, after all the batches of cultures have been grown and processed, the pooled DNA preps can be completed. This is the most convenient way to distribute the work.
When ready to proceed with the DNA preps, thaw the tubes and incubate them at 55°C, with rocking, for 4 -6 hours. A Robbins Scientific hybridization oven equipped with a rocker works well for this. Place the tubes in a rack with a piece of cardboard rubber-banded over the top to keep the tubes in. Place the rack on its side on the rocker so that the liquid sloshes from the top to the bottom of the tube for maximum mixing. After the incubation, examine using a dissecting microscope. Almost all the worms should be dissolved. If you do not have an incubator equipped with a rocker, shaking the tubes by hand a couple of times during the incubation works fine.
Extract the DNA with 200 μl phenol/chloroform using pH 6.7 1:1 phenol:chloroform mix from American Bioanalytical. Add the phenol/chloroform, vortex the tube for 30 sec, centrifuge for 4 min., and carefully remove the aqueous layer (top) to a new labeled tube, avoiding the white interface. Note that phenol/chloroform will dissolve labels written on the tubes if any spills onto the outside of the tubes. So, check for this frequently, and keep the tubes in numerical order at all stages of the procedure to minimize the possibility of mixing up the tubes.
Extract the DNA in each tube with 200 μl of chloroform (add, vortex, spin 1 min., remove aqueous layer to a new labeled tube).
Add 800 μl of 100% EtOH to each tube, and invert several times to mix. Incubate for 10 min. at room temperature, centrifuge for 10 min. A pellet should be visible. Remove the supernatant with an aspirator, making sure not to lose the pellet.
Wash with 200 μl of 70% EtOH (add, spin 1 min., aspirate). Again, make sure not to lose the pellet.
Dry briefly by leaving the lid off the tube on the bench top for 10 min.
Resuspend the pellet in 100 μl of 10 mM Tris, 0.l mM EDTA, pH 8.0 by letting the tube sit at room temperature overnight. Vortex briefly the next day. Store the DNA at −80°C.
The yield should be at least 3.4 μg of genomic DNA, contaminated by a small amount of RNA. It is absolutely essential that a good yield is achieved, so piloting the DNA preps and quantitating the yield is essential before proceeding at production scale. The yield of some of the preps can be checked by running a bit (3 μl) on an ethidium bromide stained agarose gel and comparing to a larger, purer prep of genomic DNA of known concentration (determined by OD260). When things go well, it is possible to achieved yields of up to 15 μg.
For screening the library, these preps will be diluted and aliquotted into microtiter plates (described below). The number of times the library can be screened is limited by the yield of DNA in these pooled preps, so make sure to get the best yield possible. If the yields achieved are 3.4 μg per prep, the library can be screened about 400 times. Better yields will allow more screens.
After freezing live worms and making pooled DNA preps (protocols above), 1/4 of the original culture volume will be left in each well of the culture plate (about 35 μl). These worms will be lysed and the resulting single well lysates will be used as PCR templates to find which well among the 96 contains a deletion first detected in the corresponding pooled DNA prep.
| Single well lysis buffer |
| 30 mM Tris pH 8 |
| 8 mM EDTA |
| 100 mM NaCl |
| 0.7% NP40 |
| 0.7% Tween 20 |
| Add proteinase K to 100 μg/ml just before use |
| Note: the 8 mM EDTA chelates the Mg2+ and Ca2+ ions from the S medium and thus inactivates any DNAses released from the worms. |
To each well, add 35 μl of Single well lysis buffer (above) to which proteinase K has been freshly added to 100 μg/ml, and cover each plate with Rainin Thermalseal film to prevent evaporation during the subsequent incubations.
Incubate at 55°C for 4 hours with rocking if possible. However, rocking does not seem to be essential.
Examine the wells using a dissecting microscope at the end of this incubation. Almost all of the worms should be lysed and just a few unlysed eggs and dauers should be visible.
Incubate for 30 min. at 95°C to inactivate the proteinase K. We use a Fisher Isotemp oven.
Remove the Thermalseal film from the plates. Cover the plates with their lids. Arrange them in order in Tupperware containers and store at −80°C.
The diagram in Figure 3 shows how to arrange the boxes of microtiter plates in the freezer. Try to find the best Tupperware-style container that will fit stacks of microtiter plates without wasting space, and that will also fit onto the shelf of the −80°C freezer. Make sure to take the dimensions of the freezer shelf before purchasing the Tupperware-style containers. If the right container is found, buy a lot of them: stores seem to change the styles of the containers they stock frequently.
A deletion mutation should be present at ~one part in 4000 of a pooled DNA prep. The templates for the primary PCR screens consist of 5 μl of 10-fold dilutions of the 4,000 genome pools. The total yield of the 4,000 genome DNA preps should be at least 3.4 μg in 200 μl. Thus about 8.5 ng of genomic DNA is present in each PCR reaction, which is ~77,500 copies of the genome, or about 20 copies of the mutant genome. This should be enough copies to ensure the mutant DNA can be amplified successfully. This means the library can be screened 400 times before running out of DNA. If the yield of DNA is significantly higher than 3.4 μg per prep, use a higher dilution of the DNA preps for the screening templates. This will allow the library to be screened more than 400 times.
Each template used for the primary PCR screens consists of a diluted pooled DNA prep prepared from a 96-well plate of cultured mutagenized worms. These templates thus represent DNA from 4,000 mutagenized haploid genomes. Diluted 4,000 genome pooled DNA preps are prepared in microtiter format in MμTI PCR plates (VWR). These have conical bottoms and are convenient to pipette from using 12 channel pipettors. 20 μl of each 4,000 genome prep is diluted by adding 180 μl of 10 mM Tris pH 8.0, 0.1 mM EDTA. The Mμlti plate is placed in a microtiter format tray (pipette tip holder) for stability, covered with parafilm, and stored at −80°C. As there is a danger that such a plate might be dropped and the DNA lost, it is nice that only 10% of the total pooled DNA preps are stored in any one such set of plates of diluted templates.
The entire library is represented in 2.5 such plates. The arrangement of templates in the microtiter plates is diagrammed in Figure 4. The arrangement shown is convenient. Because of the 2X microtiter spacing of the combs on the gels used to analyze the reaction products, this arrangement causes the samples to be in the order 1,2,3, … after loading on the gel.
|
Figure 3. Deletion library arrangement in the −80° C freezer. The live frozen worms and single well lysates are arranged in Tupperware-style boxes (upper schematic), and the boxes are arranged on the freezer shelves (lower schematic). Use this arrangement and, after removing plates for screening or thawing, replace the plates in their proper location to minimize the amount of time spent searching for the correct plate.
This completes the protocols for construction of a frozen library of deletion mutants. Before moving forward to protocols for library screening, presented here is a summary of the quality control targets that must be met during library construction. If every single one of these targets is met, success can almost be guaranteed. If even a single one of these criteria is not met, the resulting library will be of little or no use.
Mutagenesis: check for 10–15% F1 lethality, discard any batches that fall outside this range.
Culturing: check that the F1 animals were accurately diluted and pipetted so that an average of ~20 F1 animals actually ended up in each culture well.
Culturing: check that there were >1500 F2 animals per well, that the cultures had starved with no bacterial or mold contamination, and that the starved F2 animals arrested predominantly as early (L1 or L2) larvae.
Freezing: check that >200 live animals came from the test thaw for every single freezer box of 6 plates used in library construction.
DNA preps: check that the average yield per pooled DNA prep was at least 3.4 μg.
Recent improvements have been made in the protocol for screening deletion libraries using procedures based on the “poison primer” method (Edgley et al., 2002). This method is a dramatic improvement on earlier screening methods. Whereas earlier methods mainly detected larger (>600 bp) deletions, the poison primer method allows more sensitive detection of smaller deletions. These smaller deletions appear to occur more frequently in psoralen-mutagenized libraries than do larger deletions, so that the efficiency of detecting deletions appears to be perhaps 2–3 fold better using the poison primer method (Edgley et al., 2002). However, the previous sentence understates how great an improvement the poison primer method is. Because it involves smaller PCR amplicons that are amplified more reliably and reproducibly, the poison primer method dramatically reduces the time spent optimizing PCR conditions and dealing with failed PCR reactions.
The goal of the screening procedure is to identify pooled DNA samples that contain DNA from a deletion mutant for a gene of interest. By PCR amplifying a region of the gene of interest and running the products on a gel, in principle the smaller deletion amplicon will be observed on the gel as a band with faster mobility than the larger wild-type amplicon. However, deletion mutant DNA is present at only 1 part in 4,000 in the pooled DNA sample, so the challenge is to increase the abundance of the deletion amplicon to the point where it can be visualized on a gel.
A template that has suffered an internal deletion has a small advantage over the wild-type template during each cycle of PCR due to the shorter length of the deleted template. Suppose that the chance of completing an extension across a deleted template is 10% better than for the wild type. After 35 cycles of amplification there will be a 28-fold enrichment of the deleted amplicon relative to the wild-type amplicon. After 70 cycles the enrichment will be 790-fold. As can be seen from this example, a key to detecting rare deletion mutations is to send the PCR through a very large number of productive cycles. Even if the PCR machine is programmed to run through 70 cycles, if the amplification reactions run out of reagents and reach their endpoints after only a small number of cycles, rare deletion amplicons will not be enriched sufficiently to detect them. The goal is thus to set up PCR reactions under relatively inefficient conditions that will allow amplification to continue productively for a full 70 cycles. The poison primer method, described below, is a simple way to do this.
It is desirable to set up conditions such that wild-type template produces a nice clean single band on a gel without too much smear or artifact bands that might obscure deletion amplicons. This seems to require doing two rounds of PCR using nested primers, as sending a single primer pair through 70 cycles under inefficient amplification conditions tends to give messy results in which artifactual amplicons can predominate. Even with nesting, multiple artifactual bands arise in the amplifications. These artifactual bands may constitute an acceptable background as long as they are not too intense or too variable. Such artifacts that occur reproducibly in amplifications from many or all pooled DNA templates can be discounted. The screener is looking for rare events that occur reproducibly only when a particular pooled DNA sample is amplified.
The poison primer method is a procedure for limiting the efficiency of amplification of the PCR product of interest in the first of the two rounds of nested PCR (Edgley et al., 2002). Relatively little product is made in the first round of 35 cycles, and this limited product is then further diluted for use as the template for the second round of amplification. So little template is thus added for amplification to the second round that most of its 35 amplification cycles occur before the reaction reaches saturation. Therefore, a large portion of the 70 cycles of PCR from the two rounds of amplification are productive and can thus help enrich for deletion amplicons.
The diagram in Figure 5 schematizes the primers used in the two rounds of amplification in the poison primer method and the amplification products produced.
|
Figure 5. Schematic of primers and amplicons in the poison primer method. Two rounds of nested PCR amplifications are used in which one or two poison primers are added to the first-round PCR mix (top schematic). In the first round reaction, full-length and poison amplicons are produced (middle schematic). During the second round of amplification in which the poison primers are not added, the wild-type and deletion amplicons are produced (lower schematic). Addition of the poison primers in the first round reaction reduces the amount of full-length amplicon produced, thereby allowing the slightly smaller deleted amplicons to outcompete the amplification of the wild-type amplicon in the second round of PCR.
The poison products effectively suppresses amplification of the full-length outer amplicon during the first round because the poison amplicons are relatively short and thus efficiently amplified. By efficiently using up reagents in the amplification reaction, the poison products suppress production of other amplicons.
The second round primers cannot reamplify the poison products, but can reamplify the first round outer amplicon and any deletion mutant amplicons. A gel run after the second round reaction thus shows only the large second round amplicon, plus any deletion amplicons. The poison products from the first round have been diluted below the threshold of detection.
The poison primer method is the simplest and most effective method tried so far for detecting deletion amplicons. Other methods based on seemingly simpler or more logical designs have been extensively piloted and used, but the poison primer method is easily the winner based on empirical results. In addition to being the most effective screening method, it is also very simple and rapid.
Design two sets of primers flanking the region of the gene in which you would like to obtain a deletion. An amplicon size of 1 kb is easily amplified during PCR and seems sufficient in size to allow detection of deletions. Therefore, choose outer primers that will amplify a region just larger than 1 kb and inner primers that will amplify a region of ~1 kb. Along with the outer primer set, choose two poison primers that are roughly in the middle of the outer amplicon. Make one forward and one reverse poison primer. These two poison primers should be near each other but not overlapping by more than one base pair on their 5' ends. To select primer sets, follow a simple set of rules: 1) primers should be 22mers; 2) they should have 11 ± 1 G/C residues (since all C. elegans genomic DNA except for exons is very A/T rich, the primer sites will usually be placed in exons); 3) avoid having an A or T as the 3' residue; 4) avoid sequences that could form strong hairpins. Also, it can be helpful to check that the 3'-most five base pair sequence of the primers does not occur greater than once in the interval being amplified (which can lead to non-specific priming and amplification).
Here are some hints for choosing useful primer sets. Choose a region of the gene in which a small deletion will likely cause a loss-of-function mutation (i.e. the 5' end of the gene or a region of the gene that contains few or small introns). Therefore, decide where to put the poison primers first and then choose the outer primer sets to flank the poisons. Try to avoid encompassing non-coding sequence or introns >200 bp within the selected screening interval since a small deletion in that area could fall entirely within the non-coding region and therefore be questionable as to whether it has caused any effect on gene expression or function.
In order to ensure that a deletion is recovered, several 1 kb intervals of the same gene can be screened in parallel. For each interval to be screened, order a set of six primers (two outers, two poisons, two inners).
Before screening the library, run a quick set of test amplifications to check that all the primers involved work adequately. For each primer set, five different test amplifications are done, each in duplicate:
outer oligos only
outer oligos plus one or the other poison primer
outer oligos plus both poison primers
inner oligos only
|
Figure 6. Empirically checking that the primers work. Ethidium bromide-stained 2% agarose gel showing the amplicons produced after running test PCR reactions with primers chosen to amplify four 1 kb intervals of one gene of interest. Four sets of outer oligos (Primer sets 1-4) are shown at left. For each primer set, five different test amplifications are done in duplicate: outer primers only (a), outer primers with poison primer 1 (b1), outer primers with poison primer 2 (b2), and the outer primers with both poison primers (c). The inner oligos are also tested in duplicate for each primer set and the inner oligo products are shown at right (d). For size verification of PCR amplicons, 1 kb DNA ladder is used. Use primer sets in which the outer and inner oligos amplify a single amplicon. Use either one or both of the poison oligos if they also produce a single amplicon.
Note the following regarding the results shown in Figure 6:
All the non-poison primers worked well (as seen in tests a and d) except the outer oligos for primer set 4 (reactions 4a), which gave only weak amplification products. In some cases there is no amplification from certain primer pairs, which suggests that the reactions failed. If there is very weak or no amplification in reactions a or d, design new primers to replace the failed pair and try again. In the primer set 4 example shown in Figure 6, the outer primer amplification is too weak and a new primer set should be ordered.
All the poison primers gave poison products, seen in reactions b1 and b2. If both poison primers work, as in these examples, do the screen using both poison primers (the condition in reactions c). If one poison primer fails to give products, leave out that poison primer and do the screen just using the other poison primer. Only use a poison primer if it gives a single, clean poison product of the predicted size.
It is evident in the gel that the poison products suppress production of the outer amplicon. The intensity of the outer amplicon band is clearly reduced in reactions b1, b2, and c relative to reactions a. If the outer amplicon is suppressed below the threshold of detection (most likely in reaction c with both poison primers) this is ok and the screen can be conducted using those conditions. Partial suppression of the amplicon, as shown in the gel for primer sets 1–3 is also acceptable (Figure 6).
Certain primer sets give, in addition to the predicted amplicons, additional smaller bands on the gel or smears. While these can sometimes be eliminated by moving the primers, such artifacts are sometimes properties of the region of DNA being amplified, not of the particular primer sites chosen, and cannot be eliminated. As long as the artifactual smears or bands are lower in intensity than the predicted amplicons, go ahead with a screen and look for deletion amplicons while ignoring the artifacts.
One additional test reaction can be added that is not shown in Figure 6. Reamplify the “c” reactions described above with the inner primers in a second round of PCR, just as will be done in the actual screen. Check that a single clean band is produced and that the actual amplification protocol to be used for the large-scale screen will work.
The following materials are needed:
| C. elegans genomic DNA |
| For test reactions, a genomic DNA template is needed. Prepare a large batch of genomic DNA by scaling up the method used to make the pooled DNA templates during library construction. This DNA prep is then diluted to the same concentration as the diluted library templates. |
| Oligonucleotides |
| These are resuspended in TE (10 mM Tris, pH 8.0, 1 mM EDTA) at 100 μM and stored at −20°C. To prepare test amplifications, make working stocks by further diluting 10-fold in water to a final concentration of 10 μM. |
| Taq polymerase |
| Invitrogen Taq (5 units/μl) is used along with the 10X buffer and 50 mM MgCl2 solutions supplied with it. Different commercial sources of Taq are quite similar, but the buffers supplied by different manufacturers are of different composition and these differences have large effects on amplification. |
| dNTPs |
| Purchased from Pharmacia as a mixture of dATP, dCTP, dGTP, and dTTP at 20 mM each. To prepare test amplifications, dilute the commercial mixture 10-fold in water to 2 mM each dNTP. |
Make a premix that contains everything except the primers. Make enough for 11 reactions (only 10 reactions must be set up, and the extra is included to allow for errors in pipetting volumes):
| Premix for test reactions |
| 27.5 μl 10X PCR buffer |
| 27.5 μl 2 mM dNTP mix |
| 13.75 μl 50 mM MgCl2 |
| 105.6 μl H20 |
| 55 μl genomic DNA |
| 1.65 μl Taq (5 U/μl) |
| aliquot 21 μl of the premix into each of 10 PCR tubes |
| add 4 μl of primers (1 μl of each 10μM primer and additional H20 for those reactions with less than 4 primers) |
First set up the two duplicate d reactions (21 μl premix, 1 μl each of the inner primers, 2 μl water).
The remaining reactions all have the outer primers, so add 9 μl of each of the outer primers to the remaining premix. Then pipette 23 μl of the resulting mix to each of 8 tubes and add water or primers as needed to set up reactions a, b1, b2, and c.
Carry out a single round of amplification using the standard amplification PCR protocol:
94°X30”, (92°X30”, 55°X30”, 72°X2 min.)X35, 72°X5 min., 4° hold
As a crude type of “hot start”, wait until the PCR block heats up to 94°C before placing the tubes in the block. If the PCR machines have heated lids, put no oil in the tubes.
For 1 kb amplicons use a 30 second extension time, as indicated above. For amplicons greater than 1.2 kb use a 1 min. extension time. Run out PCR products on a 2% agarose gel.
If the products appear as extremely strong bands in the test reactions, reduce the extension time by ~5-10 seconds when screening the library to decrease the amplification efficiency. The reactions should not be too efficient, as this indicates that they may have reached their endpoints in a small number of cycles, and less productive amplification cycles would lead to less enrichment of deletion amplicons. However, do not obsess on this point or spend time running additional test reactions with different extension times. The whole beauty of the poison primer method is that it is relatively robust and thus allows screening to move forward quickly without a long delay for optimizing conditions. Running extra rounds of optimization can actually be detrimental: after too many amplifications of the same DNA there is the possibility of the lab/reagents/equipment becoming contaminated by the amplicon being amplified, ruining your ability to do further amplifications of this DNA.
After determining that the primers work and that addition of one or more poison primers results in reduction of wild-type product, make large PCR premixes sufficient for the entire primary screen as well as the subsequent retest reactions that will be used to follow up primary positives. Note that more than $200 worth of material is used here, so make sure the primers work and that the PCR conditions are worked out before making these mixes. Also note that the large premixes are made with the concentrated stocks of dNTPs and primers, not the diluted stocks used to prepare the test reactions.
Premixes for screening
| Large premix for round 1 | Large premix for round 2 |
|---|---|
| 1.07 ml 10X Invitrogen Taq buffer | 1.07 ml 10X Invitrogen Taq buffer |
| 533 μl 50 mM MgCl2 | 533 μl 50 mM MgCl2 |
| 107 μl 20 mM dNTPs | 107 μl 20 mM dNTPs |
| 43 μl outer forward primer (100 μM) | 43 μl inner forward primer (100 μM) |
| 43 μl outer reverse primer (100 μM) | 43 μl inner reverse primer (100 μM) |
| 43 μl forward poison primer (100 μM) | – |
| 43 μl reverse poison primer (100 μM) | – |
| 6574 μl dH20 | 8800 μl dH20 |
| 64 μl Invitrogen Taq 5 U/μl | 64 μl Invitrogen Taq 5 U/μl |
| 7 aliquots of 1.06 m | 7 aliquots of 1.325 ml |
| ~10 aliquots of 100 μl | ~10 aliquots of 125 μl |
Note: If using only one poison primer, make up the volume by substituting 43 μl of water for the second poison primer.
Make premixes and aliquot into screwcap Eppendorf tubes, flash freeze them in liquid nitrogen and store them at −80°C. The premixes are not stable when stored at −20°C, so they must be stored at −80°C.
Thaw two large aliquots of the “large premix for round 1” for each 96-well plate to be amplified. For ease of aliquoting the premix into the 96-well plates, first distribute the premix equally into a strip of 12 tubes (microtiter spaced PCR tubes), and use a 12-channel multipipettor to distribute 20μl (first round reactions) or 25μl (second round reactions) into each well of a microtiter PCR plate. The library DNA templates will be added to the 96-well plate containing the distributed premix.
For the first round reactions, the templates will be 5 μl of the pooled DNA preps from the library. Thaw the diluted templates by placing in a PCR machine set at 37°C. Add 5 μl of each template to the PCR plate using a 12-channel pipettor.
For the second round reactions, the templates are an extremely small volume of liquid transferred from the first round reactions using a “hedgehog” device (Boekel replicator) with 96 metal pins spaced to fit into each well of a microtiter plate. Store the hedgehog in clean dH20, dip in EtOH, flame to get rid of the EtOH, dip in the first round reactions, and then dip in the second round PCR premixes to add the templates. Rinse the hedgehog extensively between uses in running water so as to prevent unwanted DNA from contaminating future PCR reactions.
Be careful during screening to be clean. Try to avoid contaminating pipettors and other bench items with the PCR amplicon. After about 800 amplifications of the same gene the PCR reactions can start giving very smeary patterns on gels due to contamination. If this happens the best remedy is to switch to a new set of primers outside of the original sets that gave rise to the contamination.
Pour a 300 ml 2% agarose gel with two 50-well combs in the Owl Centipede gel box. All 96 second-round reactions, plus marker lanes, can be loaded on a single gel. The high percentage agarose gel allows separation of bands that differ by only a small amount. Some of the deletions identified using this poison method can be quite small (50 bp) and give rise to very low abundance amplicons, so detecting them on a gel requires good separation and a good eye with willingness to look closely and carefully at the gel for any band smaller than wild type. These products resulting from small deletions may run just under the wild-type product and can be difficult to detect.
Samples from one 96-well plate fit on one gel. The comb teeth are spaced twice as densely as microtiter wells. Thus, the 12-channel pipettor loads every other well. Arrange the samples in the PCR plate such that the gel comes out in a logical fashion (Figure 7).
|
Figure 7. Picture of a representative gel. Second-round reactions from a 96-well plate are shown. The wild-type ~1 kb amplicon can be seen in all lanes except for a few in which the reactions failed. A small number of lanes also have smaller amplicons that represent potential deletion mutations; these are referred to as “primary positives”. A close look reveals some faint bands that occur reproducibly in many lanes; these are artifacts and should be ignored. Faint bands of a size that occurs in only one or a few lanes, however, should be treated as primary positives. For size verification of PCR amplicons 1 kb DNA ladder is used.
| Gel #1 | |
| First row | 1 kb marker, 1, 2, 3,......24, 1 kb marker, 25, 26,.........48 |
| Second row | 1 kb marker, 49.............72, 1 kb marker, 73...............96 |
| Gel #2 | |
| First row | 1 kb marker, 97.............120, 1 kb marker, 121...........144 |
| Second row | 1 kb marker, 145...........168, 1 kb marker, 169............192 |
| Gel #3 | |
| First row | 1 kb marker, 193............216, 1 kb marker, 217...........240 |
Loading these gels requires care and practice: generally the tips are initially placed in the wells at a shallow angle to the gel, and then raised to near vertical before dispensing the samples. If care is not taken some tips will not be in the appropriate wells. Run the gel at 110 volts for 90 min. in 1X TAE. The gel and running buffer should contain ethidium bromide at 0.2 μg/ml. A representative gel is shown in Figure 7.
Recheck primary positives by reamplifying the appropriate diluted pooled DNA templates three times to see if the deletion band reproduces at least twice. The extra frozen large aliquots of the PCR premixes may be used for this purpose. Typically 70–90% of the “positives” from the primary screen will not reproduce. Real positives will reproduce typically in all three retries. Check that the deleted amplicons seen in the rescreen are the same size as the original positive. If a positive rechecks, cut the deletion bands out of the gel, purify the DNA (Qiagen Qiaquick gel purification kit) and use this to restriction map the deleted amplicon. (Alternatively, carry out a 100 μl PCR amplification of the positive band using the inner primers to get enough to restriction map the amplicon. These PCR products can be purified using a Qiagen Qiaquick PCR purification kit). Restriction map the deletion by using ~5 enzymes that cut at unique sites spread across the amplicon and check to see which enzymes cut (site not deleted) versus which enzymes do not cut (site deleted). If the restriction map shows that the amplicon may carry a useful deletion (i.e. removes some coding sequence), send the purified PCR amplicon for sequencing to determine the exact deletion sequence. On occasion, in addition to material being deleted, a short stretch of sequence is inserted at the site of the deleted material.
A positive 4,000-genome pooled DNA sample represents all 96 cultures from one microtiter plate. To identify the single well in which the mutant animals reside, amplify from all 96 single-well lysates from the plate corresponding to the positive pool.
Carry out nested PCR using the same PCR primers used for the primary screen. Two rounds of nested PCR from the single-well lysates is used even though the deleted DNA should be present at one part in 20 in these samples and only one round should, theoretically, be required. This is because the single-well lysates are quite crude and therefore serve as poor PCR templates. Carry out the first round of PCR in 50 μl rather than 25 μl to dilute out the inhibitors of PCR amplification found in the crude lysates.
First round: distribute 50 μl of the PCR premix in 96 wells, and use the hedgehog to add a trace of the appropriate single-well lysates into the reactions. Amplify using the same PCR program used for the primary screen.
Second round: distribute 25 μl of the PCR premix in 96 wells and use the hedgehog to dope in the first round reactions as templates.
| First round premix | Second round premix |
|---|---|
| 530 μl 10X Invitrogen PCR buffer | 266 μl 10X Invitrogen PCR buffer |
| 53 μl 20 mM dNTP mix | 27 μl 20 mM dNTP mix |
| 266 μl 50 mM MgCl2 | 125 μl 50 mM MgCl2 |
| 21 μl outer forward primer, (100 μM) | 11 μl inner forward primer, 100 μM |
| 21 μl outer reverse primer, (100 μM) | 11 μl inner reverse primer, 100 μM |
| 21 μl forward poison primer, (100 μM) | – |
| 21 μl reverse poison primer, (100 μM) | – |
| 4.3 ml H20 | 2.2 ml H20 |
| 31.8 μl Invitrogen Taq (5U/μl) | 16 μl Invitrogen Taq (5U/μl) |
| for PCR: use 50 μl premix per well | for PCR: use 25 μl premix per well |
| add templates with the hedgehog | add templates with the hedgehog |
Run the second round products on a 2% agarose gel and analyze.
Results: exactly one single-well lysate should give rise to a deletion amplicon of the appropriate size, thus identifying the microtiter culture well in which the deletion arose.
Place dry ice pellets and/or powder to fill up the lower ~1/4 of a styrofoam cooler. Place a flat piece of styrofoam on top of the dry ice inside the cooler. Go to the −80°C freezer and quickly remove the appropriate plate of frozen cultures and place it into the styrofoam container. Work quickly. The idea is to remove the positive well while leaving all the other 95 wells in the plate nicely frozen and viable. Place the plate upside down on the piece of styrofoam. Carefully identify the positive well. Using a brand-new razor blade mounted in a “carton-cutter” handle (can be bought at drugstores/hardware stores), make a cut on all four sides of the positive well as illustrated by the dashed lines in Figure 8. As shown, make the cuts more than long enough to be sure they will intersect so that the well will be cleanly removed. The razor blade will cut deeply down into the underlying styrofoam which helps make sure the cut has gone all the way through the soft plastic plate. Once the well is removed, immediately put the plate back in the −80°C freezer in its proper position.
|
Figure 8. Thawing a frozen culture. Schematic of a 96-well flexible freezing plate. After identifying the single well lysate that contains a deletion, the well containing the corresponding live animals is thawed. Being careful not to thaw the rest of the plate, use a razor blade to cut deeply through the plastic plate and sealing film in an overlapping pattern (dotted lines) that completely separates the well of interest from the plate. Remove and thaw the well and replace the plate back in its proper position in the −80° C freezer.
Place the excised well, top up, between your fingers to thaw. When thawed, use a sterile yellow tip and a P200 pipettor to distribute the liquid around the outside of the bacterial lawn on seeded NGM plates. Wash the empty well and the used pipette tip with 50 μl of M9 medium to recover any residual animals remaining. Every worm is potentially carrying the deletion of interest and is therefore precious! Leave the plates right side up until the liquid is absorbed. Then culture the plates upside down in a 20°C incubator.
As many live worms as possible must be recovered from the thaw. It is desirable to get more than 300 live animals from the thaw as the mutant animals may be present at a frequency of 1/100 or less. Absolutely every animal must be removed from the thaw plate before it becomes an adult. However, do not pick the worms off the plate before they are L3 or L4 animals, as this would risk killing them. Therefore, check the thaw plates twice a day and pick off every single live L3 or L4 animal. Animals will thus be picked over a 2–3 day interval. Please note that larvae recovering from a thaw are much more delicate than C. elegans larvae that have not been frozen, and therefore the warning not to pick L1 or L2 larvae must be taken seriously.
Make 100 mls of S medium containing freshly grown HB101 at OD550=2.0. This can be stored refrigerated and used (after swirling to resuspend the bacteria) to set up cultures over a period of several days.
Single-worm cultures are grown in 50 μl of the S medium/HB101 per well. Individual live thawed L3 or L4 worms are picked one to a well (i.e. “cloned”). The plates are covered with their hard plastic lids, placed inside a moist paper towel-lined Tupperware-style plastic box with a loose-fitting lid to maintain humidity, and incubated at 20°C with no shaking. Label the plates to indicate the date each well was set up with a worm. The cultures should grow about five days before they are ready for PCR testing. By then there should be ~100 L1-L4 starved progeny in each well and the bacteria should have cleared.
Note that any L4 or adult animals immediately recovered from the thaw will usually end up being sterile. The animals that are useful will come out of the thaw as L1 or L2 animals and will grow up to be fertile adults.
Prepare some single worm lysis buffer with Proteinase K at 100 μg/ml.
| Single worm lysis buffer |
| 30 mM Tris pH 8 |
| 8 mM EDTA |
| 100 mM NaCl |
| 0.7% NP40 |
| 0.7% Tween 20 |
| Add proteinase K to 100 μg/ml just before use. |
Pipet 20 μl of single-worm lysis buffer into each well of an appropriate number of Mμlti microtiter plates. The Mμlti plates can be held in tip racks to increase their stability.
Transfer 20 μl of the single-worm cultures into the lysis buffer. Use a 12-channel pipettor, and first pipet up/down in the cultures to make sure the worms are well suspended.
Cover the tops of the lysis plates with Thermalseal film and seal well with a roller. Put the plate at −80°C for 10 min., which helps crack open the worm cuticle.
Incubate in a hybridization oven at 55°C for 2 hours with rocking. The worms should now be dissolved.
Inactivate the proteinase K by incubating at 95°C for 30 min. in an oven. Store the lysates at −80°C.
Carry out PCR amplifications in 25 μl reactions, adding the lysates as templates using the Boekel hedgehog. Amplify for just a single round of 35 cycles using a set of two new primers designed to amplify only ~300 bp from the mutant, and a larger band from the wild type. These amplifications are not very efficient and sometimes do not give a detectable wild-type product.
Some mutants are recovered at <1/100 of the thawed animals. Thus, several hundred cultures may need to be analyzed. It is therefore important that great care be taken with the thaws to recover this many animals.
When a positive well is detected, use a P200 pipettor to remove the remaining culture from the well to an NGM plate. Do not throw away any of the cultures until a mutant has been successfully recovered! Clone individual animals from the plate, let them have progeny, and analyze the animals by single-worm duplex PCR (described below) to verify that a deletion mutant has been correctly identified.
Assign an allele number to the mutation and get the strain frozen ASAP.
Commentary: Typically deletion-positive worms are detected at frequencies of 1/8-1/100 among the live worms recovered from thawing a positive well.
Animals recovered from the deletion library have been heavily mutagenized and contain many mutations in addition to the deletion of interest. Therefore, it is necessary to extensively backcross the recovered mutant to the wild type (at least 4–6 times) to clean up the genetic background. During backcrossing, it is necessary to genotype many animals to determine whether they carry the deletion of interest and whether they are homozygous or heterozygous for the deletion. The backcrossing process is actually the slowest step in the procedure of obtaining a useful mutant. Described here is an efficient and rapid procedure to get through the process.
In the backcrossing procedure described below, sets of 8–16 adult hermaphrodite worms must be genotyped. These animals are placed, one worm per tube, into PCR tubes containing a proteinase K solution, digested to release DNA, and then amplified by PCR using primers specific to the gene of interest. Use “duplex” PCR reactions in which three primers are used to produce two different-sized products that are simultaneously amplified, one that arises only from the wild-type allele, and one that arises only from the deletion allele. Design the primers so that the amplicon from the wild-type allele is only 250–400 bp, and the amplicon from the deletion allele is ~100 bp larger than the wild-type amplicon (Figure 9). The small size of the amplicons is necessary in order to get adequately efficient amplification from single-worm lysates. The closeness in size of the two amplicons ensures that they compete with each other fairly equally for reagents during amplification. Always make the wild-type amplicon smaller than the mutant amplicon since the smaller amplicon sometimes suppresses amplification of the larger one, and it is absolutely necessary to correctly identify a worm as a mutant homozygote.
|
Figure 9. Duplex PCR genotyping of single worms. A set of three primers is chosen that will amplify a ~350 bp mutant amplicon and a ~250 bp wild-type amplicon from worms carrying a deletion in a gene of interest. The placement of the primers is diagramed in the upper schematic. After PCR using a mix containing the duplex primers, a 1% ethidium bromide-stained agarose gel is run (lower schematic). The genotype of the worm in each tube is determined. A homozygous mutant animal (m/m) produces only the larger ~350 bp amplicon. A wild-type animal (+/+) produces only the lower ~250 bp amplicon. Animals heterozygous for the deletion (+/m) produce both the larger mutant and the smaller wild-type amplicons. For size verification of PCR amplicons, 1 kb DNA ladder is used (not shown).
Make a large number of aliquots of the following two solutions in 200 μl PCR tubes (for convenience, the tubes can be stored inside 50 ml Falcon centrifuge tubes):
| Single-worm lysis buffer |
| 50 mM KCl |
| 10 mM Tris pH 8.2 |
| 2.5 mM MgCl2 |
| 0.45% NP-40 |
| 0.45% Tween 20 |
| 0.01% gelatin |
| Make 200 μl aliquots, store at −20°C. |
| 10 mg/ml proteinase K in water |
| Make 20 μl aliquots, store at −20°C. |
| Duplex PCR premix |
| 500 μl Gibco 10X PCR buffer |
| 50 μl 20 mM dNTPs |
| 250 μl 50 mM MgCl2 |
| 200 μl first primer, 10 μM |
| 200 μl second primer, 10 μM |
| 200 μl third primer, 10 μM |
| 3.57 ml dH20 |
| 30 μl Gibco Taq, 5U/μl |
| Make 220 μl aliquots in screw cap tubes, snap freeze in liquid N2, store at −80°C. Each aliquot is sufficient to genotype 8 worms. |
PCR on single worms is generally carried out in strips of 8 PCR tubes. Just before use, thaw an aliquot of single-worm lysis buffer and an aliquot of proteinase K. Add 1.2 μl of proteinase K to the lysis buffer, mix, and dispense 2.5 μl of the mix into each tube.
Using a worm pick, place the worms to be genotyped each into separate tubes. Do this under the dissecting microscope so that you actually watch each worm float off the pick into the lysis buffer - try not to carry too much bacteria along with the worm, but some is okay. You may need to bend the platinum wire a bit on the worm pick to make it easy to negotiate the worm into the bottom of the PCR tube under the dissecting scope.
Put 2 drops of mineral oil in each tube to prevent evaporation. Oil is necessary even if a heated-lid PCR machine is used.
Lyse the worms in the PCR machine by running the following program: 60°X60', 95°X15', 4° hold. The worms are digested at 60°C, and the prtoeinase K is inactivated at 95°C.
Thaw the aliquot(s) of duplex PCR premix. To each PCR tube containing a lysed animal add 25 μl of duplex PCR mix (use a P200 pipettor to pipet the premix under the oil so that the drop of liquid containing the lysed worm mixes with it under the oil).
Carry out PCR using the following program: 94°X30', (92°X30', 55°X30', 72°X30')X40, 72°X5'; 4° hold.
Analyze on a 1% agarose gel to determine the genotype of the animals.
This strategy applies to autosomal mutations. A modified (slower) scheme is needed for X-linked mutations. Mutations are almost always recovered in heterozygotes. Do not try to homozygose mutations until they have been backcrossed. The mutations are kept heterozygous throughout backcrossing, which saves time.
Clone a mutant heterozygote on a plate. Pick six of its L4 progeny to individual plates and mate each with 6–12 wild-type males. Two days after the matings were set up, genotype the hermaphrodite mothers (by duplex PCR). Discard any matings in which the hermaphrodite did not carry the mutation of interest.
Pick L4 male cross progeny from a successful mating. Set up several plates, each carrying 6–10 of these males and two L4 wild-type hermaphrodites. Move the mating animals to new plates each day for the next two days.
On the second or third days' plates, check that mating was successful (i.e. look for about 50% males among the progeny). Clone sixteen L4 hermaphrodites (putative cross progeny, 1/4-1/2 should carry the deletion of interest) to individual plates.
Two days later (after the animals have produced lots of progeny on the plate) pick the mothers off the plates and genotype them by duplex PCR. Discard plates from mothers not carrying the mutation of interest. Animals carrying the mutation have now been backcrossed 2X (actually the autosomes have been backcrossed 2X, and the X chromosome only 1X). To continue backcrossing, go immediately back to step “a” and repeat until sufficient backcrossing (4-6X) has been done.
At the end, let a mutant heterozygote self-fertilize. Clone ~16 of its progeny to separate plates, let them lay eggs for two days, and genotype to try to identify a mutant homozygote.
Freeze the homozygous mutant strain for long-term storage.
4,5'-8-trimethylpsoralen (Sigma, T 6137)
UV Dose meter (International Light Inc., Radiometer/Photometer, IL1400A)
or, with “UVA” i.e. 360 nm light detector (International Light Inc., Radiometer/Photometer, SEL 033)
UV illuminator Built by The Southern New England Ultraviolet Company, 203-483-5810. The apparatus has a home-built appearance. It consists of a box with a power supply, 8 UV bulbs (The Southern New England Ultraviolet Company, RPR-3500) below a glass plate on which the sample sits, and 8 more UV bulbs above the glass plate. Only the bulbs below the sample are used. Any apparatus using similar UV bulbs should give equivalent results.
| 12-channel multipipettors |
USA Scientific brand pipettors:
5–50 μl multipipettor (USA Scientific, 4812-0550)
50–200 μl multipipettor (USA Scientific, 4812-5250)
Eppendorf brand pipettors:
0.5–10 μl Eppendorf multipipettor (Brinkmann, 022452061)
10-100 μl Eppendorf multipipettor (Brinkmann, 022452088)
If you are not experienced with 12-channel pipettors, please note that you must generally use tips made by the same manufacturer that made the pipettor. While this is not necessary for single-channel pipettors, the fit between pipettor and tip must be more precise for 12-channel pipettors in order that they can both seal well when the tips are put on, and also release well when the tips are ejected.
Reagent reservoirs, sterile (Pierce, 15075)
96-well microtiter dishes (Corning/Costar, C3595) or (BD Biosciences, 353072)
Microtiter plate brayer (Diversified Biotech, BRAY-4000)
“Sidewall tough-tags” labels for the sides of microtiter dishes (Diversified Biotech, TT-SWALL)
100X Penicillin/streptomycin (Invitrogen, 15140-122)
100X Nystatin suspension 10,000 units/ml (Sigma, N 1638)
U-bottom 96-well MicroTest III Flexible Assay Plate (BD Biosciences, 353911)
Film to seal plates of live worm cultures for freezing
Thermalseal for PCR (Rainin, 96-TR-100)
Or MicroAmp Clear Adhesive Films (Applied Biosystems, 4306311)
Styrofoam box for freezing live worms (New England Biolabs, small enzyme shipping containers)
pH 6.7 1:1 phenol:chloroform mix (American Bioanalytical, AB11051)
Thermal cycler (MJ Research, PTC-100HB-96AgV)
Microtiter format polycarbonate V-Bottom microtiter 96-well PCR plates (USA/Scientific, 2796-3330)
Microseal A film for PCR (MJ Research, MSA-5001)
Taq polymerase, 500 Units (Invitrogen, 10342-020)
Deoxynucleotide triphosphates
dNTP mixture (dATP, dCTP, dGTP, dTTP), 20 mM each (Amersham Biosciences, 27-2094-02)
Gel box
OWL Centipede extra wide minigel system (Owl Scientific, model D3-14)
(this holds two 50 well combs in 2X microtiter spacing)
Qiaquick Gel Extraction Kit (Qiagen, 28704)
Qiaquick PCR Purification Kit (Qiagen, 28104)
Chase, D.L., Pepper, J.S., and Koelle, M.R. (2004). Mechanism of extrasynaptic dopamine signaling in Caenorhabditis elegans. Nat. Neurosci. 7, 1096–1103. Abstract Article
Edgley, M., D'Souza, A., Moulder, G., McKay, S., Shen, B., Gilchrist, E., Moerman, D., and Barstead, R. (2002). Improved detection of small deletions in complex pools of DNA. Nucleic Acids Res. 30, e52. Abstract
Hess, H.A., Roper, J.C., Grill, S.W., and Koelle, M.R. (2004). RGS-7 completes a receptor-independent heterotrimeric G protein cycle to asymmetrically regulate mitotic spindle positioning in C. elegans. Cell 119, 209–218. Abstract Article
Jansen, G., Hazendonk, E., Thijssen, K.L., and Plasterk, R.H. (1997). Reverse genetics by chemical mutagenesis in Caenorhabditis elegans. Nat. Genet. 17, 119–121. Abstract Article
Jansen, G., Thijssen, K.L., Werner, P., van der Horst, M., Hazendonk, E., and Plasterk, R.H. (1999). The complete family of genes encoding G proteins of Caenorhabditis elegans. Nat. Genet. 21, 414–419. Abstract Article
Liu, L.X., Spoerke, J.M., Mulligan, E.L., Chen, J., Reardon, B., Westlund, B., Sun, L., Abel, K., Armstrong, B., Hardiman, G., et al. (1999). High-throughput isolation of Caenorhabditis elegans deletion mutants. Genome Res. 9, 859–867. Abstract
C. elegans sequencing consortium. (1998). Genome sequence of the nematode C. elegans: a platform for investigating biology. Science 282, 2012–2018. Abstract
Fire, A., Xu, S., Montgomery, M.K., Kostas, S.A., Driver, S.E., and Mello, C.C. (1998). Potent and specific genetic interference by double-stranded RNA in Caenorhabditis elegans. Nature 391, 806–811. Abstract Article
Fraser, A.G., Kamath, R.S., Zipperlen, P., Martinez-Campos, M., Sohrmann, M., and Ahringer, J. (2000). Functional genomic analysis of C. elegans chromosome I by systematic RNA interference. Nature 408, 325–330. Abstract
Gonczy, P., Echeverri, C., Oegema, K., Coulson, A., Jones, S.J., Copley, R.R., Duperon, J., Oegema, J., Brehm, M., Cassin, E., et al. (2000). Functional genomic analysis of cell division in C. elegans using RNAi of genes on chromosome III. Nature 408, 331–336. Abstract
Kamath, R.S., Martinez-Campos, M., Zipperlen, P., Fraser, A.G., and Ahringer, J. (2001). Effectiveness of specific RNA-mediated interference through ingested double-stranded RNA in Caenorhabditis elegans. Genome Biol. 2, RESEARCH0002. Abstract
Kamath, R.S., Fraser, A.G., Dong, Y., Poulin, G., Durbin, R., Gotta, M., Kanapin, A., Le Bot, N., Moreno, S., Sohrmann, M., et al. (2003). Systematic functional analysis of the Caenorhabditis elegans genome using RNAi. Nature 421, 231–237. Abstract
Kennedy, S., Wang, D., and Ruvkun, G. (2004). A conserved siRNA-degrading RNase negatively regulates RNA interference in C. elegans. Nature 427, 645–649. Abstract
Rual, J.F., Ceron, J., Koreth, J., Hao, T., Nicot, A.S., Hirozane-Kishikawa, T., Vandenhaute, J., Orkin, S.H., Hill, D.E., van den Heuvel, S., and Vidal, M. (2004). Toward improving Caenorhabditis elegans phenome mapping with an ORFeome-based RNAi library. Genome Res. 14, 2162–2168. Abstract
Simmer, F., Tijsterman, M., Parrish, S., Koushika, S.P., Nonet, M. L., Fire, A., Ahringer, J., and Plasterk, R. H. (2002). Loss of the putative RNA-directed RNA polymerase RRF-3 makes C. elegans hypersensitive to RNAi. Curr. Biol. 12, 1317–1319. Abstract
Tabara, H., Grishok, A., and Mello, C.C. (1998). RNAi in C. elegans: soaking in the genome sequence. Science 282, 430–431. Abstract
Timmons, L., Court, D.L., and Fire, A. (2001). Ingestion of bacterially expressed dsRNAs can produce specific and potent genetic interference in Caenorhabditis elegans. Gene 263, 103–112. Abstract
Tabara, H., Grishok, A., and Mello, C.C. (1998). RNAi in C. elegans: soaking in the genome sequence. Science 282, 430–431. Abstract
Maeda, I., Kohara, Y., Yamamoto, M., and Sugimoto, A. (2001). Large-scale analysis of gene function in Caenorhabditis elegans by high-throughput RNAi. Curr. Biol. 11, 171–176. Abstract
*Edited by Victor Ambros. Last revised August 20, 2005. Published April 6, 2006. This chapter should be cited as: Ahringer, J., ed. Reverse genetics (April 6, 2006), WormBook, ed. The C. elegans Research Community, WormBook, doi/10.1895/wormbook.1.47.1, http://www.wormbook.org.
Copyright: © 2006 Julie Ahringer and contributors. This is an open-access article distributed under the terms of the Creative Commons Attribution License, which permits unrestricted use, distribution, and reproduction in any medium, provided the original author and source are credited.
§To whom correspondence should be addressed. E-mail: jaa@mole.bio.cam.ac.uk
 All WormBook content, except where otherwise noted, is licensed under a Creative Commons Attribution License.