Embryo series courtesy of Einhard Schierenberg
Table of Contents
The diplogastrid nematode Pristionchus pacificus has been recently established as a new genetic model system for evolutionary studies. Forward and reverse genetics tools have been developed to allow detailed comparisons to the rhabditid nematode C. elegans. P. pacificus has distinctive body morphology and diverges in development both at the cellular and molecular level when compared to C. elegans (see Pristionchus pacificus, http://doi/10.1895/wormbook.1.102.1). Despite these differences, P. pacificus shares many traits with C. elegans that are of advantage for genetic analyses: it is hermaphroditic, has a small genome size (169 Mb), small number of chromosomes (haploid set with 5 autosomes and 1 sex chromosome), short life-cycle (4 days at 20 °C), and produces large brood sizes (120-180 eggs). Similarly to C. elegans, P. pacificus has 4 larval stages (J1-J4). However, the first larval stage molts within the eggshell (Sudhaus and Fürst von Lieven, 2003).
P. pacificus can be frozen in liquid nitrogen, although with lower efficiency than C. elegans. The following protocol was adapted from a procedure employed to freeze parasitic nematodes (Nolan et al., 1988). Cryopreservation of P. pacificus using this protocol has been successful even for mutants that failed to freeze with other protocols (R. Hong, personal communication).
Protocol 1. Freezing P. Pacificus
Equipment and Reagents
Freezing solution (FS): 4 ml DMSO (Dimethyl sulfoxide), 4 g Dextran (MW 8500-11500, Sigma-Aldrich D9260, from Leuconostoc mesenteroides), complete volume up to 40 ml with sterile distilled water. Store solution at 4 °C.
Thawing solution (TS): L-Glutamine (1X, 300 mg/L glutamine in M9). Store solution at 4 °C.
M9 Buffer (see Maintenance of C. elegans, http://doi/10.1895/wormbook.1.101.1) containing 1 mM CaCl2.
1.8 ml cryogenic vials.
Add FS to old worm plates with mostly J2s and dauers (~2 week old). Remember that the agar will soak up some of the liquid depending on the dryness of the media. Exposure of worms to DMSO should be limited to less than 1 hour.
Aliquot 1 ml of the mixture into 1.8 ml cryogenic vials labeled with the strain name and date.
Put cryogenic vials into a polystyrene foam tube tray and cover with another (an alternative is to take a Nalgene® Cryo 1°C Freezing Container filled with 100% isopropyl alcohol). Fasten the racks with a rubber band, enclosing the samples inside the box. This ensures a slow constant rate of cooling.
Place the box at −80 °C for more than 3 days.
Move the vials to the permanent location in a liquid nitrogen tank.
To check for successful freezing, thaw a duplicate line at room temperature.
Wash away DMS with 10X the freezing volume with TS.
Centrifuge lightly at 150 × g for 1 minute to spin down worms.
Repeat wash with M9 buffer and centrifuge again.
Remove supernatant, transfer worms at the periphery of OP50 NGM plates.
Wait 4 days for viable larvae to emerge.
Ethyl methanesulfonate (EMS) has been widely used in P. pacificus to isolate a wide variety of mutants with defects in the egg-laying system, muscle, sex determination, dauer formation, behavior, and gonad formation (Protocol 2). The protocol for EMS mutagenesis used is the same as for C. elegans (Brenner, 1974). For mutagenizing P. pacificus with psoralen, however, some modifications were introduced (Protocol 3).
Protocol 2. EMS mutagenesis
Caution: EMS is a very strong mutagen and should be handled in a fume hood. All materials (gloves, pipettes, tips) that have been in contact with this mutagen should be treated with 1 N NaOH to inactive the EMS.
Equipment and Reagents
M9 Buffer.
EMS (ethyl methanesulfonate; Sigma-Aldrich M0880).
Well fed, young adult P. pacificus worms.
NGM plates seeded with E. coli OP50 (see Maintenance of C. elegans, http://doi/10.1895/wormbook.1.101.1).
Wash the worms from 4-5 6 cm diameter plates using 2 ml of M9 for each plate. Collect in a 15 ml tube.
Centrifuge for 5 min. at 1500 × g and resuspend the worms in 2 ml M9.
Add 20 µl of EMS into another tube containing 2 ml of M9. Swirl the tube until the EMS has dissolved.
Add the EMS solution to the worms (this concentration of EMS corresponds to 47 mM). Incubate the worms at 20 °C for 3.5 hrs. in horizontal position, on a rocker at low speed (40UPM).
Incubate for 30 min. in a vertical position to let worms sink.
Remove as much supernatant as possible. Discard the supernatant to a container with 1 N NaOH to inactivate the EMS.
Wash the worms 3 times with 5 ml of M9, and centrifuge each time at 1500 × g for 5 min.
Resuspend the worms in 500 µl of M9 and dispense them onto 2 NGM plates with OP50.
After the solution has soaked in the plate, pick moving J4 animals to new plates.
Depending on the mutation of interest (dominant, recessive, maternal effect), pick animals of the relevant generation onto fresh plates, and screen for desired mutant phenotypes.
Protocol 3. Psoralen mutagenesis (modified from Yandell et al., 1994)
Equipment and Reagents
M9 Buffer.
3 mg/ml TMP solution in DMF (Trioxsalen; Sigma-Aldrich T6137; 4,5′,8-Trimethylpsoralen).
Well fed, young adult P. pacificus worms.
Unseeded and seeded NGM agar plates.
Long-wave ultraviolet (UV) source (365 nm; Model UVL-21 Blak-Ray lamp, UVP, Fisher Scientific cat no. 11-984-40).
UV intensity meter (Model J-221, UVP).
Rocker.
Wash the worms from 4-5 6 cm diameter plates using 2 ml of M9 for each plate. Collect in a 15 ml tube.
Using M9 buffer, wash worms off NGM plates, and combine in a 15 ml tube.
Wash 2 times with M9, each time pelleting worms at 1500 × g for 5 min.
Remove as much liquid as possible and resuspend in 30 µg/ml of TMP, e.g., 20 µl of TMP (3 mg/ml) in 2 ml of M9.
Note: the worms should be resuspended in about 10 times their volume.
Wrap the tube in aluminum foil and incubate the worms for 15 min. at RT on a rocker at low speed (40 UPM). Afterwards, incubate for 5 min. at a vertical position to let worms sink.
Remove worms with a Pasteur pipette and place them in an unseeded worm agar plate at 20-25 °C. Wrap the plate in aluminum foil and let excess TMP to soak into the plate.
Calibrate the distance between the long-wave UV source and the plate using the UV intensity meter. Irradiate the worms for 50 seconds at 500 µW/cm2 (the distance between the plate and the UV lamp is about 10 cm).
Keep the worms in the dark for 5 hrs.
Transfer worms to seeded plates.
A powerful method to isolate C. elegans mutants in a gene of interest for which sequence information is available is by chemical mutagenesis followed by polymerase chain reaction (PCR). The generation of knockouts in a high throughput manner by using deletions in a library of worms has proven very successful for C. elegans. The protocol adopted for P. pacificus does not include the freezing of the library, since the efficiency of recovery following freezing of P. pacificus is too low. The library comprises 12 96-well microtiter plates and includes the arrayed progeny of nearly 5 × 10⁵ F1 animals representing 106 mutagenized genomes. Worms are grown in plates until the food is exhausted, generating, on the average, 100 F2 progeny per F1 animal.
Protocol 4. Deletion library
Equipment and Reagents
M9 Buffer.
Basic hypochlorite solution: 30 ml 0.1 M NaCl, 5 ml 5 M NaOH and 10 ml 6% Sodium hypochlorite.
Wild type worms.
130 NGM plates (10 cm diameter) seeded with 1 ml of OP50.
1200 NGM plates (6 cm diameter) seeded with 100 µl of OP50.
12-well NGM plates seeded with 50 µl of OP50.
20 ml 10X lysis buffer [10 ml 1 M KCl, 2 ml 1 M Tris pH 8.2, 0.5 ml 1 M MgCl2, 0.9 ml NP-40, 0.9 ml Tween-20, fill to 20 ml with water].
Proteinase K 10 mg/ml.
MicroAmp® Clear Adhesive Film (Applied Biosystems®).
Oven 65 °C.
Refrigerated incubator at 12 °C.
1.2 ml 96-well plates.
200 µl 96-well plates.
10X yellow loading dye (6 g Ficoll, 30 mg Tartrazine, to 30 ml with water).
Target a region of around 1.5 kbp (1.0-2.5 kbp), with nested oligonucleotides of around 20 bp (annealing temperature of 60 °C). The larger the region targeted, the more difficult it is to detect small mutations in agarose gels. The smaller the region, the more difficult it is to find a deletion that happens to have occurred between the primers.
Transfer freshly starved larvae from 10 6 cm diameter plates to 15 10 cm diameter plates seeded with 1 ml of OP50 per plate. Incubate at 25 °C (or 20 °C) until plates are full of eggs.
Transfer worms and eggs to a 50 ml conical tube with M9 and centrifuge for 5 min. at 1300 × g. Discard the supernatant. Add 30 ml of basic hypochlorite solution and incubate at room temperature (RT) for about 4 min. Collect the eggs by centrifugation (2000 × g, 5 min.).
Wash the eggs 2 times with 30 ml of water and 1 time with 30 ml of M9 buffer. Leave the worms to hatch overnight in the buffer or in a 10 cm unseeded NGM plate.
The next day, pipet 10 µl of the suspension onto each of 3 plates and count to determine titer. The total number of worms in 50 ml should be around 100,000 worms (20 worms/10µl). Distribute about 2000 worms per plate onto 50 seeded 10 cm NGM plates.
5. Culture synchronized culture of worms for about 52 hrs. at 20 °C. Follow protocol 3 for TMP/UV mutagenesis. After mutagenesis, plate the worms on 50 fresh seeded 10 cm NGM plates, with 2000 worms/plate.
6. After a couple of days, when P0s have laid the F1 eggs, bleach the 50 10 cm plates (as in part B, 2) and leave the eggs in 50 ml of M9 buffer overnight.
7. The following day, count the number of L1 worms. Distribute about 400 F1s/small plate (total 1200 6 cm plates).
8. Wait one generation, until the F2 eggs have hatched. Wash plates by adding 800 µl of water and transferring 150 µl of the L1 suspension into a 1.2 ml 96-well plate (to avoid mistakes, leave the yellow tip inside the well). This step will take about 30 min./plate; in total it will result in 12 × 96-well plates. Leave the washed plates at RT until they dry. Then transfer them to 12 °C.
9. Add 150 µl of lysis buffer + Proteinase K (120 µg/ml) to each well of the 1.2 ml 96-well plates, seal them with MicroAmp Clear Adhesive Film and incubate them first at −80 °C for 2 hrs. and then at 65 °C overnight with shaking.
10. The following morning, centrifuge the 96-well plates for 10 min. at 4000 rpm.
11. Transfer 150 µl of the suspension into a 200 µl 96-well plate and inactivate the Proteinase K at 95 °C for 10 min. The remaining 150 µl should be stored at −80 °C.
12. Pool the rows and columns from each of the 12 plates by combining 75 µl of each of the wells into a single 1.2 ml 96-well plate. For example, pool wells A1 of all 12 plates into the position A1 of the 1.2 ml 96-well plate. Repeat this procedure for each well, making a total of 96 pools. This is the master plate with pooled DNA.
13. Take 5 µl as template for a 20 µl PCR reaction. It is necessary to perform nested PCR. For the 2° round, use 1 µl of the 1° round.
Example for PCR mix:
| 1st PCR round: (final Volume 10 µl) | |
| H2O | 1.7 µl |
| dNTP (10 mM each of dATP, dCTP, dGTP, dTTP) | 0.2 µl |
| forward primer (10 µM) | 0.5 µl |
| reverse primer (10 µM) | 0.5 µl |
| Buffer 5X | 2.0 µl |
| Taq (5 U/µl) | 0.1 µl |
| DNA (pooled Library) | 5.0 µl |
| 94° C for 2 min. | |
| 94° C for 30 sec. | |
| 58° C for 20 sec. 35 cycles | |
| 72° C for 3 min. | |
| 72° C for 6 min. | |
| add 20 µl H2O to 1° round. | |
| 2nd PCR round: (final Volume 10 µl) | |
| H2O | 3.7 µl |
| dNTP (10 mM each of dATP, dCTP, dGTP, dTTP) | 0.2 µl |
| forward primer (10 µM) | 0.5 µl |
| reverse primer (10 µM) | 0.5 µl |
| Buffer 5X | 2.0 µl |
| Taq (5 U/µl) | 0.1 µl |
| yellow Loading dye | 2.0 µl |
| DNA (1:3 diluted) | 1.0 µl |
Same cycling conditions as 1st round.
14. Select samples which show bands that are smaller than the wild-type for further tests. Determine the precise address of the candidate sample by repeating the PCR using 5 µl of the corresponding well of each of the twelve 96-well plates (200 µl 96-well plates). This will give the number of the plate (2-A5, for example).
15. Resuspend the original plate in 50 ml water or M9 (50 ml conical tube). Count the number of worms/µl, by pippeting 3 × 10 µl into a plate. Calculate the average of worm/µl.
16. Dispense 50 worms into each well of 8 12-well plates. The remaining worms (which were not dispensed) should be centrifuged and put back in the original plate, without bacteria. Keep this plate at 12 °C.
17. Culture the worms at 20 °C for 5 days. Harvest a portion of each well by washing with 300 µl of water. Transfer 75 µl of the suspension into a 1.2 ml 96-well plate, plus 75 µl lysis buffer with Proteinase K. Incubate overnight at 65 °C with shaking. The agar plates with worms should be kept at 12 °C.
18. Transfer 100 µl to a 200 µl 96-well plate.
19. Inactivate the Proteinase K by incubating the 96-well plate at 95 °C for 15 min.
20. Screen the plate by PCR (5 µl as template), identify the plate and repeat procedure by dispensing 96 × 15 worms/plate.
21. Repeat procedure above with 5 worms/plate and later 1 worm/plate.
The possibility of rapidly knocking-down genes by RNA interference (RNAi), together with the availability of the C. elegans genome sequence, stimulated the study of gene function in a global scale (see Reverse Genetics, http://doi/10.1895/wormbook.1.47.1). Currently there are four different ways of delivering double-stranded RNA (dsRNA) into C. elegans: injection, soaking, feeding and bombardment. Preliminary experiments with P. pacificus indicate that RNAi works when injecting dsRNA into the gonad, but not by soaking or feeding. Bombardment has not been tried. When compared to C. elegans, P. pacificus is more difficult to inject because the syncytial part of the gonad is shorter and because the syncytium lies along the left-right axis (Cinkornpumin and Hong, 2011).
The conditions used for dsRNA preparation and injection were basically the same as described for C. elegans (see Reverse genetics, http://doi/10.1895/wormbook.1.47.1), with a few modifications. The injection of a 1081 bp Ppa-tra-1 dsRNA into wildtype worms, for instance, resulted in 20% (n=346) progeny with the transformer phenotype. Injections of a 464 bp Ppa-prl-1 dsRNA into a prl-1 gain-of-function allele on the other hand, resulted in ~37% of injected P0 worms (n=59) having F1's with the non-roller phenotype (10% penetrance) (R. Hong, personal communication). For genes involved in vulva development, however, the efficiency of the RNAi seems to be much lower (Zheng and Sommer, personal communication). Similar observations have been made with vulva genes in C. elegans (Chen and Greenwald, 2004). Another knockdown technology, using morpholino oligonucleotides, has proven robust for P. pacificus (Protocol 5) (Pires-daSilva and Sommer, 2004; Zheng et al., 2005). Morpholino-oligonucleotides, widely used for knocking down genes in other model systems (e.g., sea urchin, zebrafish), are modified oligonucleotides that efficiently block the translation or splicing of specific mRNAs. The properties of morpholino oligonucleotides, which combine nuclease-resistance, water-solubility and high specificity, are of major advantage. However, the injection of morpholinos causes a high rate of lethality in the P. pacificus F1 progeny (about 50%). When selecting oligo sequences, it is recommended to design at least two non-overlapping oligos. In this way, the consistency of the resulting phenotype can be tested. A good target sequence has minimal mRNA secondary structure and includes the translational start codon and/or the 5’UTR region.
Protocol 5. Injection of morpholino oligonucleotides
Equipment and Reagents
Agarose.
Glass coverslips (22 × 50).
Tips for injection Microloader (Eppendorf).
Light mineral oil (Sigma-Aldrich M3516).
Glass thin filaments 1.0 mm (World Precision Instruments).
Transjector (Eppendorf 5246).
Micropippete puller.
Inverted microscope (Zeiss Axiovert 135).
Morpholino oligonucleotides (Gene Tools, LLC).
Prepare 5 ml of 2% agarose in water, and melt it in the microwave.
Drop the melted agarose on to a coverslip. Put another coverslip on top. Repeat this procedure for 10 more pairs of coverslips.
Separate the two coverslips and leave the agarose pad in an 80 °C drying oven for 1 hr.
Dissolve the oligonucleotide to 100 µM in water.
Pull a glass thin filament with the needle puller (the tip of the needle should taper quickly and smoothly).
Load about 500 µl of the morpholino into the needle using Microloader tips. To discard bubbles accumulating in the tip of the needle, hold the loaded needle in vertical position for a few min.
Attach the needle to the transjector. To break the tip of the needle, rub the end of the tip against a thin glass bar immersed in light mineral oil. Monitor the flow of liquid out of the needle under the 40X objective.
Add a drop of the light mineral oil to the agarose pad. Pick a few worms and place them into the oil. Gently force the worms to the agarose pad with the wormpick, so that the entire body of the worm sticks to the pad.
After aligning the needle with the worms, move the gliding stage against the tip of the needle. In this way the needle will penetrate the cuticle of the worm and reach the gonad. Apply pressure to expel the morpholino solution into the gonad.
Recover the worms from the agarose pad by adding a drop of M9 buffer onto the surface of the oil. Transfer worms to a freshly seeded plate using a pick.
To characterize gene function, it is useful to characterize the temporal and spatial pattern of gene expression during development. Here we describe a protocol used for P. pacificus to characterize expression during larval development. Although the following protocol employs 48 °C for the temperature of pre-hybridization, hybridization and washing steps, the temperature may have to be optimized for each probe.
Protocol 6. In situ hybridization in P. pacificus
To prevent RNase contamination, volume measurements are made with disposable plastic conical tubes. Bench surfaces are sprayed with RNase-AWAY® (Molecular BioProducts® 7003) and wiped clean with Kimwipes®.
Equipment and Reagents
PBS: Make a 10X stock solution according to standard protocol (Sambrook and Russell, 2001).
PBTw: 1X PBS containing 0.1% Tween 20.
Methanol at −20 °C.
Acetone at −20 °C.
20 µg/ml Proteinase K in PBTw buffer.
2 mg/ml glycine in PBTw buffer.
Fixative solution: 1X PBS, 0.08 M Hepes pH 6.9, 1.6 mM MgSO4, 0.8 mM EGTA, 3.7% formaldehyde.
Hybridization buffer: 5X SSC, 50% deionized formamide, 100 µg/ml herring sperm DNA, 50 µg/ml Heparin and 0.1% Tween-20 (store at −20 °C).
Alkaline-phosphatase-conjugated anti-DIG (Roche) diluted 1:1000.
Staining solution: 100 mM NaCl, 5 mM MgCl2, 100 mM Tris (pH 9.5), 0.1% Tween-20, 1 mM Levamisole (Levamisole is a potent inhibitor of endogenous phosphatases). Tris pH 9.5 is made from the certified source (Fisher Scientific), with a pH probe that is treated with RNase away. Staining solution should be made fresh every time, because diluted Tris pH 9.5 is not stable.
SigmaFast™ BCIP®/NBT tablet (Sigma-Aldrich B5655): dissolve one tablet in 10 ml staining solution.
Dig DNA labeling Mix, 10X concentration (Roche).
QIAquick® PCR Purification kit (Qiagen #28104).
Probes for in situ with DIG or FITC (UTP) labeled RNA are more specific and give less background than probes using labeled DNA. Follow DIG-UTP or FITC-UTP labeling protocol from Roche (DIG KIT #11175025910 or FITC mix #11685619910). The template for an antisense RNA probe is a PCR product of the gene of interest amplified with the appropriate forward facing 30-mer oligo and a reverse T7-tagged oligo (add the T7 recognition sequence to the 5’ end of your 25-28 mer sequence: 5’-TAATACGACTCACTATAGGGACT-3’). The PCR product can be stored indefinitely at −20 °C.
| PCR product: | 3–8 µl |
| DIG UTP | 1 µl |
| 10X transcription buffer | 1 µl |
| RNase inhibitor | 0.5 µl |
| T7 RNA polymerase | 1 µl |
| DEPC ddH20 | up to 10 µl |
Incubate at 37 °C for 2 hrs. to overnight.
Add 50 µl DEPC ddH20 and another 0.5 µl RNase inhibitor.
Probes can be stored in aliquots at −20 °C for many months or longer.
Wash worms out of 3 plates with M9.
Centrifuge worms at 2000 rpm for 1 min. (use this parameter for every step in which worms are centrifuged in this protocol).
Wash worms twice with M9.
Resuspend the worms in 1000 µl methanol at −20 °C and incubate them for 10 min. in the same temperature. At this point samples can be stored for an indefinite amount of time.
Remove supernatant and add 1000 µl acetone at −20 °C for 10 min.
Add 1000 µl fixative solution and incubate at RT for 10 min. Place samples on a shaking platform to ensure well mixing.
Submit samples to 5 freeze-thaw cycles (liquid Nitrogen and 50 °C water bath).
Incubate samples for 20 min. at RT.
Wash twice in PBTw buffer, 5 min. each.
Incubate in 1000 µl Proteinase K (20 µg/ml) for 15 min. at RT.
Wash in 2 mg/ml glycine in PBTw buffer for 5 min.
Wash 3 times in PBTw buffer, 5 min. each.
13. Incubate worms in 500 µl of 50% PBTw/50% hybridization buffer (HB) and incubate for 10 min. at RT and 10 min. in 400 µl undiluted HB at RT.
14. Pre-hybridize in pre-warmed 500 µl HB for 1 hr. at 48 °C and boil probe for 1 hr. at 99 °C.
15. Dilute boiled probe in HB to give 100 µl of solution (1:1 dilution).
16. Boil diluted probe for 5 min., cool to 48 °C, remove pre-hybridization buffer and add the probe to the worms.
17. Hybridize for 24 hrs. at 48 °C.
18. Remove the probe and wash once with 500 µl hybridization buffer at 48 °C for 30 min.
19. Wash in 3 parts HB: 2 parts PBTw buffer at 48 °C, twice for 15 min. each.
20. Wash in 1 part HB: 4 parts PBTw buffer at 48 °C, twice for 15 min. each.
21. Wash with PBTw buffer at 48 °C, twice for 10 min. each.
22. Wash with PBTw buffer at RT, for 10 min. each.
23. Wash with PBT buffer (1X PBS; 0.1% BSA; 0.1% Triton X-100) at RT, twice for 20 min. each.
24. Dilute alkaline-phosphatase-conjugated anti-DIG antibody (1:1000).
25. Add 250 µl to each tube and incubate overnight at 4 °C.
26. Wash 4 times with PBTw for 10 min. at RT.
27. Incubate worms for 10 min. in staining solution.
28. Apply 50 µl staining solution with BCIP/NBT (you may include 1 µg/ml DAPI if there is interest in visualizing nuclei).
29. Incubate worms O/N at 4 °C under mild shaking.
30. Stop the reaction by washing the worms in 1X PBTw for 10 min. at RT.
Whole-genome sequencing (WGS) has become more affordable in recent years and is revolutionizing many areas in biology. Since nematodes have a small genome, this technique can be used at great effect to identify mutagen-induced changes linked to causal phenotypes (Zuryn et al., 2010). Thus, labor intensive protocols for mapping mutations can be avoided. A critical step to efficiently sequence genomic DNA of worms is to remove most bacteria, which is their source of food. Here we describe a method that takes advantage of the migratory behavior of dauers. We use a method to trap dauers in a buffer solution when they migrate away from the agar. The advantage of isolating genomic DNA from dauers over other stages is that this is a non-feeding stage. Therefore, there will be a minimal contamination from bacteria. With this method, more than 95% of the genome sequence is derived from the nematode.
Protocol 7: Isolation of bacteria-free worm genomic DNA using the split plate method
Equipment and Reagents
6 cm split plates (Compartmentalized Disposable Petri Dishes, 2 sections, Fisherbrand® 08-757-150).
M9 Buffer.
Epicentre Kit MasterPure™ Complete DNA Purification.
Prepare split plates with one half containing LB agar with E. coli OP50. Make sure that the height of the LB agar is just 3-5 mm below the top edge of the dividing wall. Fill the other half of the plate with M9.
Add 30 – 40 adult worms to the half of the plate with agar and OP50. To speed up the induction of dauers one can incubate worms at 25 °C and also add pheromone extract (Protocol 8). Monitor the level of M9 in the half of the plate, so that dauers can migrate from the agar to the M9.
P. pacificus dauers float close to the surface of the M9 buffer. Use a transfer pipette to transfer them to a microcentrifuge tube. Other stages will also be found in the buffer, but they do not float close to the surface.
4. Incubate worms in 50 µg/ml ampicillin and 50 µg/ml chloramphenicol on a rocker at medium speed for 48 hrs. If stages isolated are other than dauers or adults, do not incubate longer than 2 hrs. because the worms will die.
Nematodes secrete a large number of organic compounds. Although some of these compounds have been involved in signaling for dauer formation and mating, the function of most of them is not known (Robinette et al., 2011). Recently, some of these compounds have been implicated in the regulation of mouth dimorphism in P. pacificus (Bento et al., 2010). The extraction of organic compounds may be useful for characterization of additional ascarosides as well as for inducing a large proportion of dauers to extract genomic DNA (Protocol 7).
Protocol 8: Isolation of organic compounds from worm supernatants.
Equipment and Reagents
Charcoal (Sigma-Aldrich 05112).
Ethanol.
0.2 micron filter (e.g., IC millex LG from Millipore).
Prepare liquid culture containing dauers (1 liter; feed 3 times with 20% OP50, 50 ml in total). Avoid having too many arrested young larvae in the culture.
2. Boil charcoal with water in a beaker. Remove the supernatant.
3. Wash the charcoal several times until there are no floating particles.
4. Store the charcoal at 4 °C.
5. Pass the 500 ml of the liquid culture twice through filter paper.
6. Centrifuge the supernatant at 12,000 rpm with SLA-1500 rotor (Thermo Scientific®) for 30 min.
7. Pass the supernatant through 0.2 µm filter and transfer it to a beaker.
8. Add 25 ml of active charcoal and stir with a magnetic stirrer for 1 hr.
9. Discard the supernatant.
10. Wash the charcoal 4 times with water in a beaker.
11. Remove as much water as possible with a pipette.
12. Transfer the charcoal to a conical flask with a glass plug (or Parafilm®).
13. Add 50 ml ethanol and stir for 1 hr. Collect the eluate.
14. Add 50 ml 1:1:1 (volume) mixture of acetone, toluene and ethanol. Stir for 1 hr. Collect the eluate.
15. Repeat previous step 5 times.
16. Evaporate combined eluate (300 ml) with rotary evaporator.
17. Resuspend the pellet with 2.5 ml water (first add 500 µl water to a single tube, dissolve the pellet and transfer to another tube).
18. Centrifuge at 14,000 rpm for 20 min.
19. Store the supernatant at −20 °C.
Detailed descriptions of body morphology, gonad morphology and neuronal circuitry are valuable for comparative morphology and behavior between C. elegans and P. pacificus.
Protocol 9: Transmission Electron Microscopy of P. pacificus (as performed by Daniel Bumbarger, Max Planck Institute for Developmental Biology, Tübingen, Germany)
Equipment and Reagents
100 mm deep metal specimen carrier.
freezing apparatus (e.g., Bal-Tec HPM 010).
liquid nitrogen.
Whatman™ Nucleopore™ Track-Etched Membrane 110616, 12.0 µm pore size, 25 mm circles.
cryogenic tubes.
freeze substitution unit (e.g., Leica EM AFS2).
5% gallic acid in acetone.
acetone.
1% Osmium tetroxide (Crystalline, 100 mg in glass ampoules, Electron Microscopy Sciences 19134). Store ampoules in air-tight container in reserved and labeled fridge. Store ready-to-use solutions at −20 °C.
Caution: Osmium tetroxide is an extremely toxic, highly oxidizing substance. Fumes should by no means be inhaled nor get into the eyes. Always work under a chemical hood, wear disposable nitrile gloves, chemical goggles, lab coat and closed shoes. Waste and contaminated material have to be collected in a labeled leak proof waste container for pickup and proper disposal. For detailed safety instructions see for example: http://www.chemistry.ucla.edu/file-storage/publicview/pdfs/SOP_Osmium_Tetroxide.pdf.
0.1% Uranyl acetate in acetone with 2% water (Note: For 10 ml Osmium/UA solution mix 9.75 ml 100% acetone, 0.2 ml H2O, 50 µl 20% Uranyl acetate in methanol, 0.1 g OsO4). You can use a 20% Uranyl acetate in methanol stock solution, which can be kept at −20 °C. The tiny amount of methanol does not matter.
EPON (Epon-812 Kit, Electron Microscopy Sciences 13940).
acetone/EPON series (3:1, 1:1, 1:3).
slide duplicating molds (Electron Microscopy Sciences 70170).
ACLAR® film (Electron Microscopy Sciences 50425).
2% Uranyl acetate.
1 N NaOH.
lead citrate.
lead nitrate.
lead acetate.
sodium citrate.
Grow mature mixed plates with lots of young adult worms.
Wash worms off plate with water, pipette into Eppendorf tube, spin down, remove supernatant.
Place a 10 µm deep metal specimen carrier on an ice-cold metal plate to relax worms prior to freezing.
Fill the metal carrier with a drop of worm suspension.
Cover with the flat side of a second carrier. Adjust the size of the drop so that the carrier is completely filled (no air left inside) but nothing will squeeze out when the top is put on.
High pressure freeze with a high pressure freezing apparatus.
Store frozen samples in liquid nitrogen.
8. Remove lid from metal specimen holder in liquid nitrogen. The bottom part contains the frozen worms.
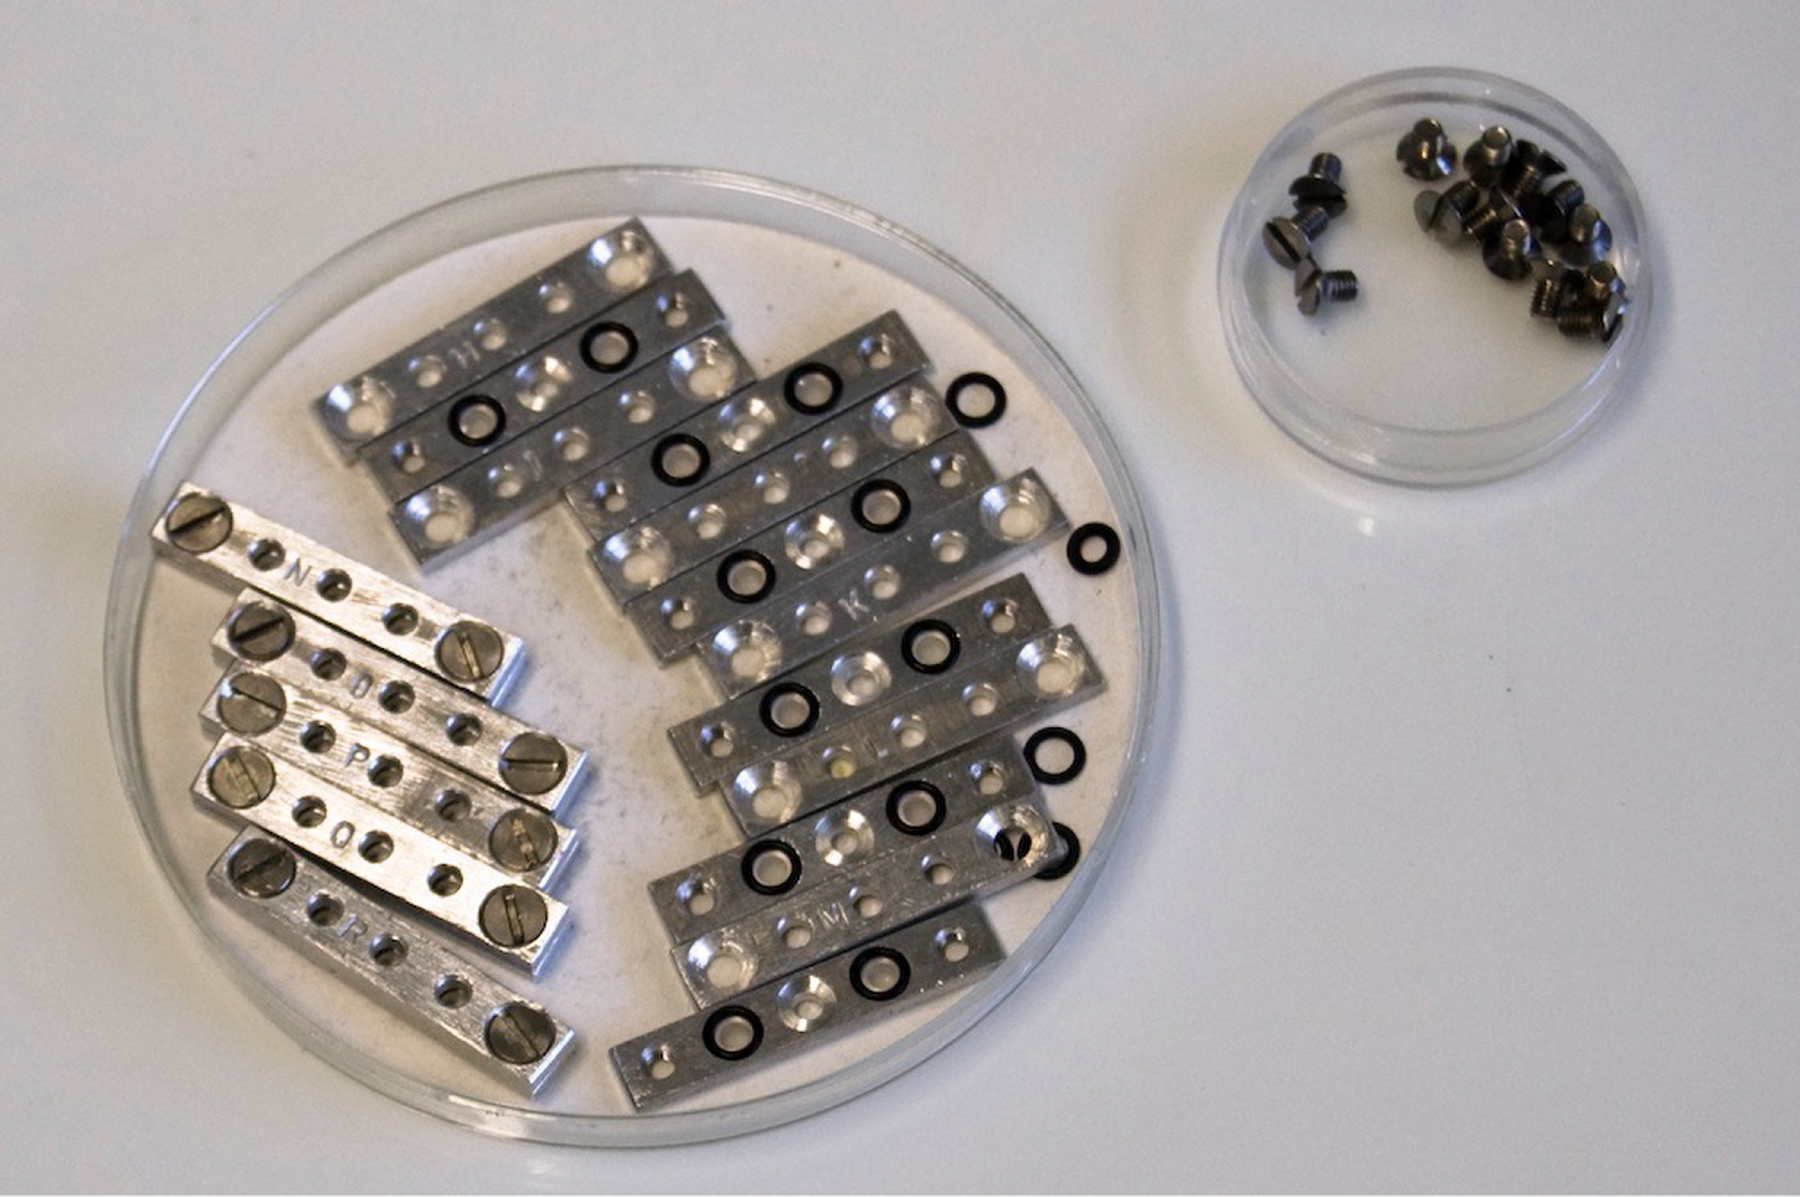
In liquid nitrogen transfer the bottom part of the specimen holder with the frozen worms into some sort of small permeable chamber that fits into a 2 ml cryogenic tube to prevent losing worms. Use custom-made 3-well metal chambers fitted with Nucleopore membranes (Figure 1). Alternatively, one can use cut pipette tips fitted with mesh.
|
Figure 1. Custom-made 3-well chamber designed for freeze substitution. On the right are the bottom parts of the holders with 2 wells per holder fitted with an O-ring and on the left are the top parts to be screwed on after loading.
9. Place 2 ml cryogenic tubes filled with 5% gallic acid in acetone into an Automated Freeze Substitution machine (AFS) set to −90 °C. The following freeze substitution steps are all carried out in the AFS. The machine can be programmed to hold or change temperatures over a wanted period of time.
10. Transfer the chambers with the worms into the cooled cryogenic tubes and incubate in 5% gallic acid in acetone for 48 hrs. at −90 °C.
11. Raise temperature by 4 °C/h to −60 °C (7.5 hrs.).
12. 5 rinses of 100% acetone at −60 °C.
13. Incubate in a solution of 1% Osmium tetroxide, 0.1% Uranyl acetate in acetone with water for 24 hrs. at −60 °C.
14. Raise temperature by 4 °C/hr. to 0 °C (15 hrs.).
15. 5 rinses of 100% acetone at 0 °C.
16. Tubes can now be removed from the AFS.
17. Pass through a series of 3:1 acetone/EPON, 1:1 acetone/EPON 1:3 acetone/EPON and 3 changes in 100% EPON at room temperature. Long times between changes improve infiltration, and the total time prior to polymerization is at least 48 hrs.
18. Embed in slide duplicating molds, with ACLAR film on the bottom of the mold.
19. Polymerize for 48 hrs. at 60 °C.
For serial sections a thickness of 50 nm is advisable. The use of an auto-stainer saves a lot of time (e.g., QG-3000 EC TEM stainer, RMC products).
Post-stain with 2% Uranyl acetate for 10 min. and modified Sato's lead stain for 20 min. (see below).
Carbon coat the grids before inspection.
Mix the following together and shake well in 50 ml flask or bottle:
0.20 g lead citrate (untreated, non-calcined lead citrate works fine)
0.15 g lead nitrate
0.15 g lead acetate
1.00 g sodium citrate
41.00 ml CO2-free distilled water (boiled and left to cool in tightly closed bottle)
Add 9.0 ml 1 N NaOH, mix well, sonicate in water bath sonicator until solution becomes transparent. Store in sealed 50 ml syringe at RT in the dark. This lead is stable for a long time.
Protocol 10: Scanning Electron Microscopy of P. pacificus (as performed by Jürgen Berger, EM facility, Max Planck Institute for Developmental Biology, Tübingen, Germany)
Equipment and Reagents
Glutaraldehyde.
1% osmium tetroxide.
PBS.
Ethanol series (30%, 50% and 70%).
polylysine-coated 1 cm round coverslip.
24 well plates.
liquid CO2.
Grow nematodes on agar plates until bacteria are almost used up.
Wash worms off the plate with 1.5 ml of water and transfer into Eppendorf tube.
Spin down gently at 2000 rpm for 1-3 min.
Wash 3 times with water to remove bacteria. The cleaner the worms the better.
Fix with 2.5% glutaraldehyde for 72 hrs. at 4 °C.
Wash 5 times with PBS over a period of 24 hrs. at 4 °C.
Post-fix with 1% osmium tetroxide in PBS for 5 hrs. on ice.
Wash 5 times with PBS over a period of 24 hrs.
Dehydrate in 30%, 50% and 70% ethanol, 24 hrs. each step. In 70% ethanol worms can be stored at 4 °C until further use.
Pipette a small volume of worms from the bottom of the Eppendorf tube onto a polylysine-coated 1 cm round coverslip. Worms will sink and adhere to the polylysine. Take care that worms do not dry out.
Transfer coverslip into a well of a 24 well plate that is filled with 70% ethanol.
Dehydrate in 95% and 100% ethanol, 24 hrs. each step.
Carry out critical-point-drying from CO2. (5 hrs. in liquid CO2).
Mount coverslips on stubs and sputter coat with 10 nm Au/Pd.
Protocol 11: Fluorescent staining of actin and DNA in dissected gonad arms
Equipment and reagents
Mouth pipette for all transfer steps.
Slides with etched rings for decapitation (e.g., Gold Seal 3032).
27-gauge disposable hypodermic needles for decapitation.
Deep depression slide, glass block dish or watch glass for fixation and staining.
PBS.
Levamisole as anesthetic, stock solution.
Para-formaldehyde, stock solution.
Methanol, stored at −20 °C.
Acetone, stored at −20 °C.
Ice bucket.
Tween-20.
BSA, stock solution.
Egg buffer (118 mM NaCl, 48 mM KCl, 2 mM CaCl2, 2 mM MgCl2, 25 mM Hepes, pH 7.3).
AlexaFluor® 488 Phalloidin A-12379 (green), Molecular Probes, actin stain.
or AlexaFluor® 546 Phalloidin A-22283 (red), Molecular Probes, actin stain.
4′,6-diamidino-2-phenylindole (DAPI) D-1306, Molecular Probes.
VectaShield mounting medium (H-1000, Vector Laboratories, Inc.).
5% agar in water for agar pads.
Dissection:
Pipette a drop of PBS with 0.25 mM levamisole into etched ring on a microscope slide.
Transfer staged animals by mouth-pipette into the drop.
Decapitate animals with a 27-gauge disposable hypodermic needle at the base of the pharynx. Gonad arms will be squeezed out of the carcass. Carcasses may be removed or left in place.
Fixation:
4. Transfer gonad arms (with or without associated carcasses) into 2% para-formaldehyde (PFA) in PBS in deep depression slide or similar glass dish.
5. Fix for 1 hr., on ice.
6. Remove fixative, wash in PBS for 15 min., on ice.
Two alternative extraction methods are given below, methanol/acetone or Tween. Both work fine. Use one of the two.
Extraction Method 1:
7. Remove PBS, add methanol (−20 °C), extract for 5 min.
8. Remove methanol, add acetone (−20 °C), extract for 5 min.
9. Remove acetone, re-hydrated in PBS for 15 min.
10. Remove PBS, add PBS containing the dyes of interest (see below).
Extraction Method 2:
7. Remove PBS, add 0.1% Tween-20, 0.5% BSA egg buffer, extract for 10 min.
8. Remove detergent, wash in fresh egg buffer solution.
9. Remove egg buffer, add egg buffer containing the dyes of interest (see below).
Staining:
11. Stain actin filaments with 0.15 µM fluorescently labelled phalloidin in buffer of choice (1:50 dilution of AlexaFluor® 488 or 546 Phalloidin)
12. Stain DNA with 1 µg/ml DAPI in buffer of choice. Phalloidin and DAPI staining can be done together or consecutively.
13. Stain for 30 min. to 6 hrs.
14. Remove staining solution, wash in buffer of choice.
15. Store in Vectashield.
Mounting:
16. Mount gonads in Vectashield on agar pad.
17. Inspect in fluorescent microscope.
Protocols have to be modified for P. pacificus because the cuticle is thicker than in C. elegans.
The protocol from Finney-Ruvkun (http://www.wormatlas.org/antibodystaining.htm) (Finney and Ruvkun, 1990) is good for larvae and adults, but not for embryos. The method was first applied and optimized for P. pacificus by Kolotuev and Podbilewicz (Kolotuev and Podbilewicz, 2004). The detailed protocol can be found in the Pristionchus wiki (http://www.pristionchus.org/wiki/index.php/Immunoflourescence_staining_of_whole_animals).
Good results were also obtained with “Freeze Crack in Tubes” in Ruvkun's Modified Witches Brew – followed by the standard protocol. The tube fixation method is described in Immunohistochemistry, http://doi/10.1895/wormbook.1.105.1.
Curtis Loer's anti-Serotonin protocol with collagenase digestion also works in P. pacificus. A detailed description of the method is given at http://home.sandiego.edu/~cloer/loerlab/anti5htlong.html.
For a comprehensive survey of the available methods and reagents see Immunohistochemistry, http://doi/10.1895/wormbook.1.105.1.
In contrast to C. elegans, injecting plasmids in the gonad of P. pacificus does not result in expression of extrachromosomal arrays, probably due to gene silencing. To overcome this problem, complex arrays have to be made (Schlager et al., 2009). Detailed protocols for making transgenics and description of transformation markers for P. pacificus are described elsewhere (Schlager et al., 2009; Cinkornpumin and Hong, 2011; Wang and Sommer, 2011).
Detailed descriptions of how to perform mapping of P. pacificus mutants can be found in the following websites:
http://www.pristionchus.org/wiki/index.php/Mapping
http://www.pristionchus.org/wiki/index.php/Mapping_with_SSLP_markers
I am grateful to Ralf J. Sommer, Metta Riebesell, David Rudel, Daniel Bumbarger, Benjamin Schlager, Ray Hong, Jürgen Berger and Akira Ogawa for sharing and establishing many of the protocols described in this chapter. Work in APS lab is supported by NSF 1122095.
Ahringer, J. (2006). Reverse genetics. WormBook, ed. The C. elegans Research Community, WormBook, doi/10.1895/wormbook.1.47.1, http://www.wormbook.org. Article
Bento, G., Ogawa, A., and Sommer, R.J. (2010). Co-option of the hormone-signalling module dafachronic acid-DAF-12 in nematode evolution. Nature 466, 494-497. Abstract Article
Brenner, S. (1974). The genetics of Caenorhabditis elegans. Genetics 77, 71-94. Abstract
Chen, N., and Greenwald, I. (2004). The lateral signal for LIN-12/Notch in C. elegans vulval development comprises redundant secreted and transmembrane DSL proteins. Dev. Cell 6, 183-192. Abstract Article
Cinkornpumin, J.K., and Hong, R.L. (2011). RNAi mediated gene knockdown and transgenesis by microinjection in the necromenic nematode Pristionchus pacificus. J. Vis. Exp. 56, e3270. Abstract Article
Duerr, J. S. (2006). Immunohistochemistry. WormBook, ed. The C. elegans Research Community, WormBook, doi/10.1895/wormbook.1.105.1, http://www.wormbook.org. Article
Finney, M., and Ruvkun, G. (1990). The unc-86 gene product couples cell lineage and cell identity in C. elegans. Cell 63, 895-905. Abstract Article
Hanaichi, T., Sato, T., Iwamoto, T., Malavasi-Yamashiro, J., Hoshino, M., and Mizuno, N. (1986). A stable lead by modification of Sato's method. J. Electron Microsc. 35, 304-306. Abstract
Kolotuev, I., and Podbilewicz, B. (2004). Pristionchus pacificus vulva formation: polarized division, cell migration, cell fusion, and evolution of invagination. Dev. Biol. 266, 322-333. Abstract Article
Nolan, T.J., Aikens, L.M., and Schad, G.A. (1988). Cryopreservation of first-stage and infective third-stage larvae of Strongyloides stercoralis. J. Parasitol. 74, 387-391. Abstract Article
Pires-daSilva, A., and Sommer, R.J. (2004). Conservation of the global sex determination gene tra-1 in distantly related nematodes. Genes Dev. 18, 1198-1208. Abstract Article
Robinette, S.L., Ajredini, R., Rasheed, H., Zeinomar, A., Schroeder, F.C., Dossey, A.T., and Edison, A.S. (2011). Hierarchical alignment and full resolution pattern recognition of 2D NMR Spectra: application to nematode chemical ecology. Anal. Chem. 83, 1649-1657. Abstract Article
Sambrook, J., and Russell, D.W. (2001). Molecular cloning : a laboratory manual (Cold Spring Harbor, N.Y.: Cold Spring Harbor Laboratory Press).
Schlager, B., Wang, X., Braach, G. and Sommer, R.J. (2009). Molecular cloning of a dominant roller mutant and establishment of DNA-mediated transformation in the nematode Pristionchus pacificus. Genesis 47, 300-304. Abstract Article
Sommer, R.J. (2006). Pristionchus pacificus. WormBook, ed. The C. elegans Research Community, WormBook, doi/10.1895/wormbook.1.102.1, http://www.wormbook.org. Article
Stiernagle, T. (2006). WormBook, ed. The C. elegans Research Community, WormBook, doi/10.1895/wormbook.1.101.1, http://www.wormbook.org. Article
Sudhaus, W., and Fürst von Lieven, A. (2003). A phylogenetic classification and catalogue of the Diplogastridae (Secernentea, Nematoda). J. Nemat. Morphol. Syst. 6, 43-90.
Wang X., and Sommer, R.J. (2011). Antagonism of LIN-17/Frizzled and LIN-18/Ryk in nematode vulva induction reveals evolutionary alterations in core developmental pathways. PLoS Biol. 9, e1001110. Abstract Article
Yandell, M.D., Edgar, L.G., and Wood, W.B. (1994). Trimethylpsoralen induces small deletion mutations in Caenorhabditis elegans. Proc. Natl. Acad. Sci. U. S. A. 91, 1381-1385. Abstract Article
*Edited by Ralf Sommer. Last revised March 12, 2012. Published March 14, 2013. This chapter should be cited as: Pires-daSilva, A. Pristionchus pacificus protocols (March 14, 2013), WormBook, ed. The C. elegans Research Community, WormBook, doi/10.1895/wormbook.1.114.2, http://www.wormbook.org.
Copyright: © 2013 Pires-daSilva A. This is an open-access article distributed under the terms of the Creative Commons Attribution License, which permits unrestricted use, distribution, and reproduction in any medium, provided the original author and source are credited.
§To whom correspondence should be addressed. E-mail: apires@uta.edu
 All WormBook content, except where otherwise noted, is licensed under a Creative Commons Attribution License.