Embryo series courtesy of Einhard Schierenberg
Table of Contents
Welcome to the world of C. elegans genetics. We use genetics in C. elegans for two principal purposes: (1) to define precisely the locations of mutations so that the affected gene products can be identified; and (2) to generate strains containing multiple mutations or visible markers for phenotypic analysis. The following chapters (1-10) will address both concerns, although the emphasis will be on the genetic mapping of mutations. In addition, we will briefly touch upon several topics already discussed in somewhat more detail in other sections of WormBook such as Maintenance of C. elegans. For this section to be nominally useful, readers will need to possess a basic working knowledge of Mendelian genetics. In addition, for a concise review of some of the topics discussed in the following chapters, see Hodgkin (1999).
Genetics has its good and bad points. On the positive side, in the hands of a competent researcher, genetics typically works, producing interpretable and internally consistent results. This may lead us to our goal of cloning mutations from genetic screens or may enable us to create complex configurations of mutations in order to uncover meaningful functional relationships. In this sense, it can be quite satisfying, particularly if we have been clever and creative in the process. On the down side, genetics can sometimes seem like a slow and arduous progression, and we are often "slaves" to the developmental timeclock of the worm. Moreover, even when a reasonably careful approach is taken, genetics can sometimes fail to provide a clear answer. For example, we may generate pieces of conflicting data that must be resolved by additional experiments.
Being a successful geneticist (not to mention scientist) requires a high level of foresight, diligence, and commitment. Half measures and vague notions will seldom suffice. Unlike coursework, there is generally no partial credit in the real world of science. One faulty link in the chain of logic and experimental execution usually leads to zero results. The three keys to success in genetics are as follows: (1) understand from the start exactly what you are doing and what you expect to happen at each step; (2) notice if things do not go as expected; and (3) always take the patented "sledgehammer" approach. The bottom line is that to be an effective C. elegans geneticist you must consistently get things to work the first time. Failure to do so will vastly reduce your progress. In this sense, C. elegans genetics is not substantially different from many other scientific disciplines. Given the time required for worms to develop, however, one can waste significant time and effort before discovering that the experiment has failed. Try hard to prevent this from happening to you.
To ensure the first point - thoroughly understanding your experiment from beginning to end - it will almost always be necessary to draw out the entire set of crosses, taking into account and quantifying all possible outcomes. This is particularly true when you are just starting out in genetics, and you will want to do this before picking a single worm. Remember this: if your basic strategy is flawed, then all the experimental diligence in the world won't save you. Each genetic situation will have unique considerations. By drawing out the entire genetic flowchart, complete with all possibilities, one can nearly always guarantee a good result. Avoid at all costs a faulty scheme. DRAW IT OUT!
With respect to the second point, it is essential that you quickly and consistently note any inconsistencies between the expected results and those actually obtained. This requires looking hard at your plates over the entire course of the genetic procedure. Continually ask yourself if the observed plate phenotypes make sense and if the approximate ratios are in line with your expectations. Do not sweep any significant inconsistencies under the rug! This is a red flag and may be telling you that either one of your starting strains is not as advertised or that there is a fundamental error in your experimental design. Both situations are your responsibility to avoid. Bad or incorrectly described strains can generally (though not always) be detected by a careful examination of the strain before beginning the experimental process. Rather than investing weeks or months of your time in trying to work with a questionable strain, obtain (or generate) a correct version of the strain from some other source, or possibly come up with an alternative strategy for your experiment. Sometimes it may be difficult or impossible to know if a strain is definitively correct. To some extent we must operate on faith, and we are usually safe in doing so. It is always advisable, however, to have multiple pieces of corroborating data before moving on to subsequent steps, particularly when it comes to genetic mapping.
Finally, always take the "sledgehammer" approach. The bottom line is that it usually takes only a couple of extra minutes to pick a few more animals or to set up additional plates for matings. Contrast this to the days or weeks that can be lost if sufficient animals were not picked to isolate the necessary genotype or generate sufficient numbers of crossprogeny. Plates are cheap, but your time is precious.
This is in many ways the bane of all genetics and why non-geneticists typically deplore reading our papers. The problem is that the style and rules of nomenclature are different for all the commonly studied organisms. Moreover, unification between the fields is unlikely ever to occur as we are too entrenched in our unique notations and jargon. The general rules for C. elegans are described below. Additional information can be found in Maintenance of C. elegans.
These are designated by three letters followed by a hyphen and a number. The letters and number are always italicized. The letters chosen are usually either abbreviations of a longer descriptor (such as lin for lineage defective or unc for uncoordinated) or may be acronym-like (such as sur for suppressor of ras). A number then follows the letters (such as lin-31) to indicate the approximate order in which the mutations were discovered.
Originally, most or all gene names were derived from genetic screens in which mutant alleles were isolated. In some cases the actual open reading frame (ORF) that is compromised in these mutants may still await identification. Subsequent to the sequencing of the worm genome, many names have been given to ORFs (or predicted ORFs) for which no mutations have been identified. This most often occurs when ORFs appear to be the obvious homolog of a gene characterized in other systems or are members of large protein families.
There is something of a protocol in our field that should be followed before assigning one's favorite new mutation a novel three-letter name. First, efforts should be made to initially map the mutation, in part to prevent the assignment of a new name to a previously described mutation or gene. For a number of good reasons, it is becoming quite common now for genes to be cloned (the mutant ORF positively identified) before assigning gene names. If the gene or mutant is believed to be novel, a proposed name is submitted to the "worm gene czar", Jonathan Hodgkin, who then passes sound judgment on the merits of the suggested acronym.
This is both simple and confusing: simple because the name of a mutant strain, lin-31 for example, is the same as the name of the gene affected in this strain, lin-31, and confusing because when we say "lin-31" we may mean either the (wild-type) ORF that encodes lin-31 or mutant lin-31 animals. Obviously the context will specify which definition is meant. When we refer to a specific mutation that affects lin-31 function, we often tack on to the end an allele designation. These are commonly one or two letters (usually two) followed by a number, such as the allele lin-31(n301). The letters that proceed the number are specific to each C. elegans lab or principal investigator and allow one to identify the origin of the mutant allele (n for example is the Horvitz lab's designation). Allele numbers correspond to the order in which they were identified by a given lab. Of course, the nature and severity of the mutant phenotypes displayed by individual alleles for any given gene may vary greatly.
More complexity. When describing the phenotype of an animal, we capitalize the first letter and do not use italics. Thus animals with an unc-4 genotype display an Unc phenotype. In addition, such animals may display other defects, for example they may be slightly small, or Sma. With time one gets to know all the major descriptors, which isn't really too onerous a task given that there are only a limited number of ways to mess up a worm.
Below is a list of the most common types of marker mutations used for standard genetic mapping. One issue to always consider is the penetrance of the allele. If the penetrance is significantly below 100%, the marker may be difficult or even impossible to use for mapping. Another issue is the ease with which the mutation can be scored by its plate phenotype. Wormbase provides information about specific mutations and alleles. A scale of one to three (ES1, ES2, ES3) is commonly used to designate the ease of scoring of the plate phenotype. ES3 mutations are generally very easy to score, whereas most ES1 mutations require some level of clairvoyance and a pair of dowsing rods (Sigma catalog #DR502). ES2-rated mutations range from the reasonable to the ridiculous. For a more complete listing of mutants and phenotypes, see Wormbase.
dpy Dumpy (Dpy); short and fat phenotype. Different dpy mutants can range from severe (small footballs) to moderate (slightly pudgy) in character. The more severe ones will often display a variable Unc phenotype as well.
unc Uncoordinated (Unc). There are many different subclasses of unc mutants. These include coiler Uncs, kinker Uncs, paralyzed Uncs, shrinker Uncs, Uncs that fail to move backwards when touched with a pick on their heads, Uncs that display poor forward movement but back well, etc. Recognizing certain types of Uncs can initially be challenging, although it usually gets easier over time. Often Uncs are somewhat misshapen and are typically smaller or thinner than wild-type animals.
sma Small (Sma). These animals tend to be more proportional in shape than Dpy animals; less stocky, more like wild type.
lon Long (Lon). These animals can often be a bit on the thin (stringy) side. Although Dpy and Sma animals can in some cases be very small as compared with wild type, even the longest Lon is only about 50% greater in length than wild-type animals.
egl Egg-laying defective (Egl). This can lead to the Bag (bag of worms) phenotype where embryos hatch within the mother, leaving a cuticle sack containing multiple wriggling larvae. Egl animals can be recognized before bagging as adults that seem to be bloated with eggs. Caution must be used, however, as aging wild-type hermaphrodites can often appear somewhat Egl over time. An individual bag will only last for about 24 hours (at 20° C) on the plate. Once worms become starved, the incidence of Egls and Bags in genetically wild-type animals increases substantially. Unambiguous identification must always be carried out on non-starved plates.
let Lethals (Let). These can range from embryonic lethals that never hatch to lethals that die as larvae. The latter category is easier to recognize, especially when the worms display a distinct larval lethal phenotype such as a "paralyzed rod" or a severe Dpy. Dead or dying eggs can be difficult to distinguish from healthy wild-type eggs on first viewing with a dissecting scope. To "see" embryonic lethals, one must allow a parent to lay eggs for a set period of time (usually 3-12 hours). The parent is removed to a new plate, and the fates of the eggs are followed. The presence of lethals can usually be identified unambiguously after about 18 hours (at 20°C) when the vast majority of wild-type embryos would have already hatched. Other designations for embryonic lethal mutations include emb and zyg.
ste Sterile (Ste). These animals come in several varieties. The most useful for mapping are those in which the sterility is obvious because the adult worms are devoid of eggs. Care must be taken to avoid mistaking a sterile animal for one that is merely a young adult that does not yet contain obvious eggs. If in doubt, transfer the suspected sterile animal to a new plate and follow its fate. In some cases, sterile animals may contain a protruding vulva (Pvl-sterile), which makes identification facile. So called "maternal-effect" lethal mutants are really just sterile animals that contain dead eggs and are therefore harder to recognize.
rol Roller (Rol). Animals form a horseshoe shape and tragically twist in place about their long axis. The Rol phenotype can be masked by strong unc or dpy mutations, which prevent the animals from carrying out the classic roller moves.
bli Blister (Bli). Adult animals have a variably blistered cuticle, which can resemble a large bubble on the surface of the worm. The Bli phenotype can be suppressed by a number of dpy and rol mutations.
lin Lineage defective (Lin). These can display any number of distinct defects in the pattern of cell divisions that occur during development. Consult WormBase or other sources for specifics concerning the defects associated with particular mutants.
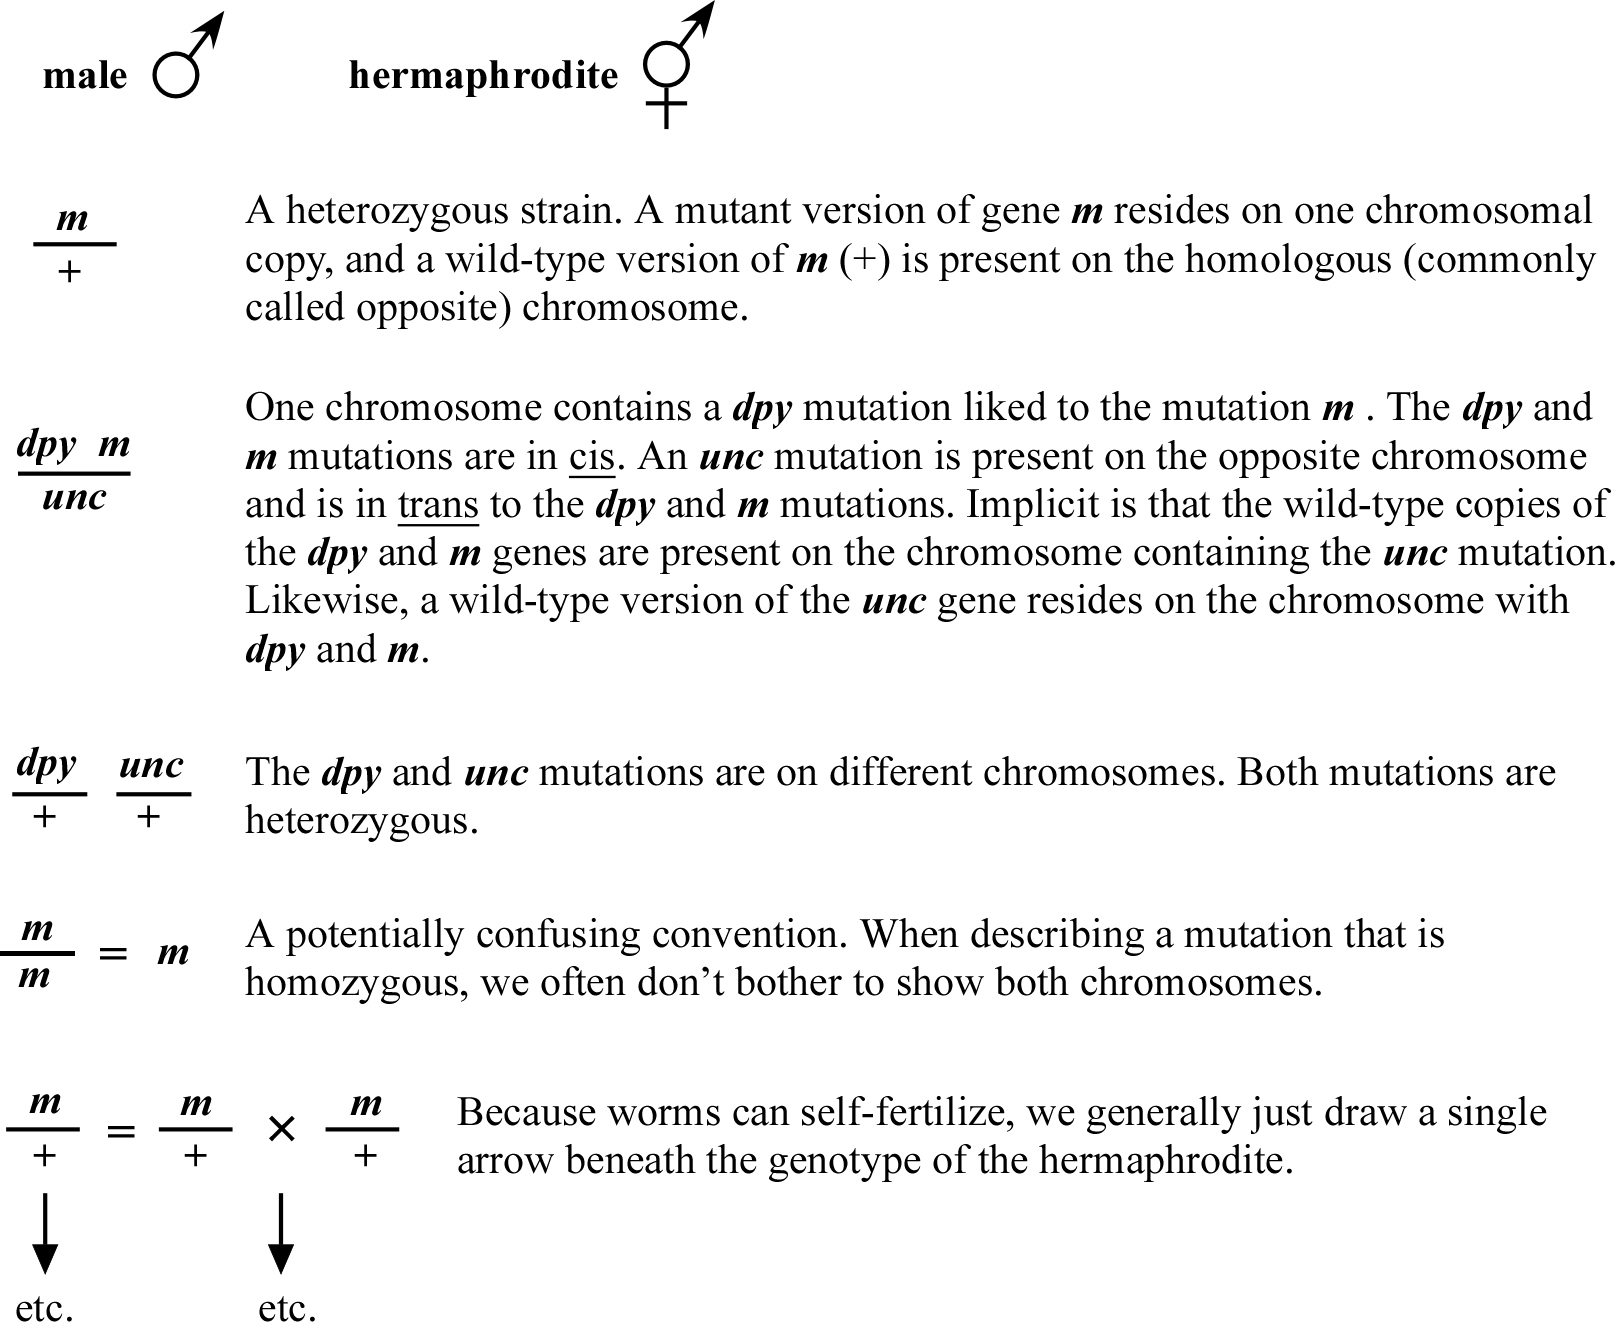
There are undoubtedly numerous "correct" ways to convey genetics in writing. Some standard C. elegans conventions that I use throughout the chapters are shown in (Figure 1).
Maintaining a worm stock is usually relatively straightforward. Worms are typically grown on Nematode Growth Medium (NGM) plates containing the bacterial (E. coli) strain known as OP50. They crawl around the plate, eat off the bacterial lawn, and reproduce. The plates are secured with a rubber band and are stored upside down to prevent them from drying out. Usually worms are grown at either 15°C or 20°C. It takes about 3.5 days at 20°C for a fertile adult to develop from a one-cell embryo. At 15°C this process takes about twice as long, and varying the incubation temperature (between 15°C and 20°C) is pretty much the only way to control the rate of worm growth and development. Higher temperatures (20°C to 25°C) can further expedite the rate of development but can cause a drop in fertility and poor health, especially in certain mutant backgrounds. Temperatures >25°C are usually harmful and should be avoided under normal circumstances.
Embryogenesis itself normally takes about 14-16 hours at 20°C. This is followed by four larval stages during which all growth occurs. Wild-type worms kept at 20°C will begin producing and laying eggs 3-4 days into their life cycle and will produce on average 220 or more self-fertilized progeny. After about two generations, the OP50 bacteria will be completely consumed, and the worms will become starved. Starvation in worms does not have the same connotation as it might in other organisms. Worms are tough and can survive without food for extended periods of time. They do this in part by forming "dauer" larvae, which are dark and thin and often lie motionless. Neglected worms can survive for up to several months, provided the plates do not become badly contaminated or dry out. Wrapping plates in Parafilm and storing at 10°C to 15°C can help to increase long-term survival rates.
It is important to stress that taking a lackadaisical attitude towards ones worms stocks is not to be encouraged. Loss of a precious strain can be exceedingly painful. The time required to regenerate the strain can be costly, and in some instances may not even be possible. Loss of strains may result either from letting the plates get too desiccated (high danger sets in by the fruit leather stage and is extreme by the potato chip stage) or through a fungal or bacterial contamination that is detrimental to nematode survival (also see below). In fact, contamination is a more common cause of strain loss and can occur quite rapidly (< 2 weeks) in the case of particularly nasty infestations (such as the virulent mold we refer to as "the orange death"). It is also important to note that for less-robust strains, survival on even reasonably moist (but starved) plates may be an issue after several weeks. Thus it is essential to check on your strains once a week at the minimum to ensure their long-term survival. In addition, all newly generated or received strains should immediately be frozen away, as this is the only surefire way to "guarantee" that the stock can be regenerated (and that you stay off of Theresa Stiernagle's public List of Shame).
Avoid contamination! There are two general types of contamination, bacterial and mold/fungal. Though the mold (generally a fuzzy growth) may appear especially sinister and will require a fairly rapid response, it is the easier of the two to get rid of. Normally, a mold can be defeated by transferring animals to a clean plate, and then moving them to a second clean plate after several minutes or an hour. Bacterial infestations occur when strains other than OP50 colonize the plate. Getting rid of bacteria can be problematic. This is because the worms have been eating the stuff and it's in their intestines. The only way to get rid of a nasty bacterial infestation is to dissolve gravid (fertile, egg-containing) worms in a mixture of sodium hypochlorite (bleach) and sodium hydroxide; this mixture will kill everything but the internal eggs, which are protected by their chitin shell.
Contamination will come from three sources: 1) the plates themselves may contain the dreaded exploding "footballs" or some other unwanted microbe; 2) the OP50 used to spot the plates may itself be contaminated; or 3) air-born nasties, which are usually of the fungal or mold-like variety, can fly onto your plates. Obviously, one wants to do everything possible to avoid using inherently bad plates, and a thorough appreciation for sterile technique (not to mention a high level of paranoia) should be instilled in those pouring the plates. Bad OP50 is often due to lack of proper sterile technique. Always inoculate liquid LB cultures by picking OP50 colonies from a reasonably fresh LB plate. Never inoculate a new OP50 liquid culture from a preexisting OP50 liquid stock. This will nearly ALWAYS lead to contaminants. To avoid bad OP50, some labs even transform their OP50 strain with an Amp resistance plasmid, and then grow the liquid culture of OP50 in the presence of ampicillin. Other labs may let a small sampling of spotted plates from each batch sit at room temperature for a week before using the bulk of the plates (stored at 4°C) to allow any widespread contaminants to manifest themselves. To avoid mold and fungus infestations, keep plates covered whenever possible while picking. Also toss discarded plates into covered bins and periodically inspect your incubators boxes containing ancient plates, which are typically highly contaminated. Basically, use good sense and be meticulous about your plate pouring and spotting techniques. A bad contamination can literally ruin an experiment, kill your strains, or at the very least make the work far less pleasant.
Maintaining a worm stock can be significantly more difficult if the strain is not "balanced". Roughly speaking, a balanced strain is one that contains distinct mutations on each copy of a particular chromosome. Balancing a mutation is usually an issue only if the mutation causes lethality or sterility when it is homozygous. A sterile mutation, for example, could be balanced by a set of dpy and unc mutations on the homologous chromosome. Usually the best configuration for balancing is when the markers are close together and flank the mutation that needs to be balanced. This decreases the likelihood that the mutation will be lost because of a single recombination event. Still, even having close flanking markers does not guarantee that the strain cannot be lost over time, and diligence must be exercised during each passage of the stock to make sure that this does not occur. Other than having a homozygous mutation, the most stable situation is when the mutation is balanced over a chromosomal translocation or deficiency (see Genetic balancers). In this case, the "balancer" chromosome is homozygous lethal and may also prevent recombination from occurring in the region of the mutation.
C. elegans has six chromosomes: five autosomes (I-V) and an X chromosome. Hermaphrodites are diploid for all six, whereas males are diploid for the autosomes but are haploid for X (designated X/∅). A variety of visible markers for mapping (such as dpy and unc mutations) are present on all six chromosomes. Although these markers are distributed to some degree along the entire length of the chromosomes, there is a markedly higher density occurring in the central regions of each autosome. For this reason (and others) it is generally easier to map and clone mutations that reside in the central or "gene cluster" regions of the autosomes. As discussed below, however, the ability to use single nucleotide polymorphisms (SNPs) for genetic mapping has largely (although not completely) abrogated many of the disadvantages associated with cloning mutations outside the clusters.
During meiosis, the four homologous chromatids (produced by the duplication of each parental autosome) join together to form the structure known as the synaptonemal complex. The exception is the X chromosome in males, for which there are only two chromatids. In general, a single crossover event will occur between just one of the two pairs of parental chromosomes. The pair of maternal and paternal chromosomes that undergo the exchange will consequently contain both maternal and paternal sequences. The other maternal-paternal chromatid pair will remain in their original form. Although this pattern of a single crossover event for each synaptonemal complex is highly reproducible, occasionally both or even neither pair of chromatids will undergo strand exchange. In addition, at low frequencies, two spatially separated crossover events can occur between a single pair of chromatids. When such double exchanges occur, they generally take place at opposite ends of the chromosomes because the crossover points (called chiasmata) somehow discourage other nearby crossover events. The practical consequence of this phenomenology is that we are almost always safe in assuming that the recombinants that we isolate are the result of a single crossover event, particularly if we are targeting crossovers within relatively small regions of the genome.
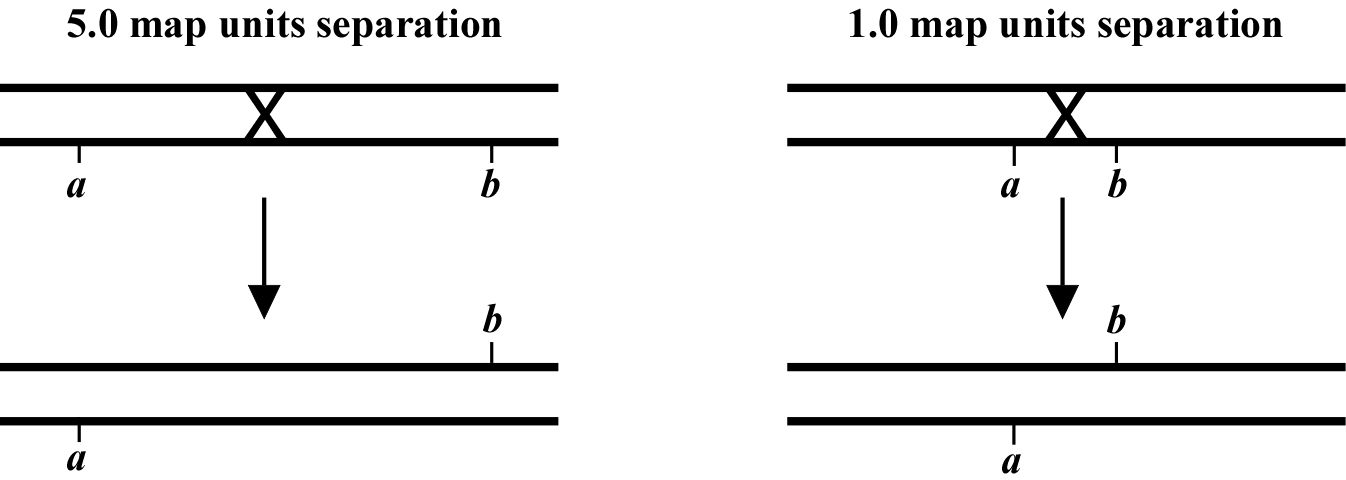
The genetic distance separating two genes (or any two points on a chromosome) is determined by the frequency of meiotic recombination that takes place between them. The nearer the two genes are to each other, the less likely that a recombination event will occur in that span. One (1.0) map unit (also sometimes called a centiMorgan; cM) is equal to a 1% meiotic recombination frequency. In other words, if on average 1% of all gametes (sperm or oocytes) have experienced a recombination event between two particular genes, then these genes are considered to be 1.0 map unit apart. Note that recombination frequency has been reported to change somewhat with temperature and age of the parent. Although the frequency of meiotic recombination does not substantially vary between 16°C and 20°C, rates increase significantly at temperatures greater than 20°C and decrease at temperatures below 15°C.
In the examples shown in (Figure 2), the recombination event on the left will occur in 5% of the gametes whereas the one on the right occurs in 1%. Both lead to mutations a and b becoming genetically (and physically) unlinked from each other. Most chromosomes are on average about 50 map units long. This means that mutations on opposite ends of a chromosome will appear genetically to be unlinked, as they will be separated during meiosis 50% of the time (see also Chapter 2: Two-point mapping with genetic markers). The clusters or gene-rich regions in the center of the autosomes usually span a distance of about 5-8 map units. Note that as discussed above, only one pair of chromatids within the synaptonemal complex will generally undergo a recombination event. However, map unit distances are actually calculated as an average for the two pairs. Thus the recombination frequency is effectively zero for the pair that doesn't recombine, and twice the calculated map distance for the pair that does. This can lead to some confusion. Probably the easiest way to think about this is just to remember that the map distance is the average frequency of recombination for both pairs of chromatids, and leave it at that.
One thing you will hear about is the concept of "genetic" versus "physical" distances. As we have seen, genetic distance is based on the frequency of meiotic recombination between two particular points (or genes) on a strand of DNA. Physical distance is the actual amount of DNA between them in base pairs. Although the order of the genes on the genetic map always agrees with their arrangement on the physical maps, the distances may not correlate. This is because the frequency of meiotic recombination is not uniform along the physical chromosome. Sometimes fairly small physical regions can be quite large genetically, whereas large physical regions can be relatively small genetically. For example, the gene cluster regions of the autosomes tend to be quite large physically but quite small genetically relative to the chromosome arms. Also, microenvironments are likely to exist throughout the genome in which recombination may be either depressed or enhanced. This can be an important factor, as you don't want to over interpret your genetic results and thereby make erroneous conclusions regarding the precise physical locations of the mutants you may be mapping.
Getting matings to work is one of the most critical aspects of successful genetic manipulation. To begin with, all matings will require males. Unfortunately, males occur at only a low frequency (∼0.02%) in wild-type populations. Therefore, anyone doing serious genetics will maintain his or her own stocks of males by placing about a dozen males on a plate with 3 or 4 hermaphrodites. Usually several plates are kept going, and the process is repeated every few days (at 20°C) or perhaps once a week (at 15°C). When maintaining male stocks for strains that are sick or have low brood sizes, the number of males and hermaphrodites per plate can be adjusted accordingly. If the mating goes well, ∼ 50% of the F1 progeny should be male, which is usually more than enough to carry out one's experiments and still have sufficient males left over for regenerating the stock.
How does one get the males to generate the male stock to begin with? Probably the best current way to generate males from a hermaphrodite stock is by placing hermaphrodites on RNAi feeding plates) that lead to a high incidence of males (Him phenotype). This occurs because loss of the Him gene activity leads to an increase in the spontaneous occurrence of haplo-X progeny. Many labs use an RNAi construct that targets him-14 (GC363; available from the stock center). In our hands, RNAi feeding of him-14 will produce sufficient males within one or two generations to set up several plates for maintaining a long-term stock (if needed). One can also use actual Him mutant strains (such as him-5 or him-8), which produce 20-40% males at each generation. Depending on your intended use, however, it may not be convenient to have your constructed strains throwing large numbers of male self-progeny in future generations. In addition to these approaches, males can also be generated following a mild heat shock of gravid adult hermaphrodites (34°C for 3-4 hours), although the frequency of males obtained using this method is relatively low.
Once you've got your male stock, you will often want to keep it going indefinitely. Here are a few hints for success, which also apply to all matings you may care to set up. 1) Do not use old hermaphrodites! They are past their prime and will not work well. The best hermaphrodites to use are very young adults that have few or no eggs. It is better to set up matings using L4s than aging gravid adults. 2) Males should also be on the young side (although this is somewhat less critical). 3) Matings will usually work best if the bacterial spot is not too large and does not contact the edge of the plate. 4) If you are in desperation, it is permissible to set up matings with animals that may be somewhat starved. Males seem to recover quite rapidly once placed on plates with food, and hermaphrodites also do reasonably well, provided they are picked as L4s or very young adults.
Should your homozygous male stock become contaminated, transfer several dozen males and hermaphrodites to a single plate, incubate overnight, and hypochlorite treat the hermaphrodites the next day. Alternatively, if you can find a mating plate where there are many males and gravid adults, simply hypochlorite treat the hermaphrodites (30-80, using several plates if necessary), and sufficient clean males and hermaphrodites should be recovered by the next generation. We have also had success with freezing away worms from male stock plates. Thus, lost or badly contaminated stocks can be recovered just by thawing out a tube.
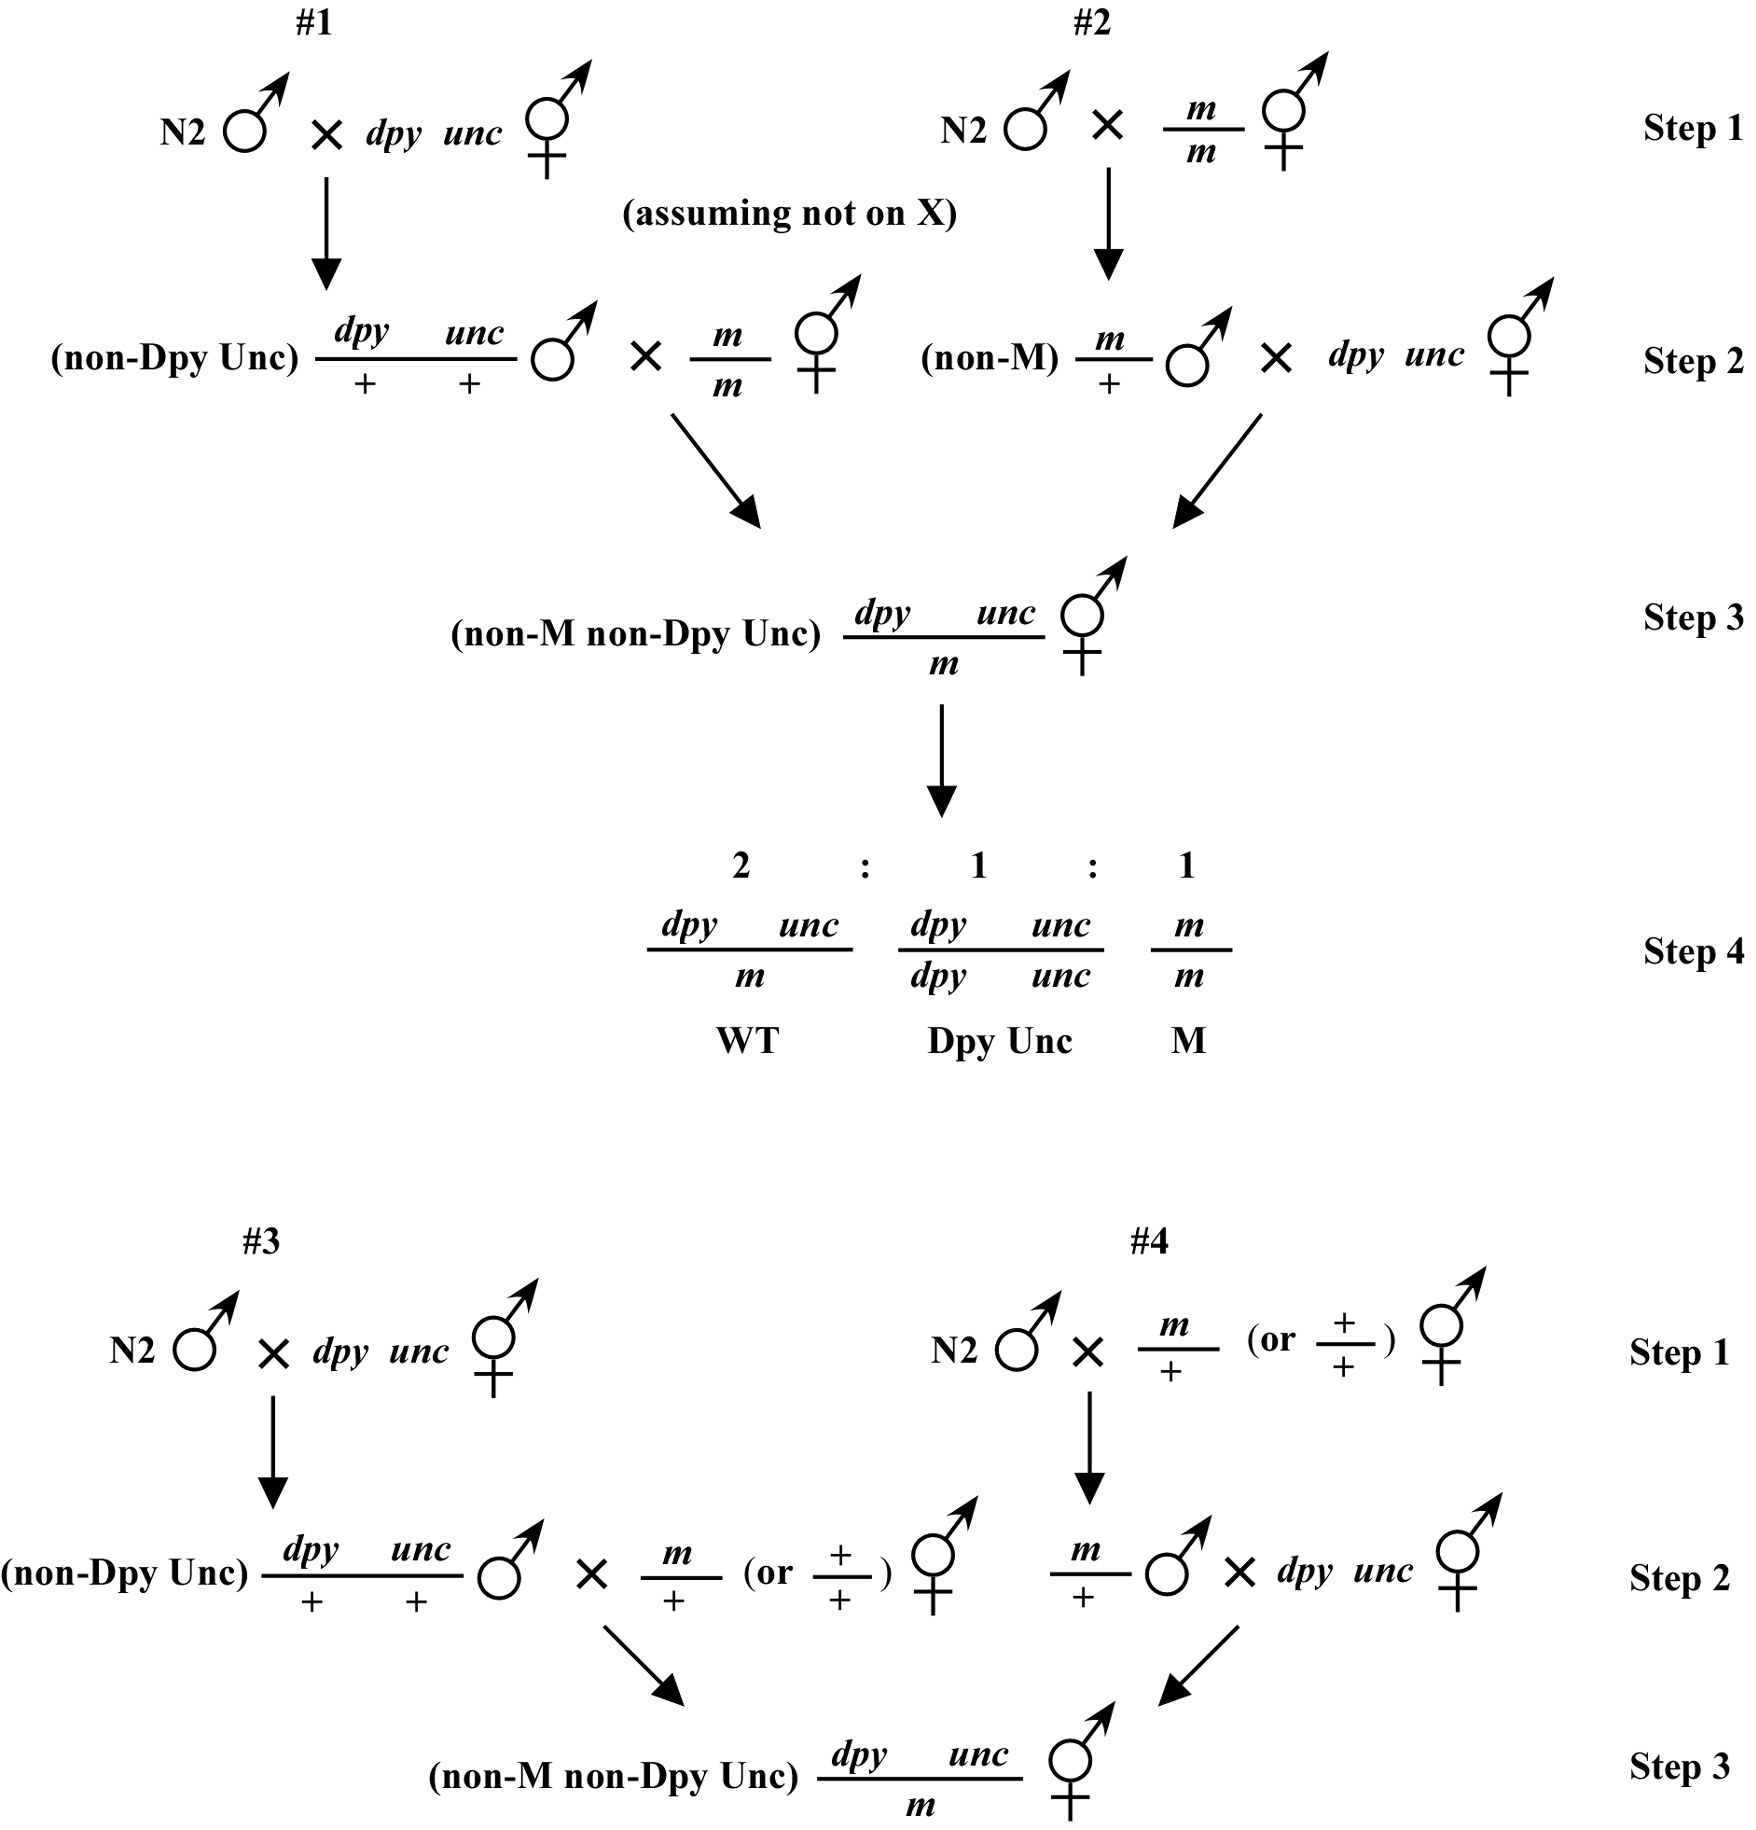
Beginning then with a stock of male animals, you will be able to set up matings between various mapping strains and your mutants. There are nearly always two ways to go here, as shown in (Figure 3). You can either first cross N2 males into the mapping strain and then mate the male cross-progeny obtained into your mutant strain (schemes #1 and 3) or you can first cross N2 males to your mutants and then mate the male cross-progeny into your mapping strain (schemes #2 and 4). The basic goal in choosing one scheme over another is to maximize your efficiency by minimizing the number of cross-progeny that you will have to pick to recover sufficient numbers of animals of the desired genotype. Often genetic schemes will require that you pick "blindly" at certain steps, as you often won't be able to tell the difference between wild-type and heterozygous animals when working with mutations that are recessive. In addition, you may not be able to tell the difference between self- and cross-progeny when crossing into heterozygous strains. Clearly the best way to deduce the optimal scheme for your specific considerations will be by drawing it out both ways and then figuring out which method will be most efficient.
For the four schemes shown in (Figure 3), the objective is simply to obtain dpy unc/m animals. If m animals are viable and easy to score, then either scheme #1 or #2 should suffice. The percentage of expected worms of genotype dpy unc/m at step 3 will be 50% for each, although positive assignment must wait until one can score the progeny at step 4. Also, in both cases, there will be no ambiguity associated with identifying cross-progeny produced by the matings in steps 1 and 2.
Consider the situation, however, where (m) is either lethal or sterile when homozygous. In this scenario, you will need to maintain m as a heterozygote (m/+), and all crosses into this strain will necessarily be made using m/+ animals. In this case, the two schemes (#3 and #4) would both theoretically result in 1/6 of the final progeny being of the desired genotype (calculate this yourself to ensure you understand). However, for scheme #3, you will be picking more blindly at step 3 than for scheme #4. This is because you won't be able to tell the difference between self- and cross-progeny at this step. Obviously, if the matings were to be 100% efficient, then this would not be an issue. But matings are never 100% efficient (often much less), and thus scheme #4 provides a clear advantage. Another potential reason to choose one scheme over another would be if the mutations were on the X chromosome. This is because the cross-progeny males generated at step 2 (either dpy unc/∅ or m/∅) might be incapable of mating because a recessive allele on X will be expressed phenotypically in males.
1) As already stated, take the sledgehammer approach! Having too many males is not a problem. Having too few males is a big problem! Having too many cross-progeny is not a problem. Having too few cross-progeny can be a big problem! When setting up matings with strains that normally have low brood sizes such as DpyUncs adopt the more-the-merrier philosophy. For such matings you can put 15 males on a plate with an equal number of DpyUnc animals. Because you will be picking out non-DpyUnc cross-progeny, you need not worry much about the plates starving too quickly, as the wild-type cross-progeny will develop very rapidly as compared with the DpyUnc self-progeny.
2) For many matings it will be extremely important that you DO NOT inadvertently carry over any larvae or eggs from the male plate. Contamination of this type can quickly destroy a series of genetic crosses and if not detected can lead to erroneous conclusions. Better to first pick the males needed to a fresh plate, let them crawl around briefly, and then re-pick these "clean" males to the actual plates containing the hermaphrodites. Although this isn't always essential, it's best to just get into this habit and thus save yourself from trouble down the road.
3) Particularly when you are starting out, it is essential that you closely follow all your crosses to get a feeling for the normal progression and rate of the process. Otherwise, you could possibly mistake males used in a previous step for cross-progeny males. Also, if you inadvertently transferred a larvae or egg of the wrong genotype along with your males, you stand a chance of noticing and removing the offending animal before it creates any problems.
1) It is good practice to always choose virgin hermaphrodites when picking among your candidate cross-progeny animals. For some situations this may be more critical than others. However, the idea is that you usually want to see what the self-progeny of this virgin animal will segregate and don't want to complicate matters by having additional genotypes present. The safest way to do this is to pick cross-progeny hermaphrodites at the L4 stage. Whether or not an animal was a virgin can also be determined later by looking for males in the progeny. If present, the animal was obviously not a virgin, and you may want to discard such a plate in favor of one that displays the desired phenotypes but does not contain male animals.
2) When given a choice, pick cross-progeny animals from multiple plates where the mating has appeared to go well. For some situations, not every male will carry the chromosome that we desire them to contribute to the cross-progeny. When looking at cross-progeny on the plate, it is impossible to tell if they happen to be the spawn of one (lucky) male or many. However, the odds that we will pick cross-progeny that include the desired genotype end up in our favor if we pick from multiple plates. This is a further reason to set up multiple mating plates and to have a generous number of males on each mating plate. Things get chancy if we have to put all our eggs in one basket.
3) Do not carry over any contaminating larvae or eggs with your picked cross-progeny (also see above). If the plates from which you are picking are too crowded, simply remove the desired worms to either a clean portion of the same plate or to a new (intermediate) plate before re-picking.
4) Pick more candidate cross-progeny animals than you think are necessary. If you expect 25% of the cross-progeny animals to be of the correct genotype and you only need one or two, pick at least 20-40 animals anyway. Some may not be true cross-progeny. Some will crawl up the side of the plate and desiccate. Some may be damaged by picking. Odds may defy you. We have all had the experience of picking 50 animals, expecting to get at least 12 of the correct genotype, and actually getting only one! In this case, we are glad we picked 50! Picking a few more animals takes little time. Setting up the whole set of crosses again takes much time.
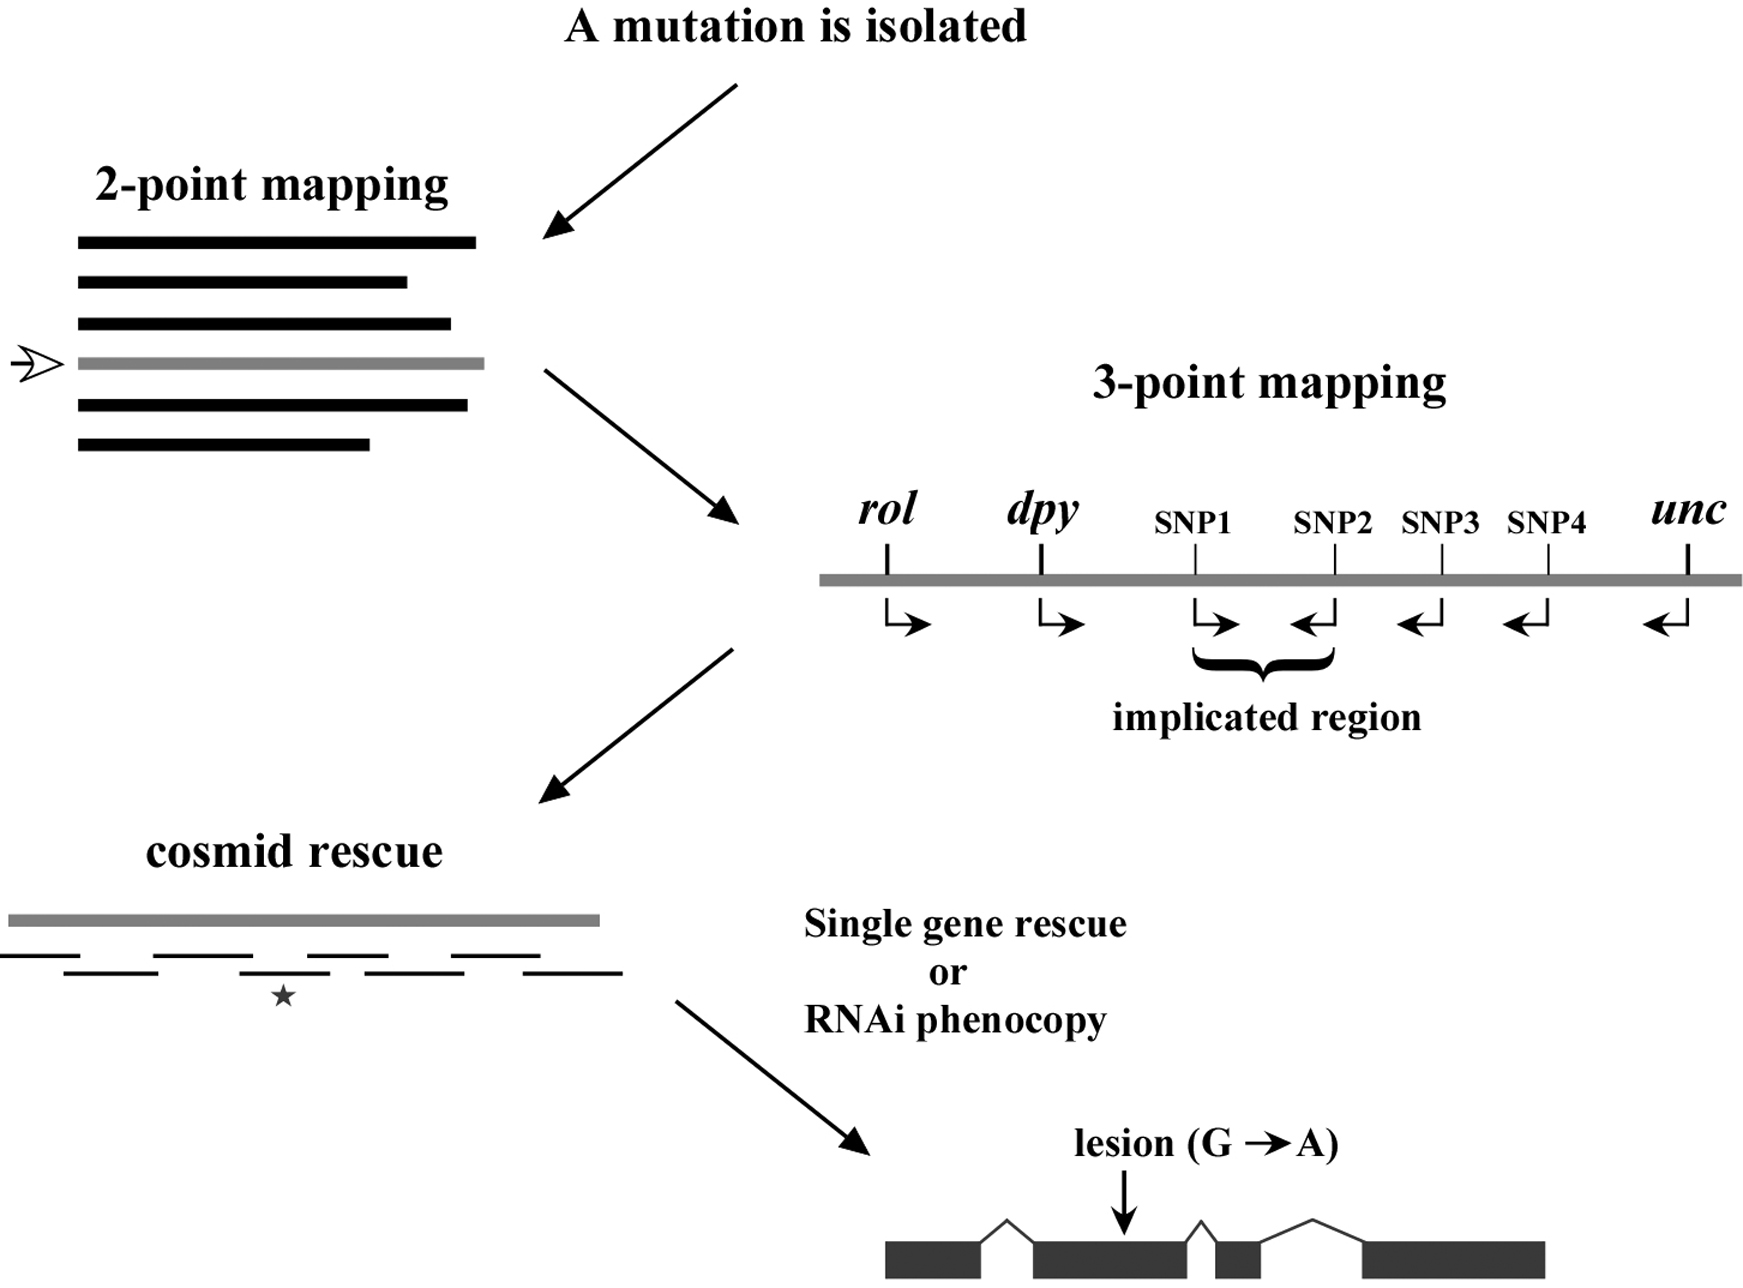
In closing this chapter, it is probably worth our time to outline the standard progression of events that culminate in the cloning of one's mutation of interest. As shown in (Figure 4), following the isolation of a mutation, two-point mapping, using either standard genetic markers or single-nucleotide polymorphisms, is used to place the mutation on one of the six chromosomes. In addition, two-point mapping can also provide useful information regarding the approximate position of the mutation on the chromosome. Three point mapping using genetic markers and SNPs are then employed to sequentially narrow down the region harboring the mutation. In some cases, SNP mapping may allow the region of interest to be limited to just a handful of genes. Deficiency mapping can also be useful for providing definitive terminal endpoints. Once the region of interest is sufficiently confined, researchers will often attempt to rescue (revert) recessive mutations by creating transgenic strains that carry a wild-type version of the mutated gene. This is typically done by injecting regional cosmids, which are low-copy bacterial vectors that contain ∼20–40 kb inserts of wild-type C. elegans genomic DNA (see Reverse genetics). In addition to transgene rescue, it is now common to attempt to phenocopy loss-of-function phenotypes using RNAi methods (see Reverse genetics). Once a gene has been positively implicated (either by rescue, RNAi phenocopy, or both), the gene is sequenced to find the molecular lesion that is responsible for the defect.
While the above description lists the typical sequence of events, various factors may lead to alterations in one's strategy. For example, some regions of the genome are not amenable to cosmid rescue because they lack complete coverage. In these situations, RNAi may be attempted before cosmid rescue, or regional candidate genes may be sequenced in the complete absence of rescue or RNAi data. In summary, every mapped mutation will have a slightly different history. Some genes are relatively easy to clone while others may be exceeding difficult, and it is impossible to predict a priori where your mutation may lie in this spectrum. In the end, you are simply trying to get from point A to point B in the most efficient manner possible. And while a positive outcome cannot be guaranteed, diligence, care, and sweat are powerful weapons indeed.
*Edited by Victor Ambros. Last revised April 30, 2005. Published February 17, 2006. This chapter should be cited as: Fay, D. Genetic mapping and manipulation: Chapter 1-Introduction and basics (February 17, 2006), WormBook, ed. The C. elegans Research Community, WormBook, doi/10.1895/wormbook.1.90.1, http://www.wormbook.org.
Copyright: © 2006 David Fay. This is an open-access article distributed under the terms of the Creative Commons Attribution License, which permits unrestricted use, distribution, and reproduction in any medium, provided the original author and source are credited.
§To whom correspondence should be addressed. E-mail: davidfay@uwyo.edu
 All WormBook content, except where otherwise noted, is licensed under a Creative Commons Attribution License.